Data sources
OPC UA
OPC UA (Open Platform Communications Unified Architecture) is the standard machine-to-machine protocol for industrial automation, maintained by the OPC Foundation. With the OPC UA data source you connect Peakboard to an OPC UA server, secure the connection with certificates and subscribe to the nodes you want to visualize.
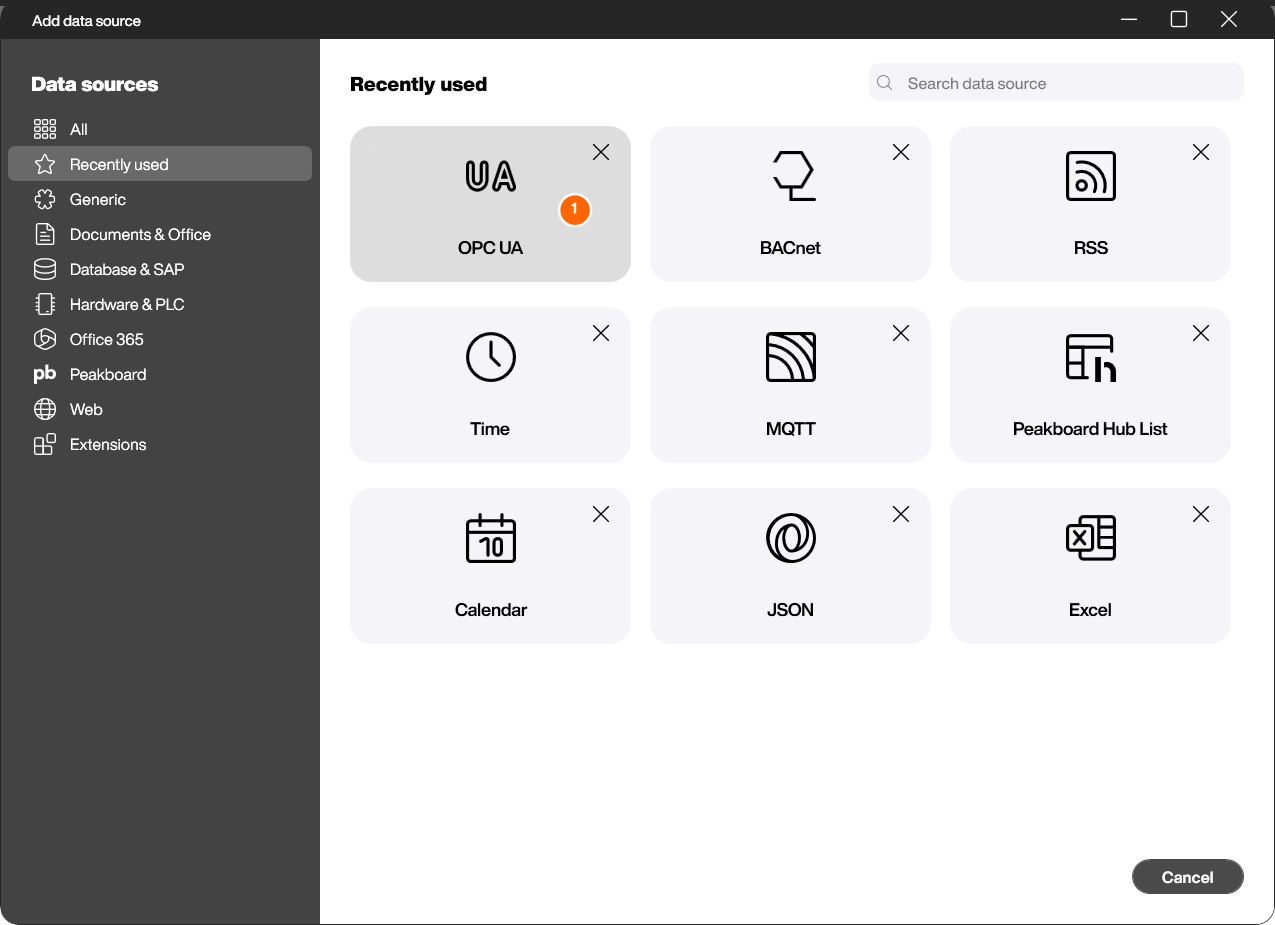
Add the data source
In the Explorer, select the [Data] node and click [Add data source]. In the dialog choose OPC UA (1).
Configure the connection
The [Add OPC UA data] dialog collects everything needed to reach the server.
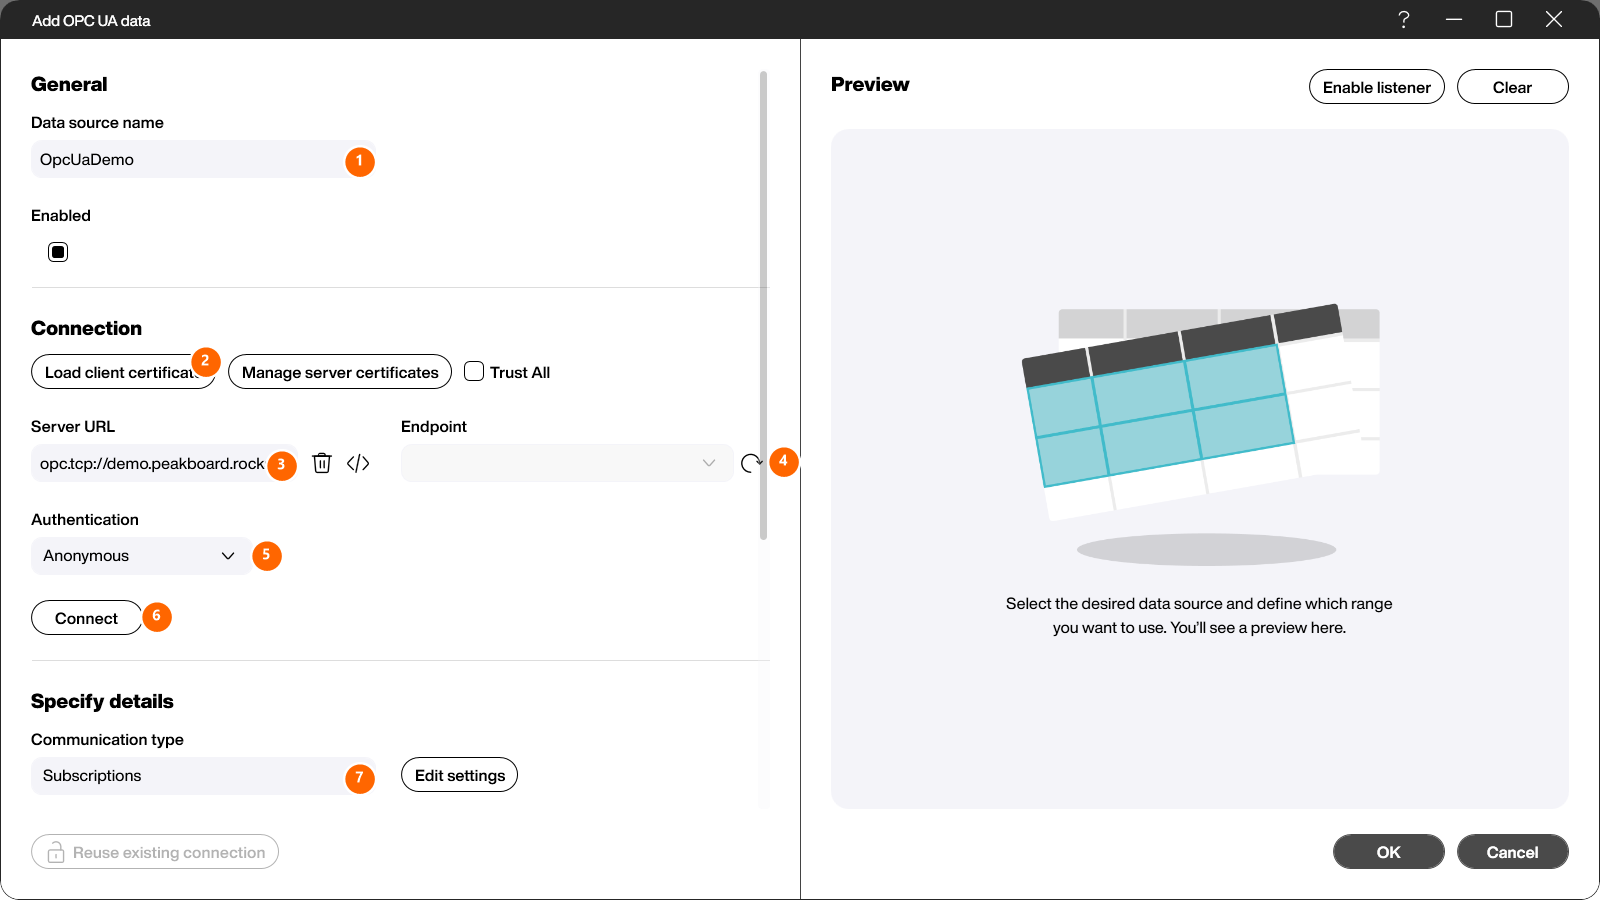
- Data source name (1): like every other data source, the OPC UA data source needs a name. This name is used to access the data from within the Peakboard application.
- Load client certificate (2): a client certificate is required (the only exception is the none / none endpoint). The certificate is stored as a whole (public + private key) on the client side. Its public part has to be transferred to the server and stored there as a trusted certificate.
- Server URL (3): the address of the OPC UA server, in the form
opc.tcp://<host>.<domain>:<port>[/<path>]. Use the trash icon to clear it, or the{ }icon to provide the URL from a script. A scripted URL is evaluated only once, when the connection is established on startup. - Endpoint (4): use the refresh icon to load the endpoints offered by the server. If a certificate prompt appears, accept the server certificate. Endpoints differ by their encryption and signing levels and algorithms. Enable [Trust All] beforehand to skip the server-certificate prompts.
- Authentication (5): optionally authenticate the OPC UA user against the server (Anonymous, UserName or Certificate). This user authentication is independent of the client/server certificates, which authenticate the client and the server against each other.
- Connect (6): test the connection. If it succeeds, all entered information is valid. If a connection is already stored elsewhere (personal / Peakboard Hub / application), it can be reused with [Reuse existing connection] — certificates still have to be created and accepted.
- Communication type (7): see Choose the communication type below.
Manage the client certificate
Clicking [Load client certificate] opens the [Manage Certificates] dialog.
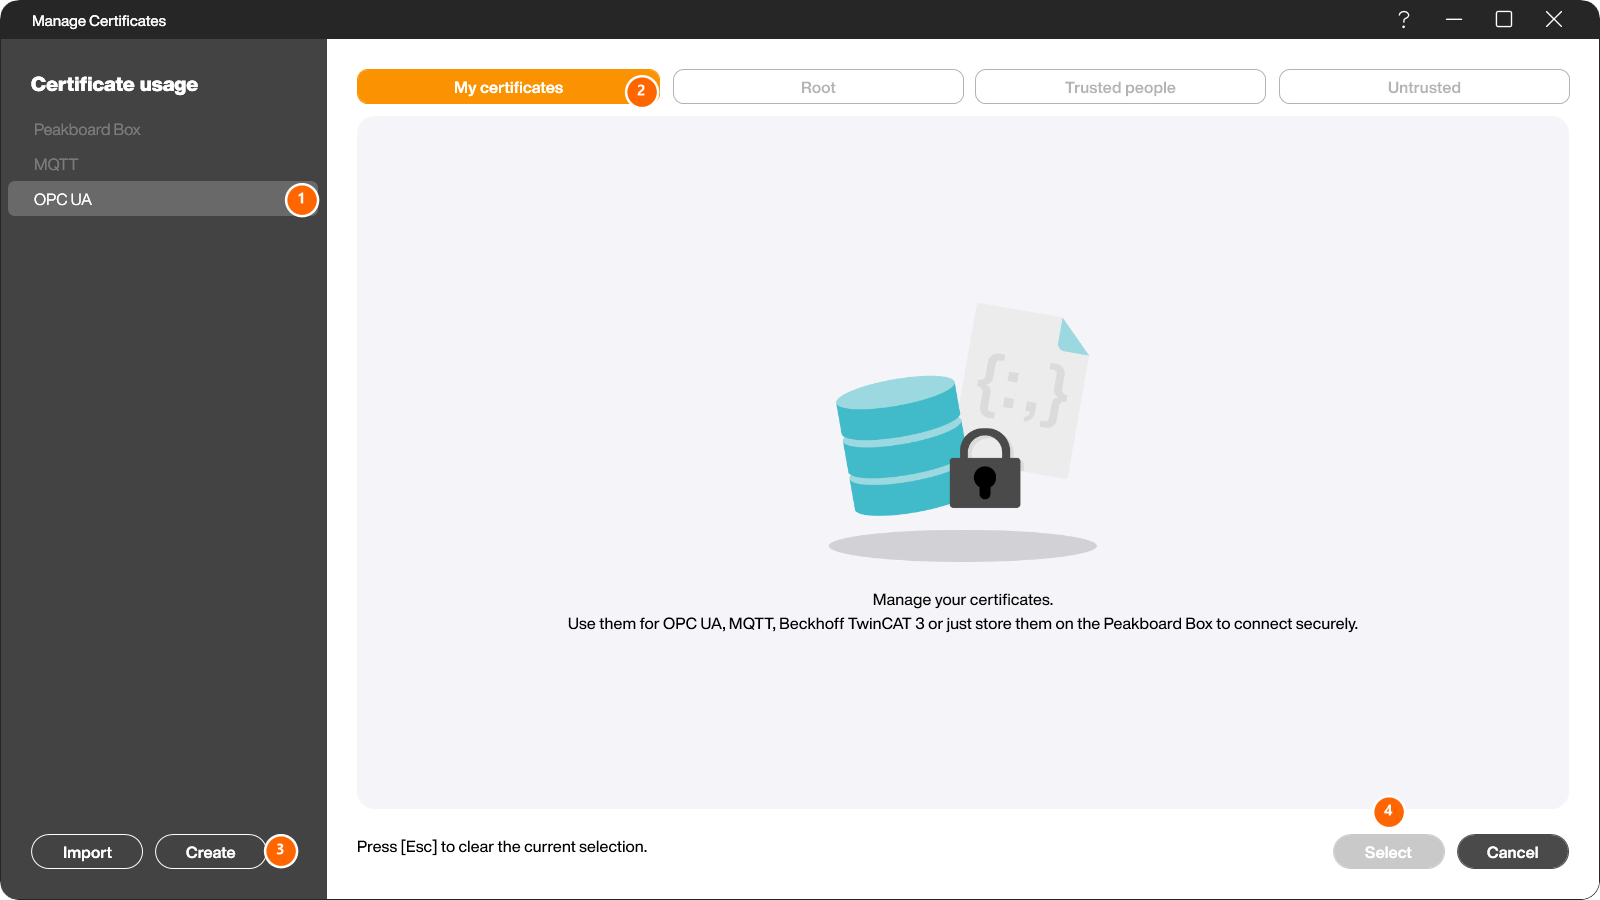
- Certificate usage (1): pick the usage area. For an OPC UA client certificate, select OPC UA.
- Certificate stores (2): switch between [My certificates], [Root], [Trusted people] and [Untrusted]. A client certificate has to live in [My certificates].
- Import / Create (3): [Import] an existing certificate (
.pfx,.p12or.p7bfile) or [Create] a new one (see below). To export or inspect a certificate, use the actions on the certificate entry — [export] writes a.crtfile, [open] shows it in the Windows certificate viewer. - Select / Cancel (4): [Select] the highlighted certificate or [Cancel] to discard the selection. Certificates that were added are not deleted when you press [Cancel]. Press [Esc] to clear the current selection.
Create a new certificate
[Create] opens the [New OPC UA client certificate] dialog.

- Fill in the certificate subject (1). The upper block (Common name, Organization, …) describes the certificate holder; the validity, RSA key strength and signature algorithm are pre-filled with sensible defaults and rarely need to be changed. Optionally add IP addresses and domain names the certificate should be valid for.
- Click [Create] (2) to generate the certificate. It is then available in the [My certificates] store, ready to be selected.
Connect to the server
Enter the [Server URL] (3 in the configuration dialog), enable [Trust All] if you do not want to handle server-certificate prompts manually, then use the refresh icon (4) to load the endpoints. Select the desired endpoint, choose an [Authentication] method (5) if required and click [Connect] (6). A confirmation message indicates a successful connection.
Choose the communication type and manage subscriptions
Once the connection succeeds, the Disconnect button (1) replaces [Connect]. The data-handling options live in the Specify details and Subscriptions sections.
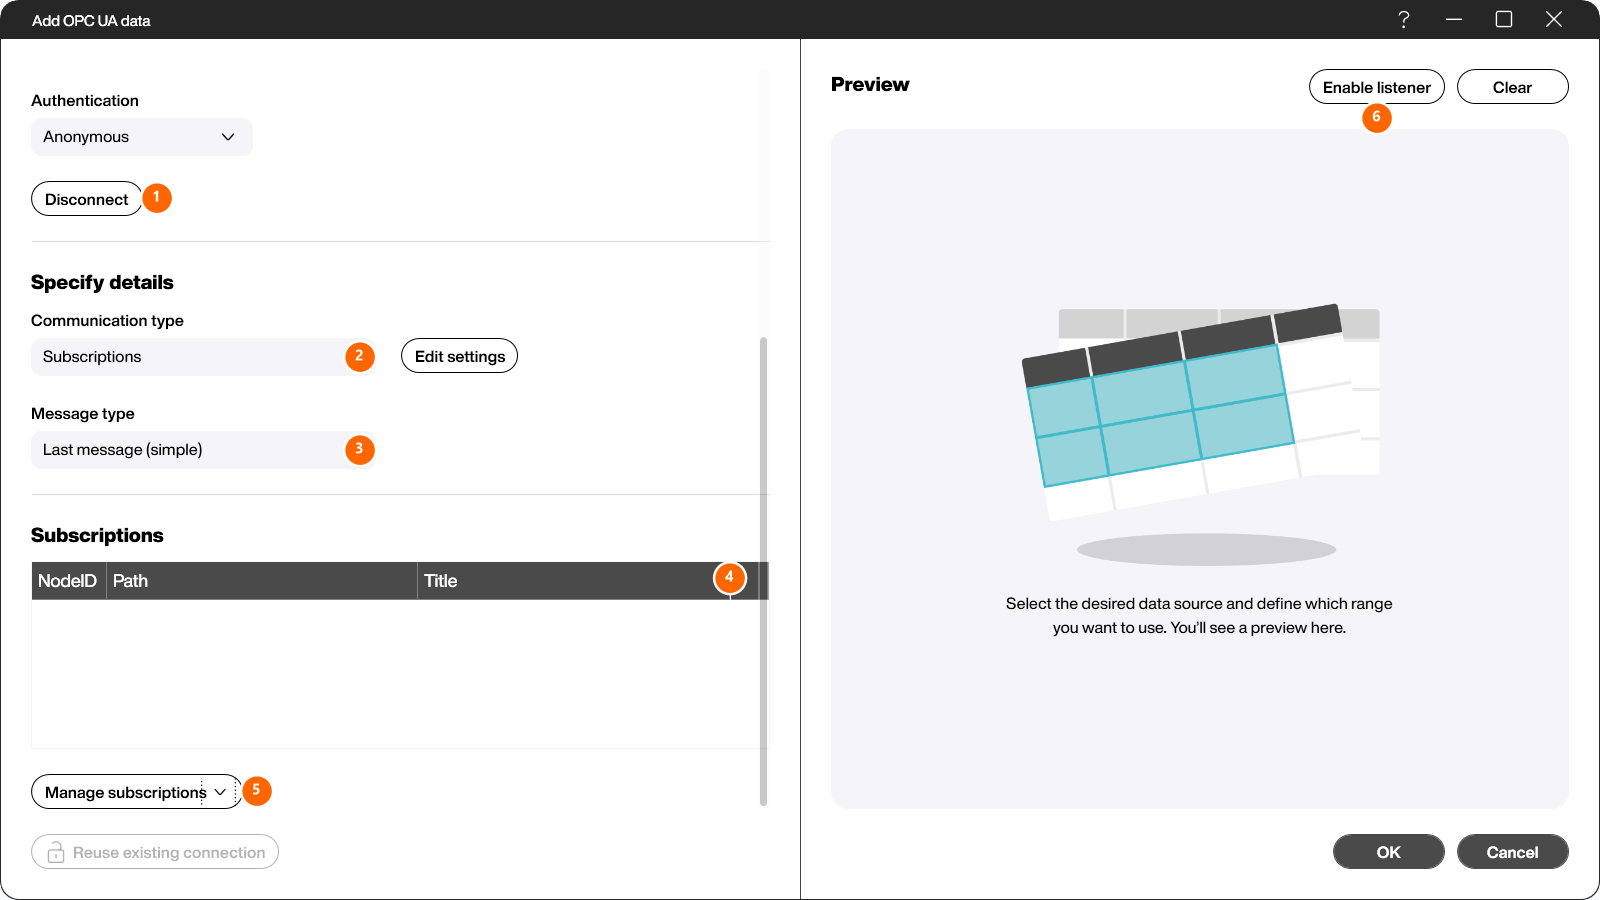
- Communication type (2):
- Subscription: the subscription mechanism defined by OPC UA. This is the recommended option whenever the server supports it. Use [Edit settings] to adjust subscription-specific options — only change these if you know what you are doing.
- Variables: poll node values after a fixed [Reload Interval]. Only variable nodes can be used; objects and their events are not available.
- Message type (3): defines how value updates are stored. Simple keeps the latest message per subscription, Advanced keeps the last value updates up to the configured queue size.
- Subscriptions (4): the list of subscribed nodes. The Title of a subscribed node is used to access it from within the Peakboard application.
- Manage subscriptions (5): clicking it (or choosing [Browse] from its menu) opens the node browser, which shows the tree of nodes stored on the connected server — a connection is required. Selecting a node adds a subscription, deselecting it removes the matching subscription. With [Add manually] a node can be added by its node ID and namespace without a connection (offline).
- Enable listener (6): see Verify the data below.
For each subscribed node you can edit the Title, Namespace and Identifier. Namespace and Identifier can be scripted; that script runs only once, when the subscription is established on startup. When a connection is available, [Fetch Node Info] reads additional details (node class, data type, …) from the server:
- Variable: has a value that is read from the server.
- Object: has events that can be subscribed to from the [Edit OPC UA Subscription Item] dialog, via the [Add] button under the [Event Filter] table (a server connection is required).
Browse and select nodes
[Browse] from the [Manage subscriptions] menu opens the node browser.
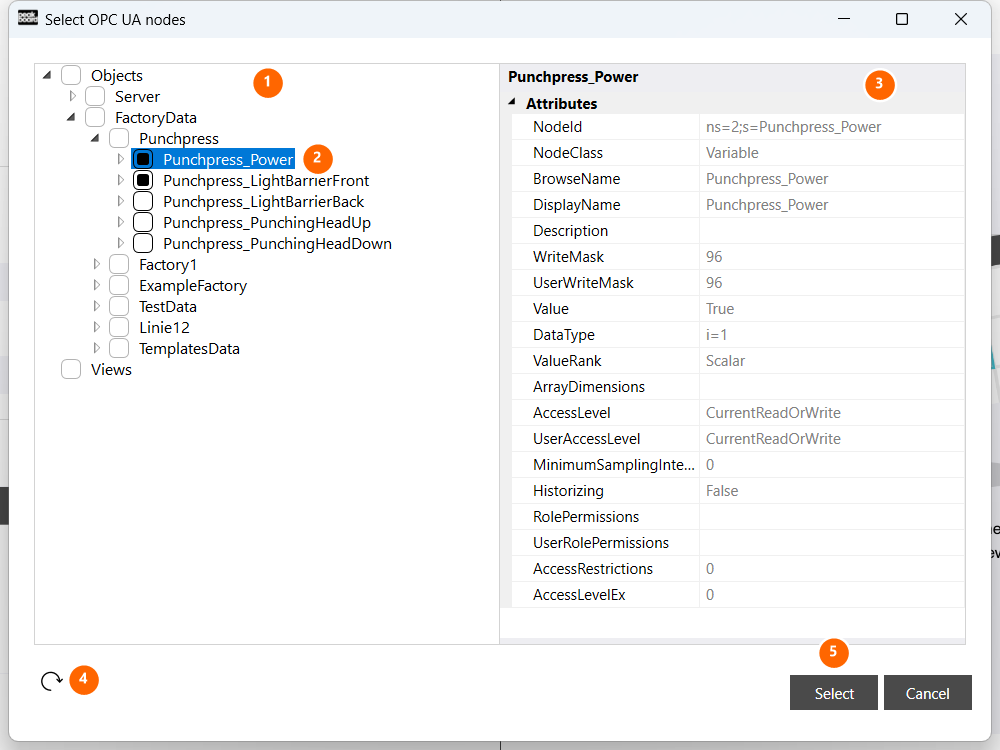
- Node tree (1): the address space of the connected server. Expand a branch to drill down to its variable nodes.
- Subscribe a node (2): tick the checkbox next to a node to add a subscription; clear it to remove the subscription again.
- Attributes (3): the OPC UA attributes of the selected node (NodeId, NodeClass, DataType, current Value, AccessLevel, …) — useful to confirm you picked the right node.
- Refresh (4): re-reads the server address space.
- Select / Cancel (5): [Select] confirms the ticked nodes and returns to the configuration dialog; [Cancel] discards the changes.
Verify the data
In the Preview pane, click [Enable listener] (6) to check that all subscriptions are defined correctly. The listener behaves exactly like the data source in the running Peakboard application. When everything looks right, confirm the dialog with [OK].