Peakboard hub
Peakboard Boxes
To manage your Peakboard Boxes you have to add them to the Peakboard Hub. The procedure differs depending on whether you use a Peakboard Hub on premise or a Peakboard Hub online. Be sure to use the correct article.
Network Settings for the Peakboard Boxes
To ensure the correct functionality some network settings for the boxes are necessary.
| URL | Port | Description |
| https://hub.peakboard.com | 443 | Initialer request von Peakboard Boxen zum Hub |
| peakboardhubonline.servicebus.windows.net | 5671 | Communication channel for Peakboard Hub online via AMQP connection (Azure Service Bus) |
| https://downloads.peakboard.com/download/Peakboard/master/PeakboardRuntime.pbux | 443 | Download update files |
| http://www.msftconnecttest.com/connecttest.txt | 80 | Check the internet connection state from a box |
Note.
Necessary proxy settings must be set on the boxes via the Peakboard Designer.
Adding a Peakboard Box to the Peakboard Hub online
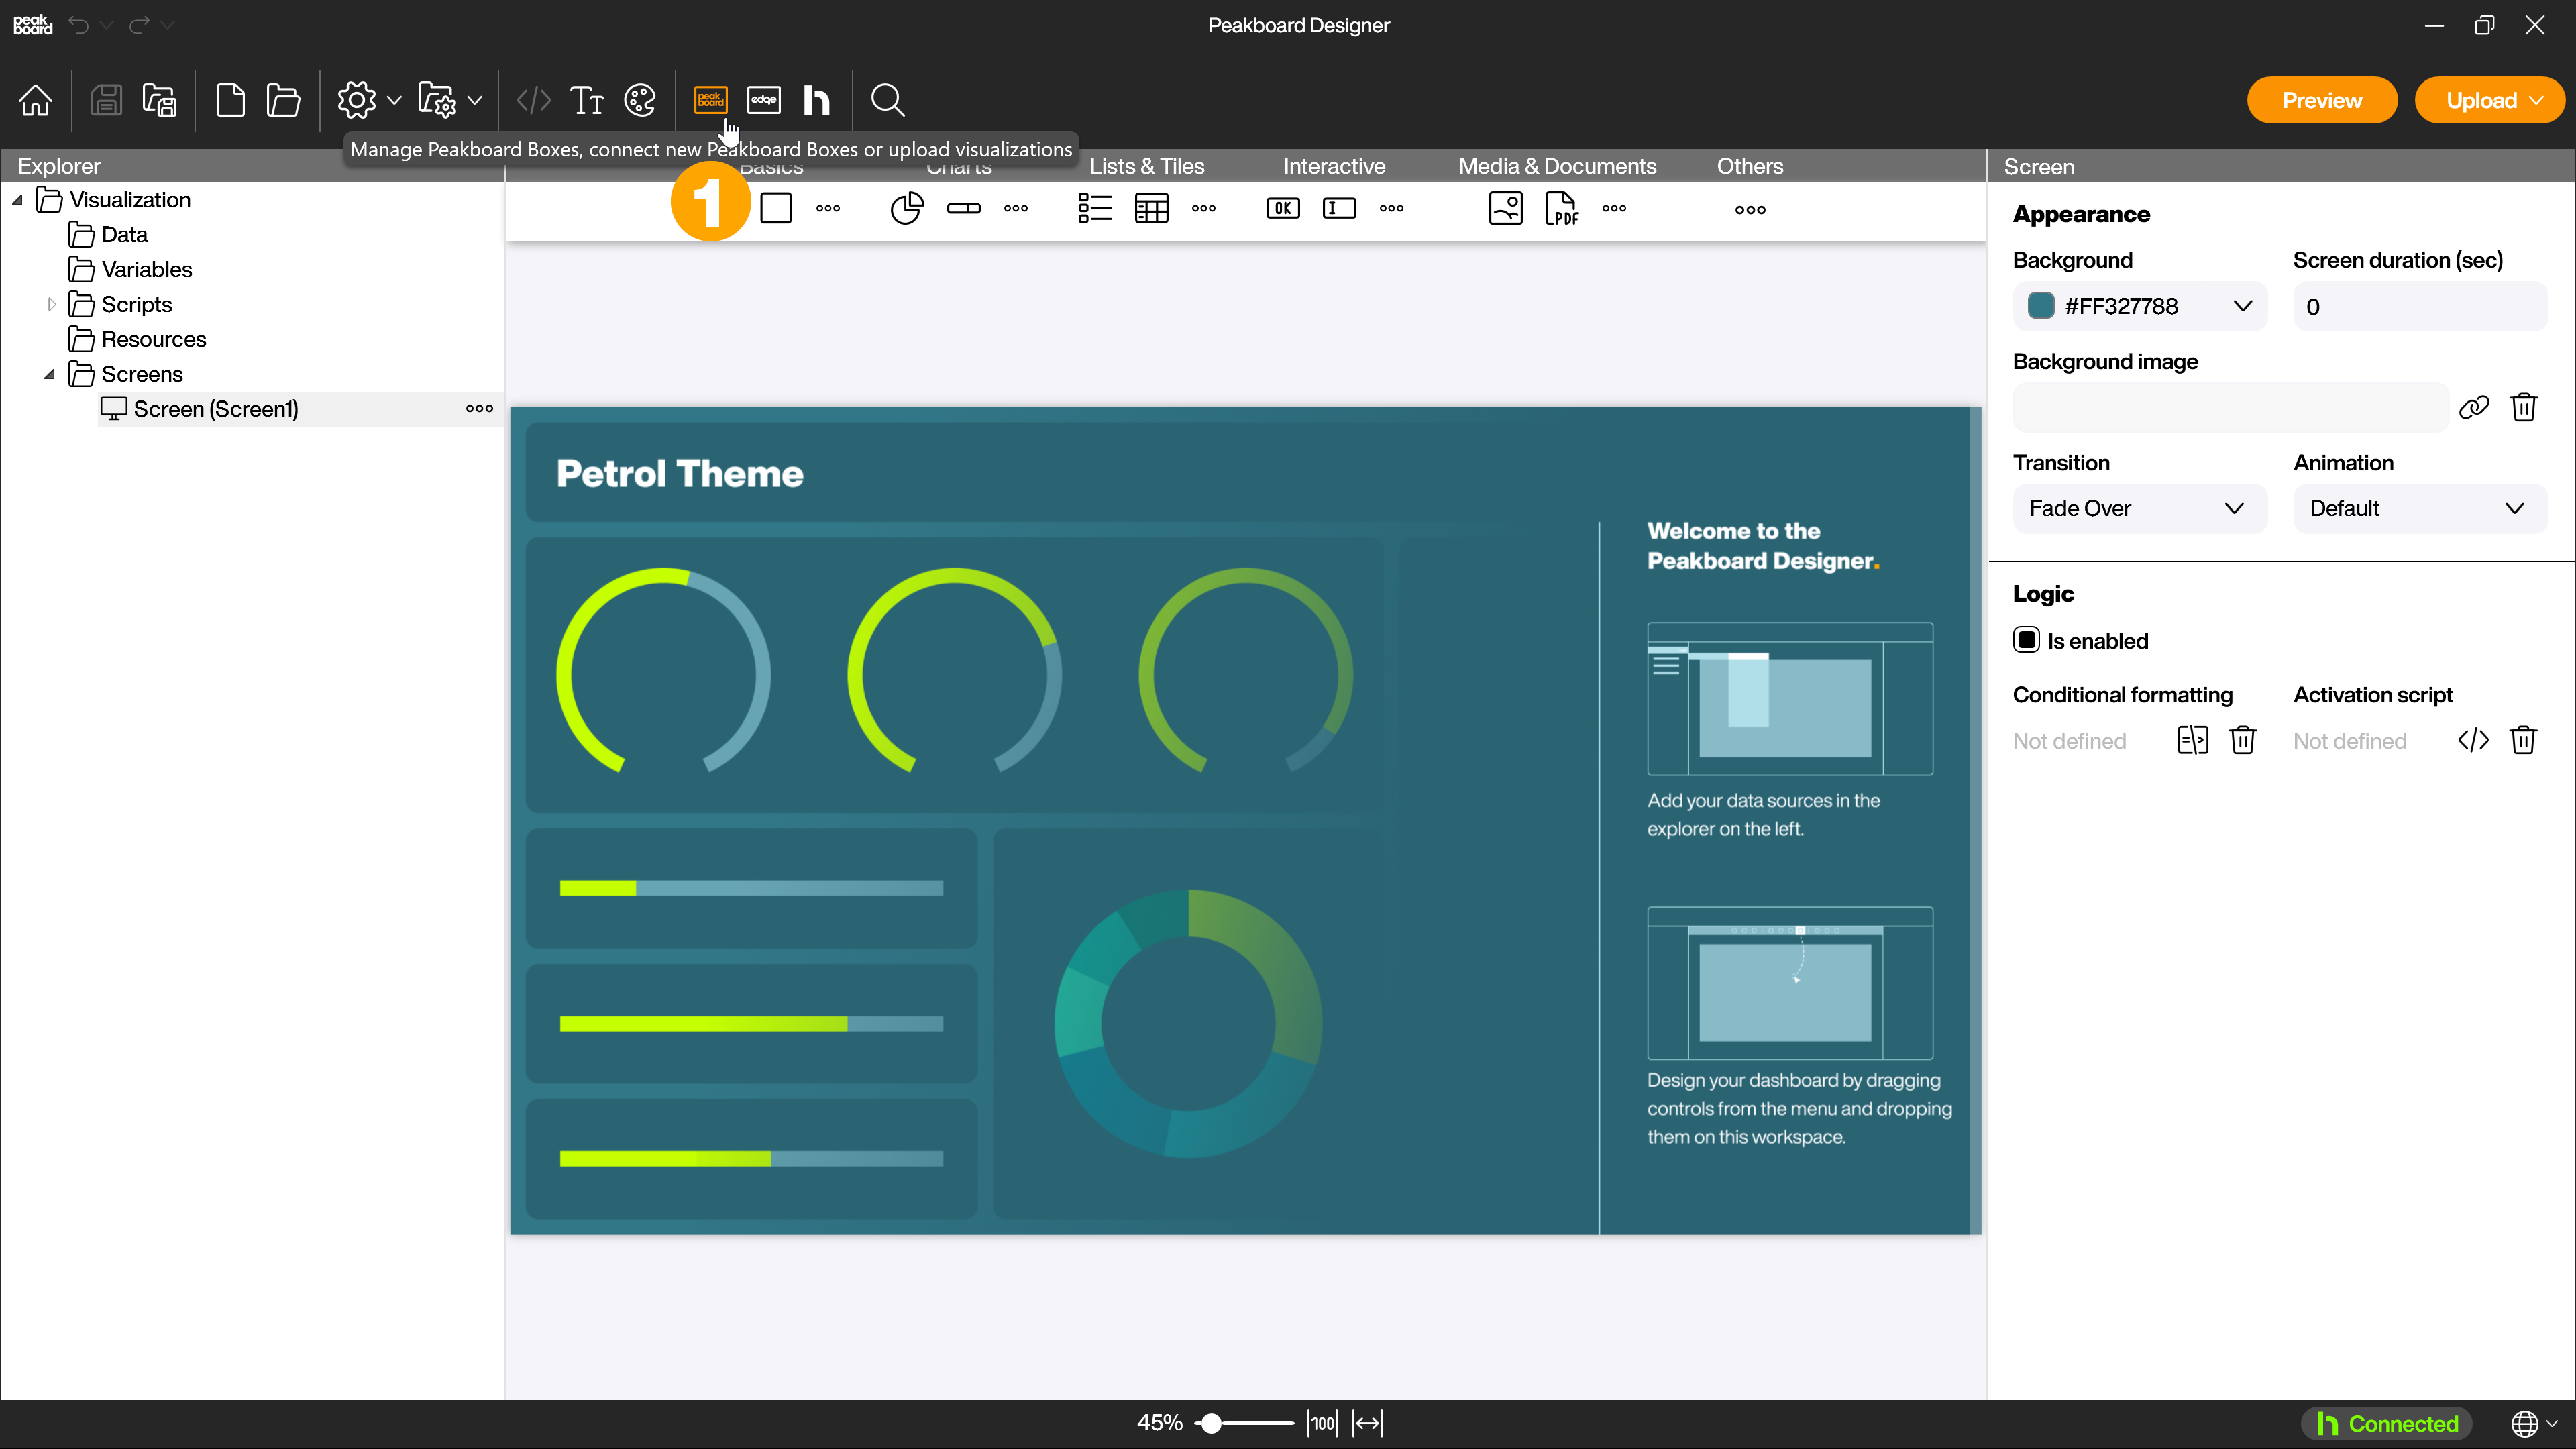
The first step is to connect your Peakboard Boxes to the cloud. To do this, open the Peakboard Designer and open the Peakboard Box settings (1).
Select the Peakboard Box on the left (1) that you want to add to Peakboard Hub online and open the [General] tab (2). Click on the cloud icon (3) to connect your Peakboard Box to the cloud. Then copy the cloud ID (4), you will need it in the next step.

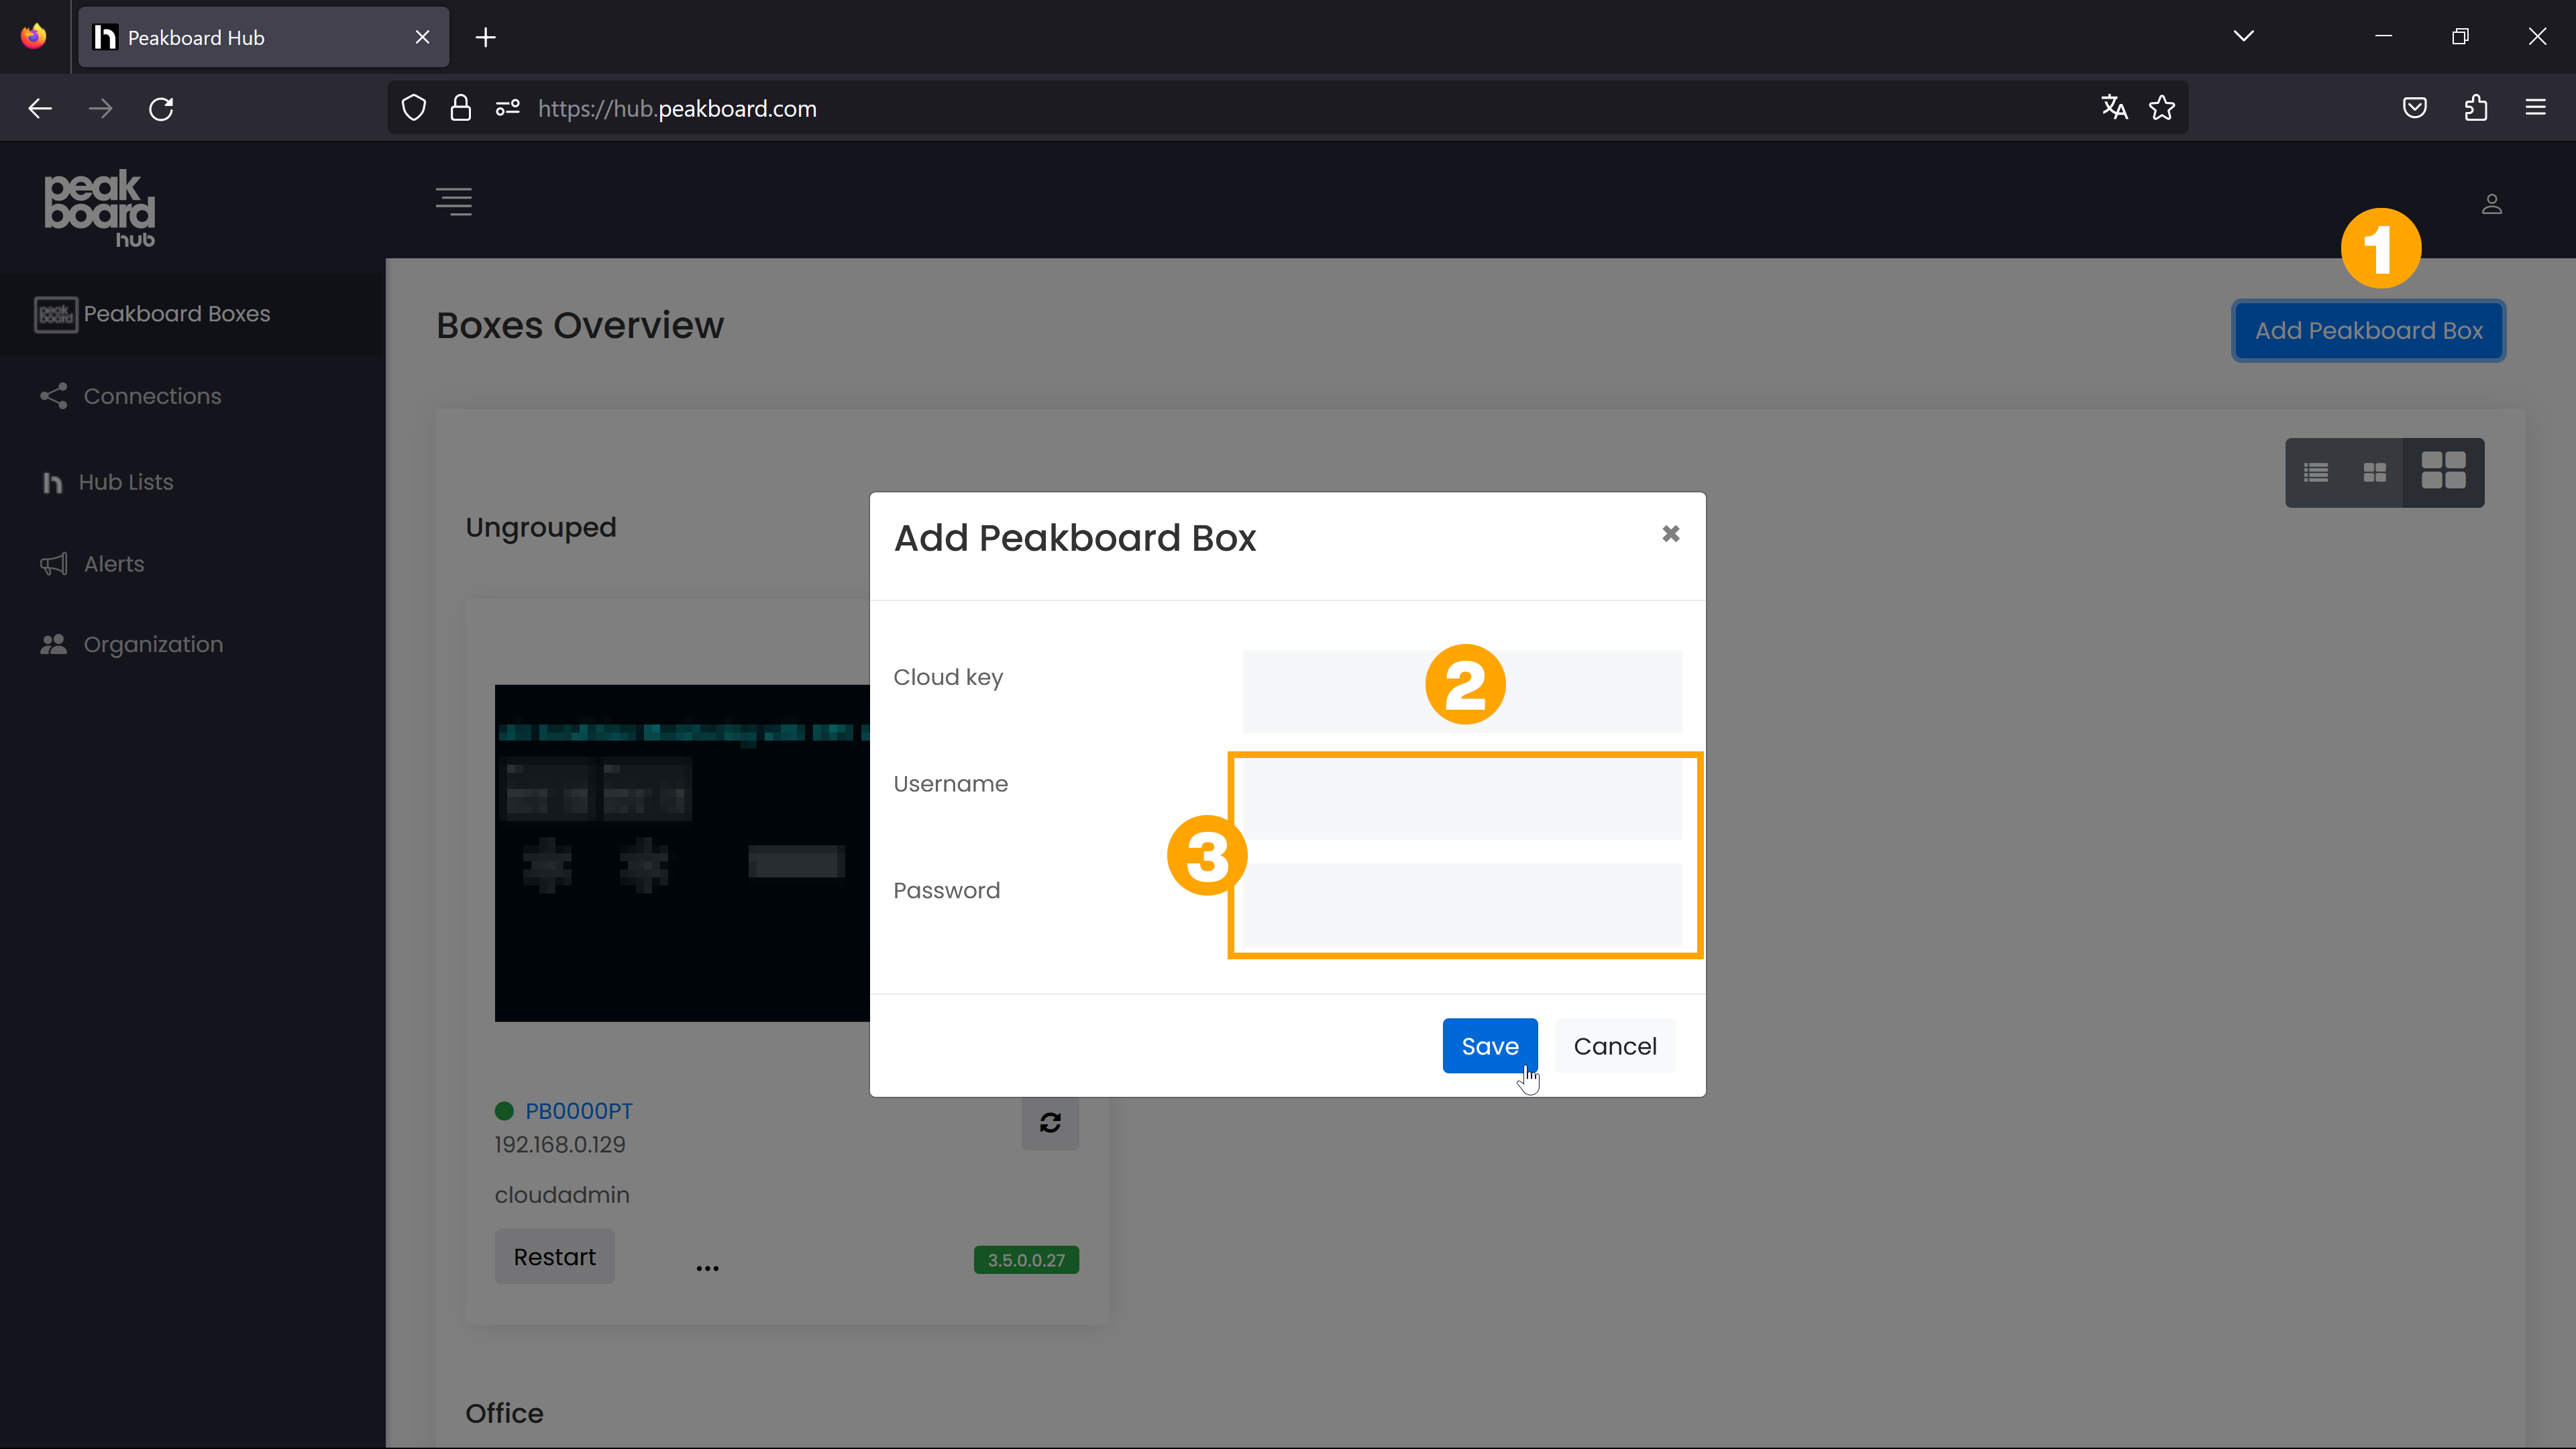
Now click on [Add Peakboard Box] (1) in the Peakboard Hub online under [Peakboard Boxes] to open the add dialog. To add a Peakboard Box to the Peakboard Hub online, you need the previously copied cloud ID (2) from the Peakboard Designer. The user (3) you are connecting to needs the [Allow cloud communication] permission. You can find the permission in the Peakboard Box settings in the [Users and roles] tab of the User administration.
Manage Peakboard Boxes
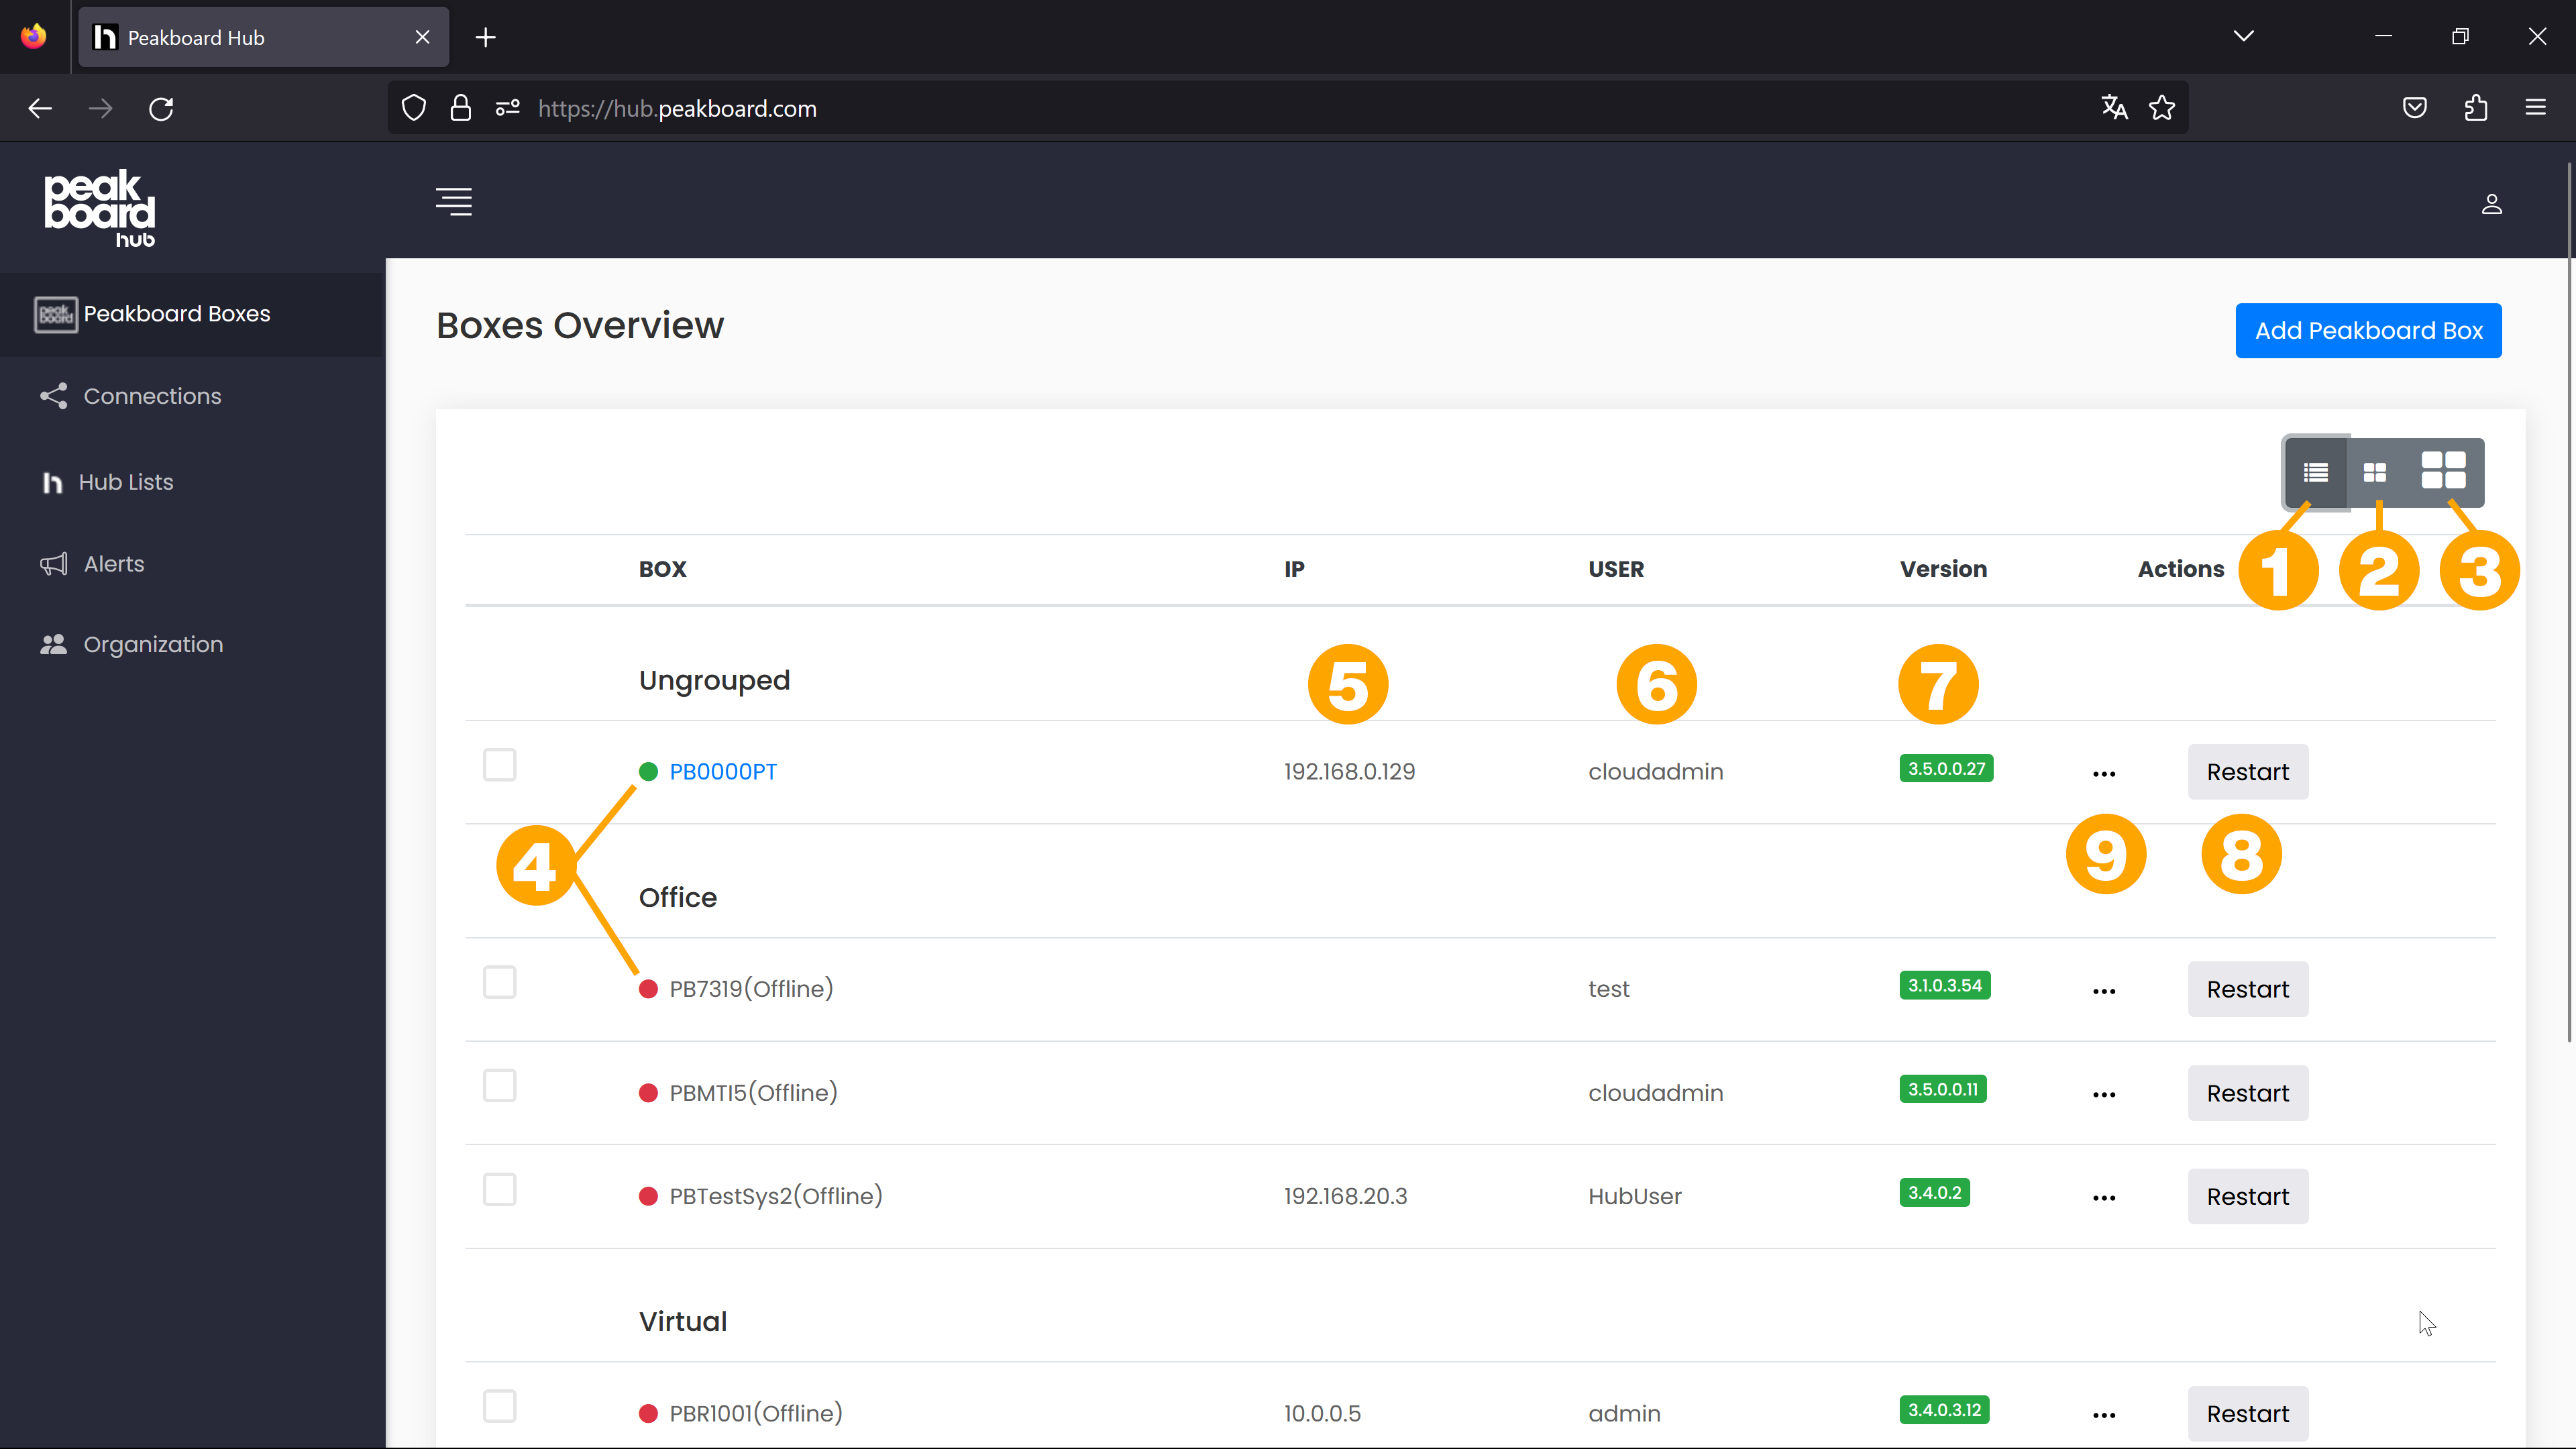
In the upper right corner you can now choose in which view your Peakboard Boxes should be displayed.
The list view (1) is recommended if you already have many Peakboard Boxes connected to Peakboard Hub on premise. It gives you a quick overview of the groups, names and other data of your Peakboard Boxes. However, no screenshots are visible in this view. To display them, select small (2) or large tiles (3) for viewing. Now you can see at a glance which visualization is currently loaded on the Peakboard Boxes.
Besides the screenshots that are updated regularly (except in the list view), you will find other elements that the different view types have in common. In the tile view you can click on the magnifying glass icon to enlarge the current screenshot and the reload icon to update the screenshot. A green circle next to the name of the respective Peakboard Boxes indicates whether it is accessible or not (4). You can see the IP address (5), the user (6) and the version (7) of the respective Peakboard Box at a glance and can restart it by clicking on the [Restart] button (8). By clicking on the […] icon (9), you can open a context menu that gives you access to further actions. You can update, reset, delete or assign your Peakboard Boxes to a group.
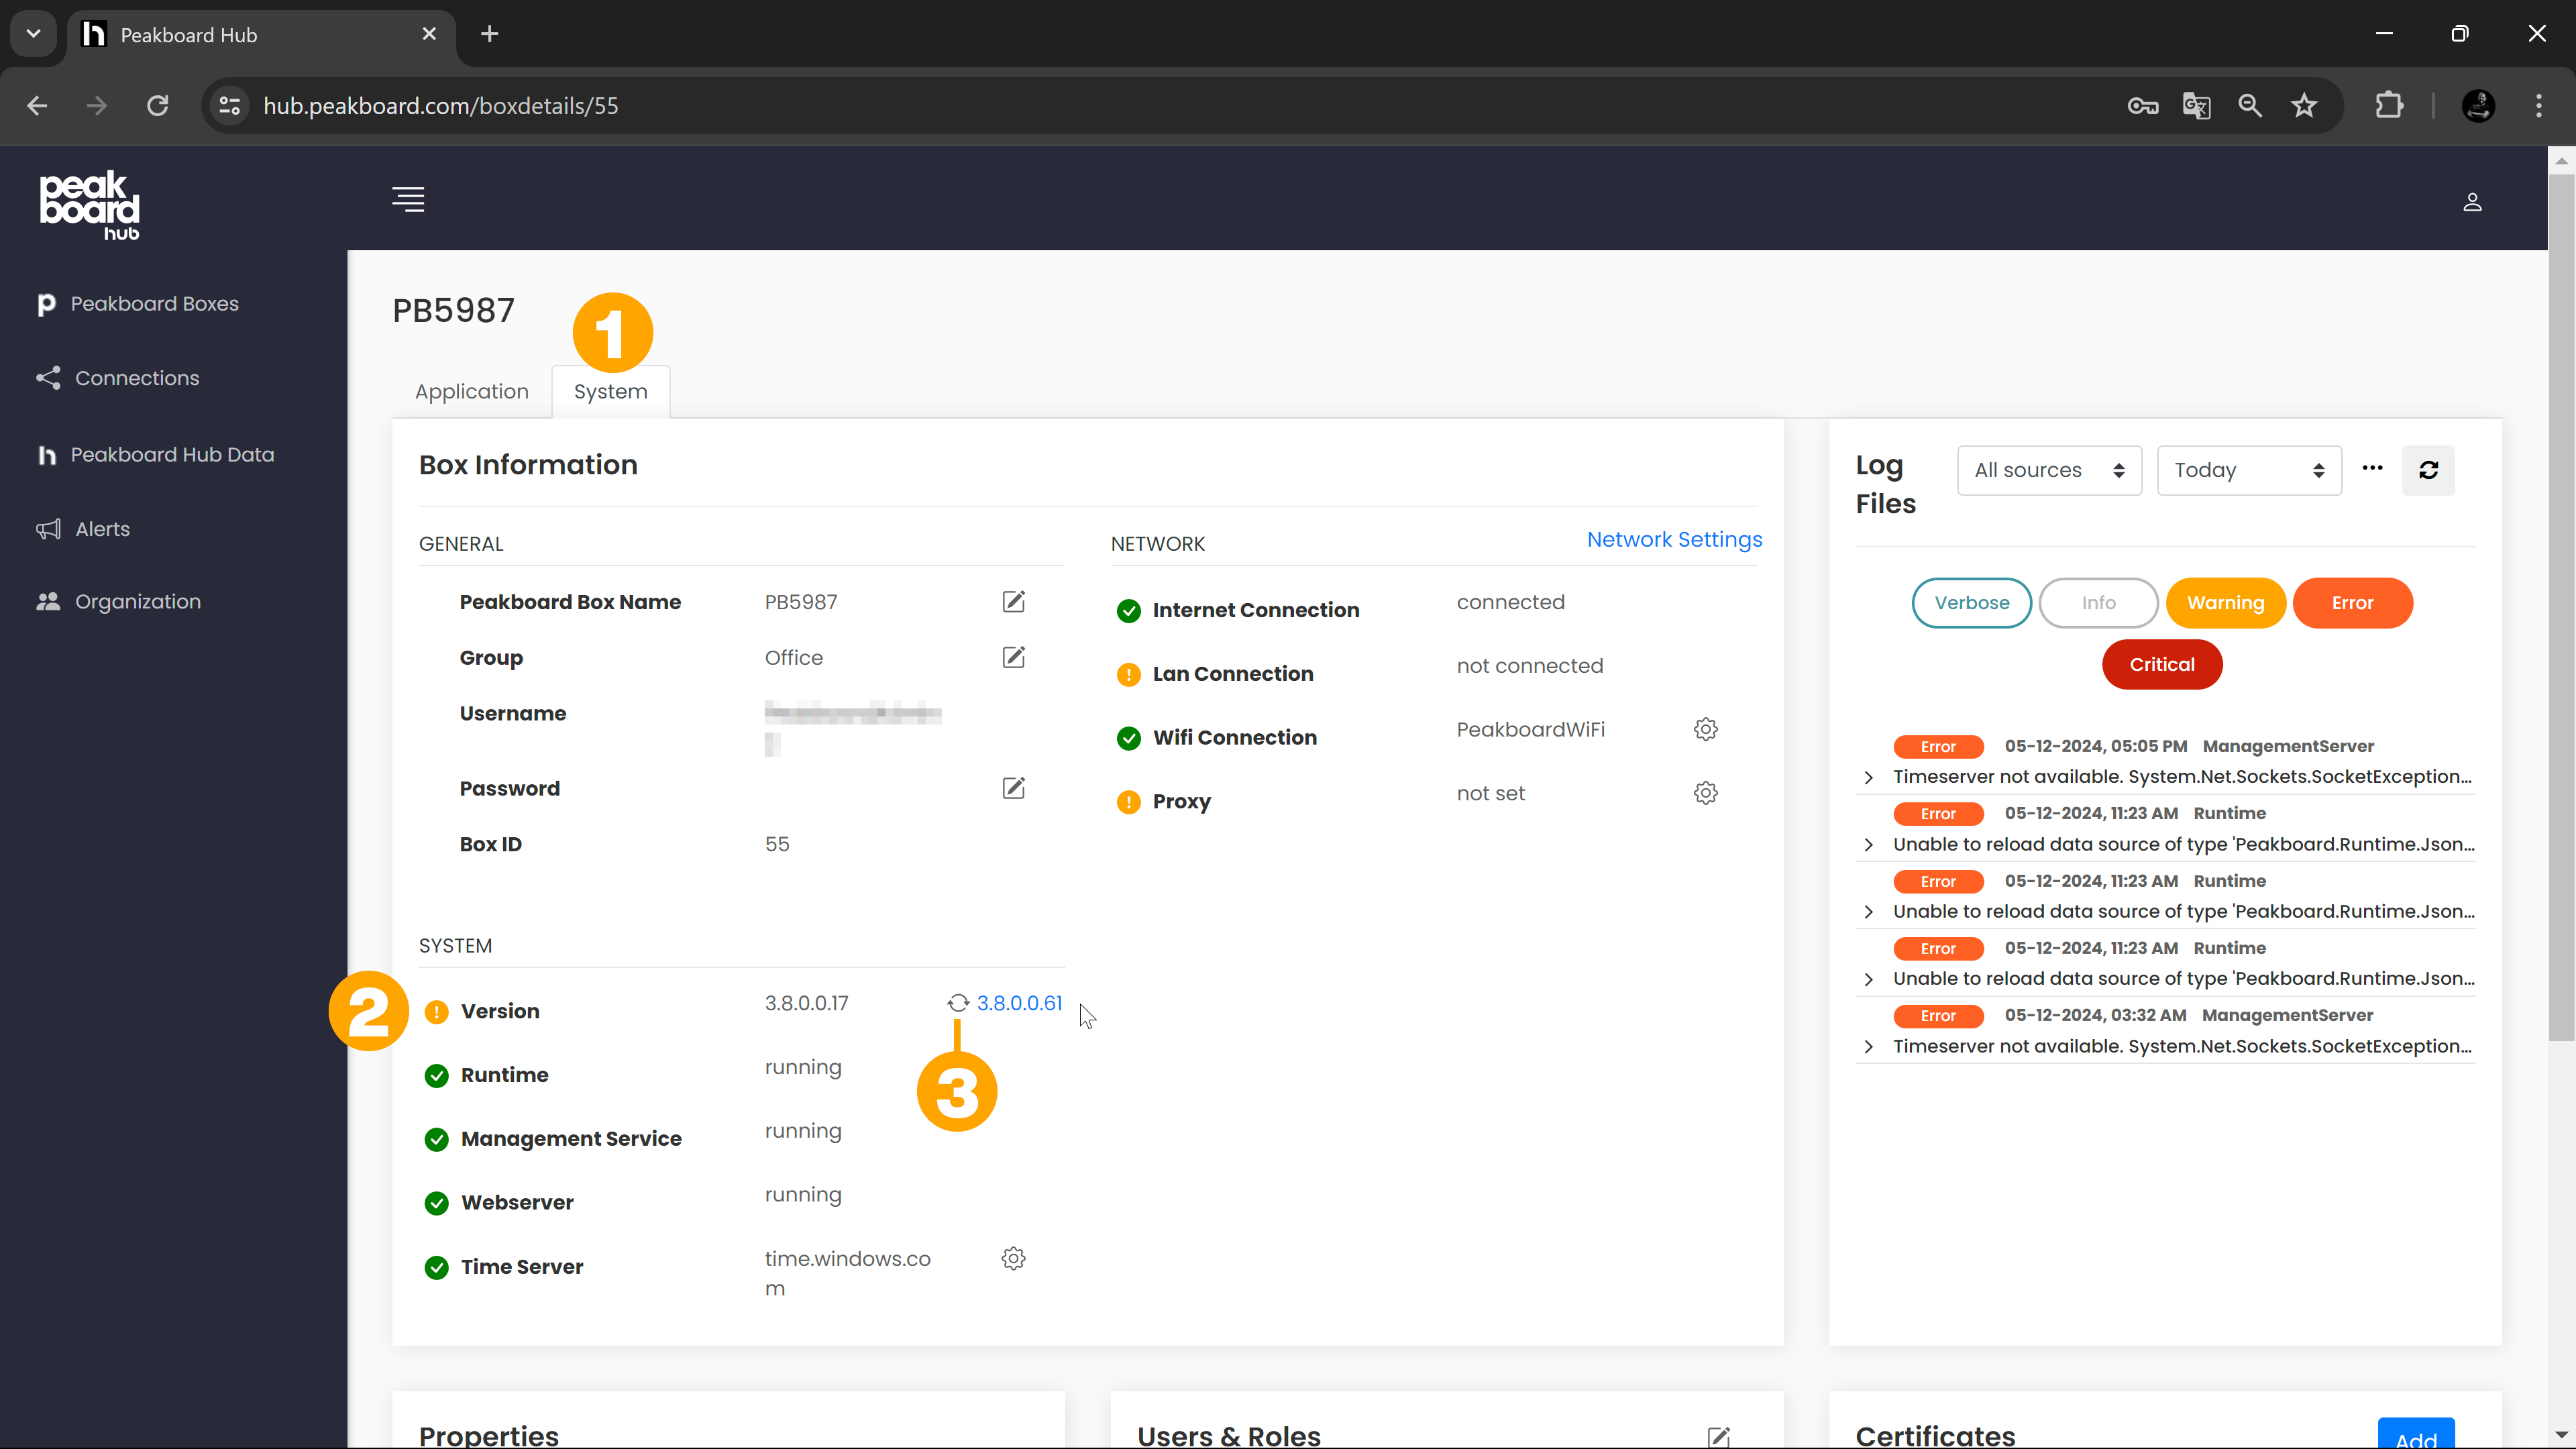
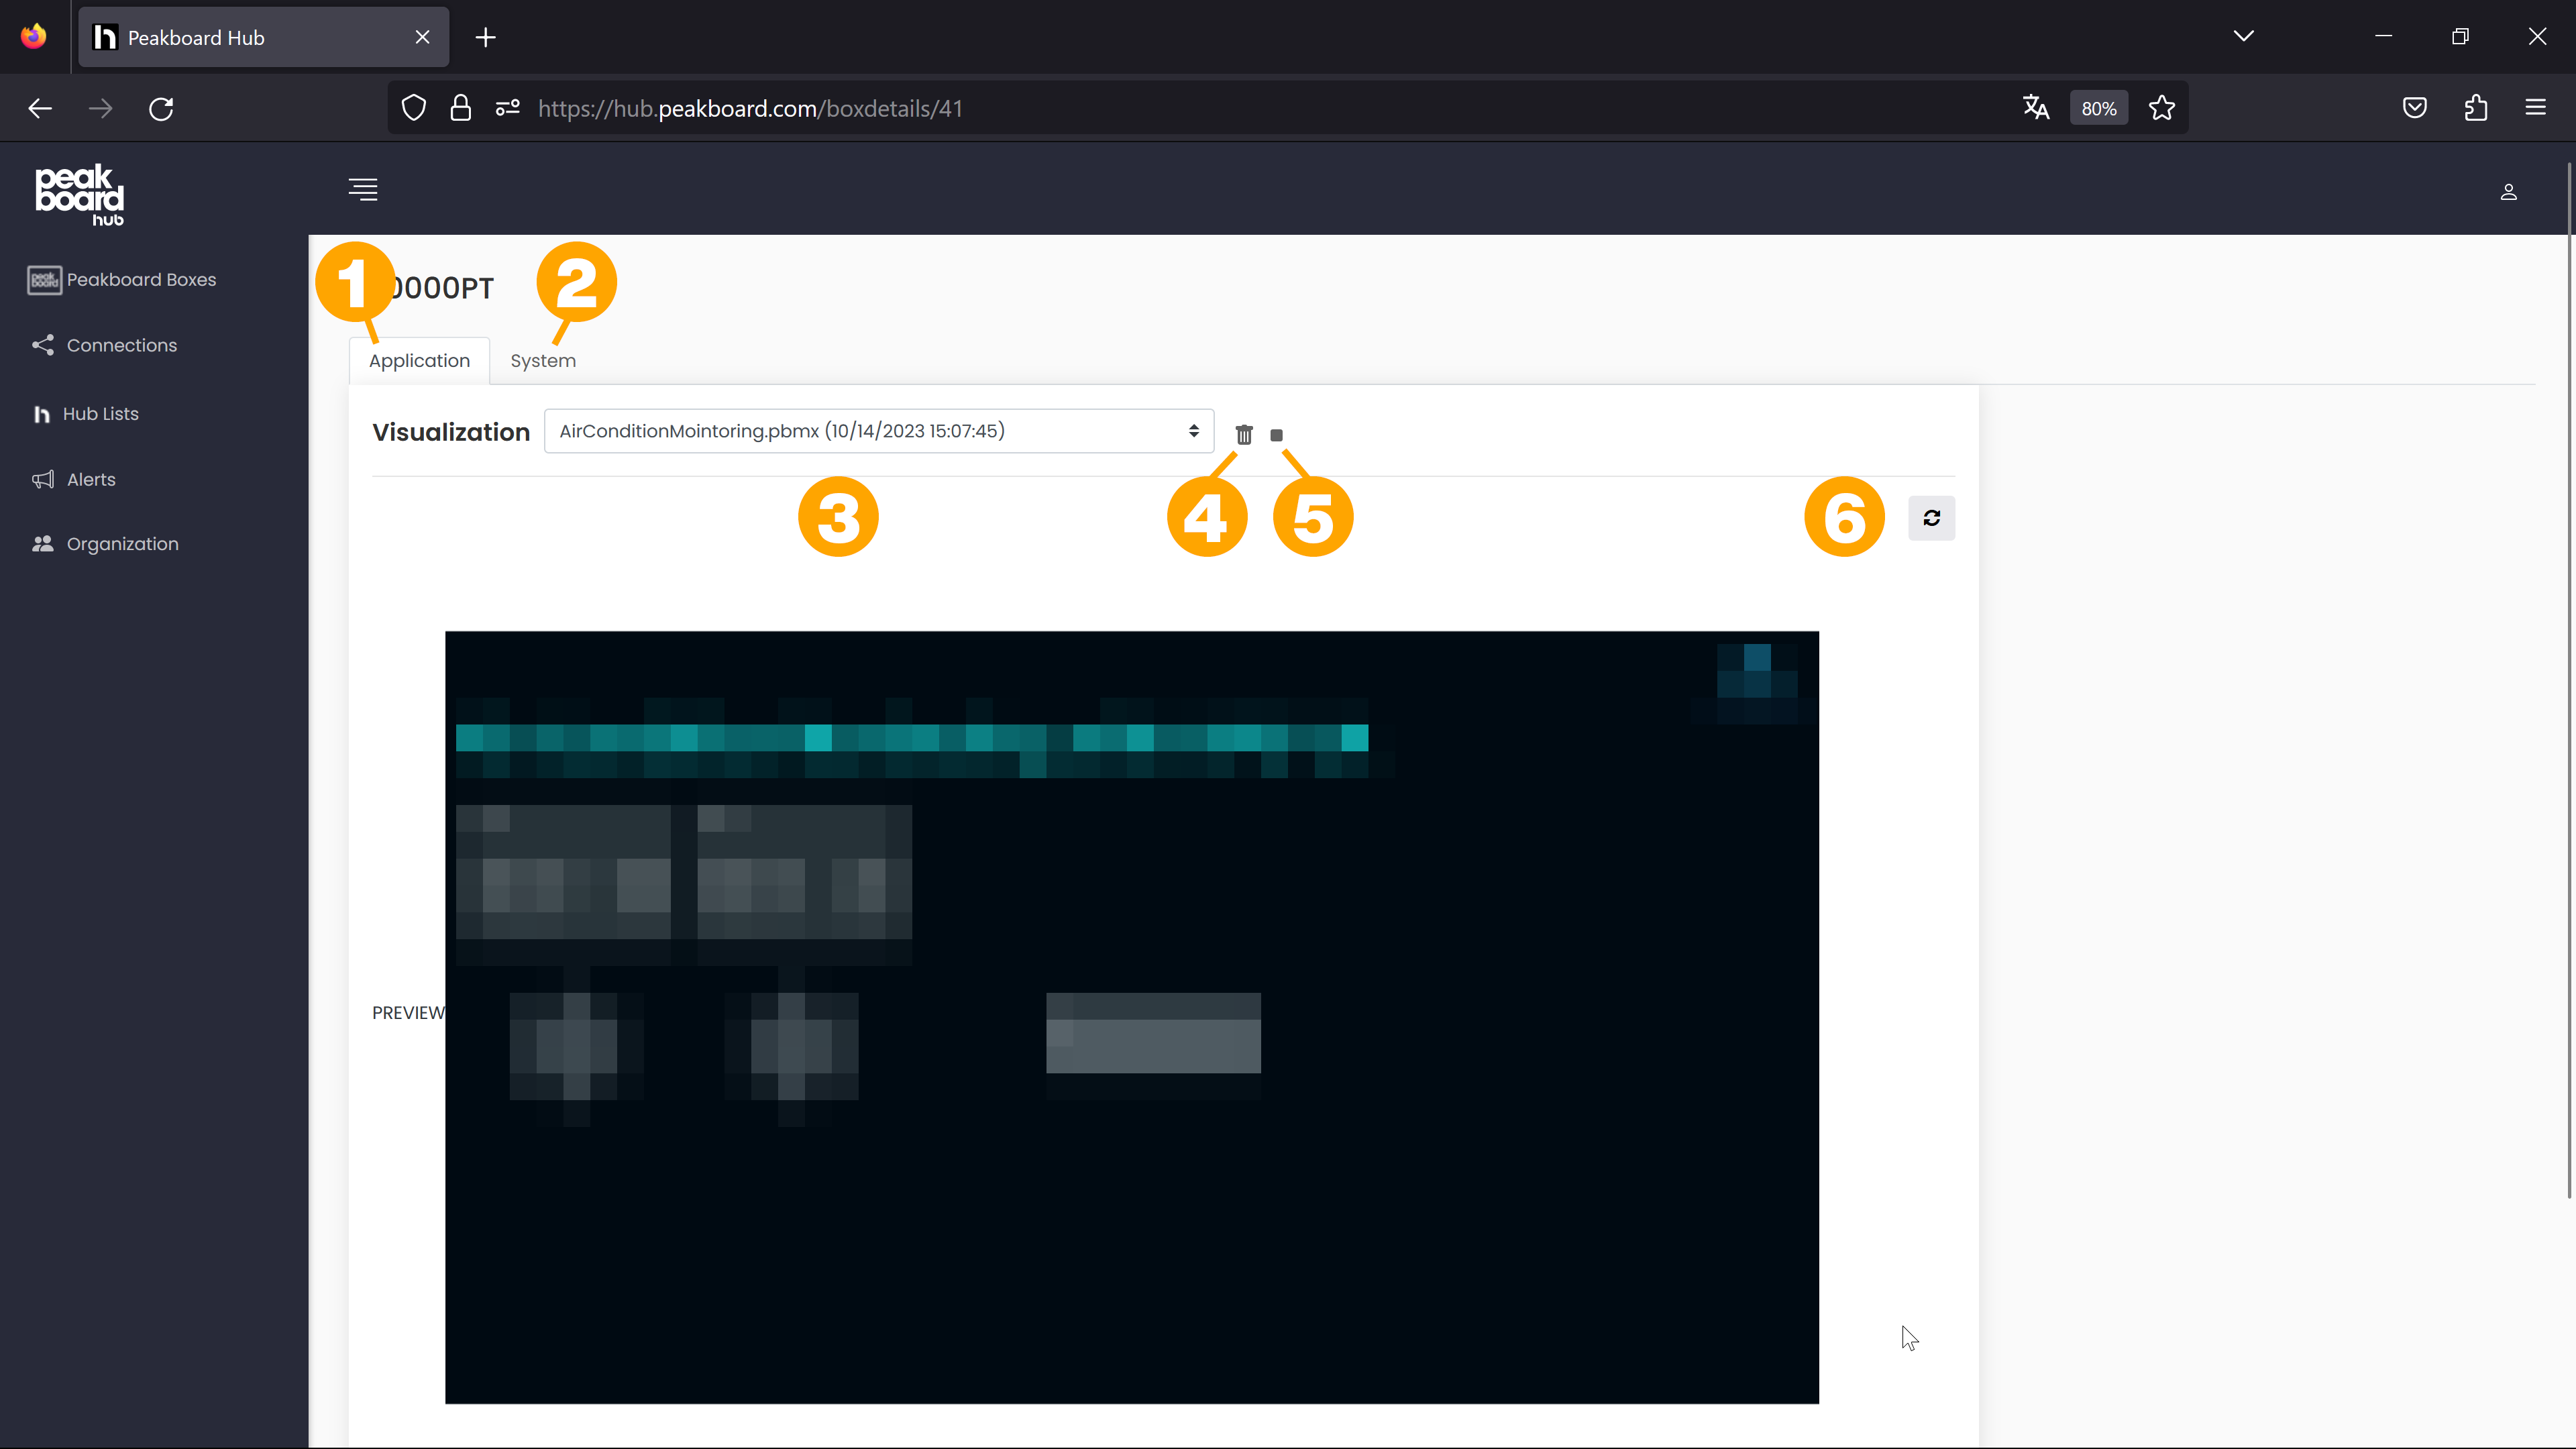
Peakboard Boxes detail view
Clicking on the name of the Peakboard Boxes or on the screenshot will take you to the detail page of the selected Peakboard Boxes. The detail page offers two tabs, [Application] (1) and [System] (2). The application tab shows which visualization is currently displayed. In the upper area you can select which of the existing visualizations should be displayed on the Peakboard Box by clicking on the drop-down menu (3). You can also delete (4) or stop (5) the visualization there. In the lower area you will again find a current screenshot. You can update it by clicking on the corresponding button (6).
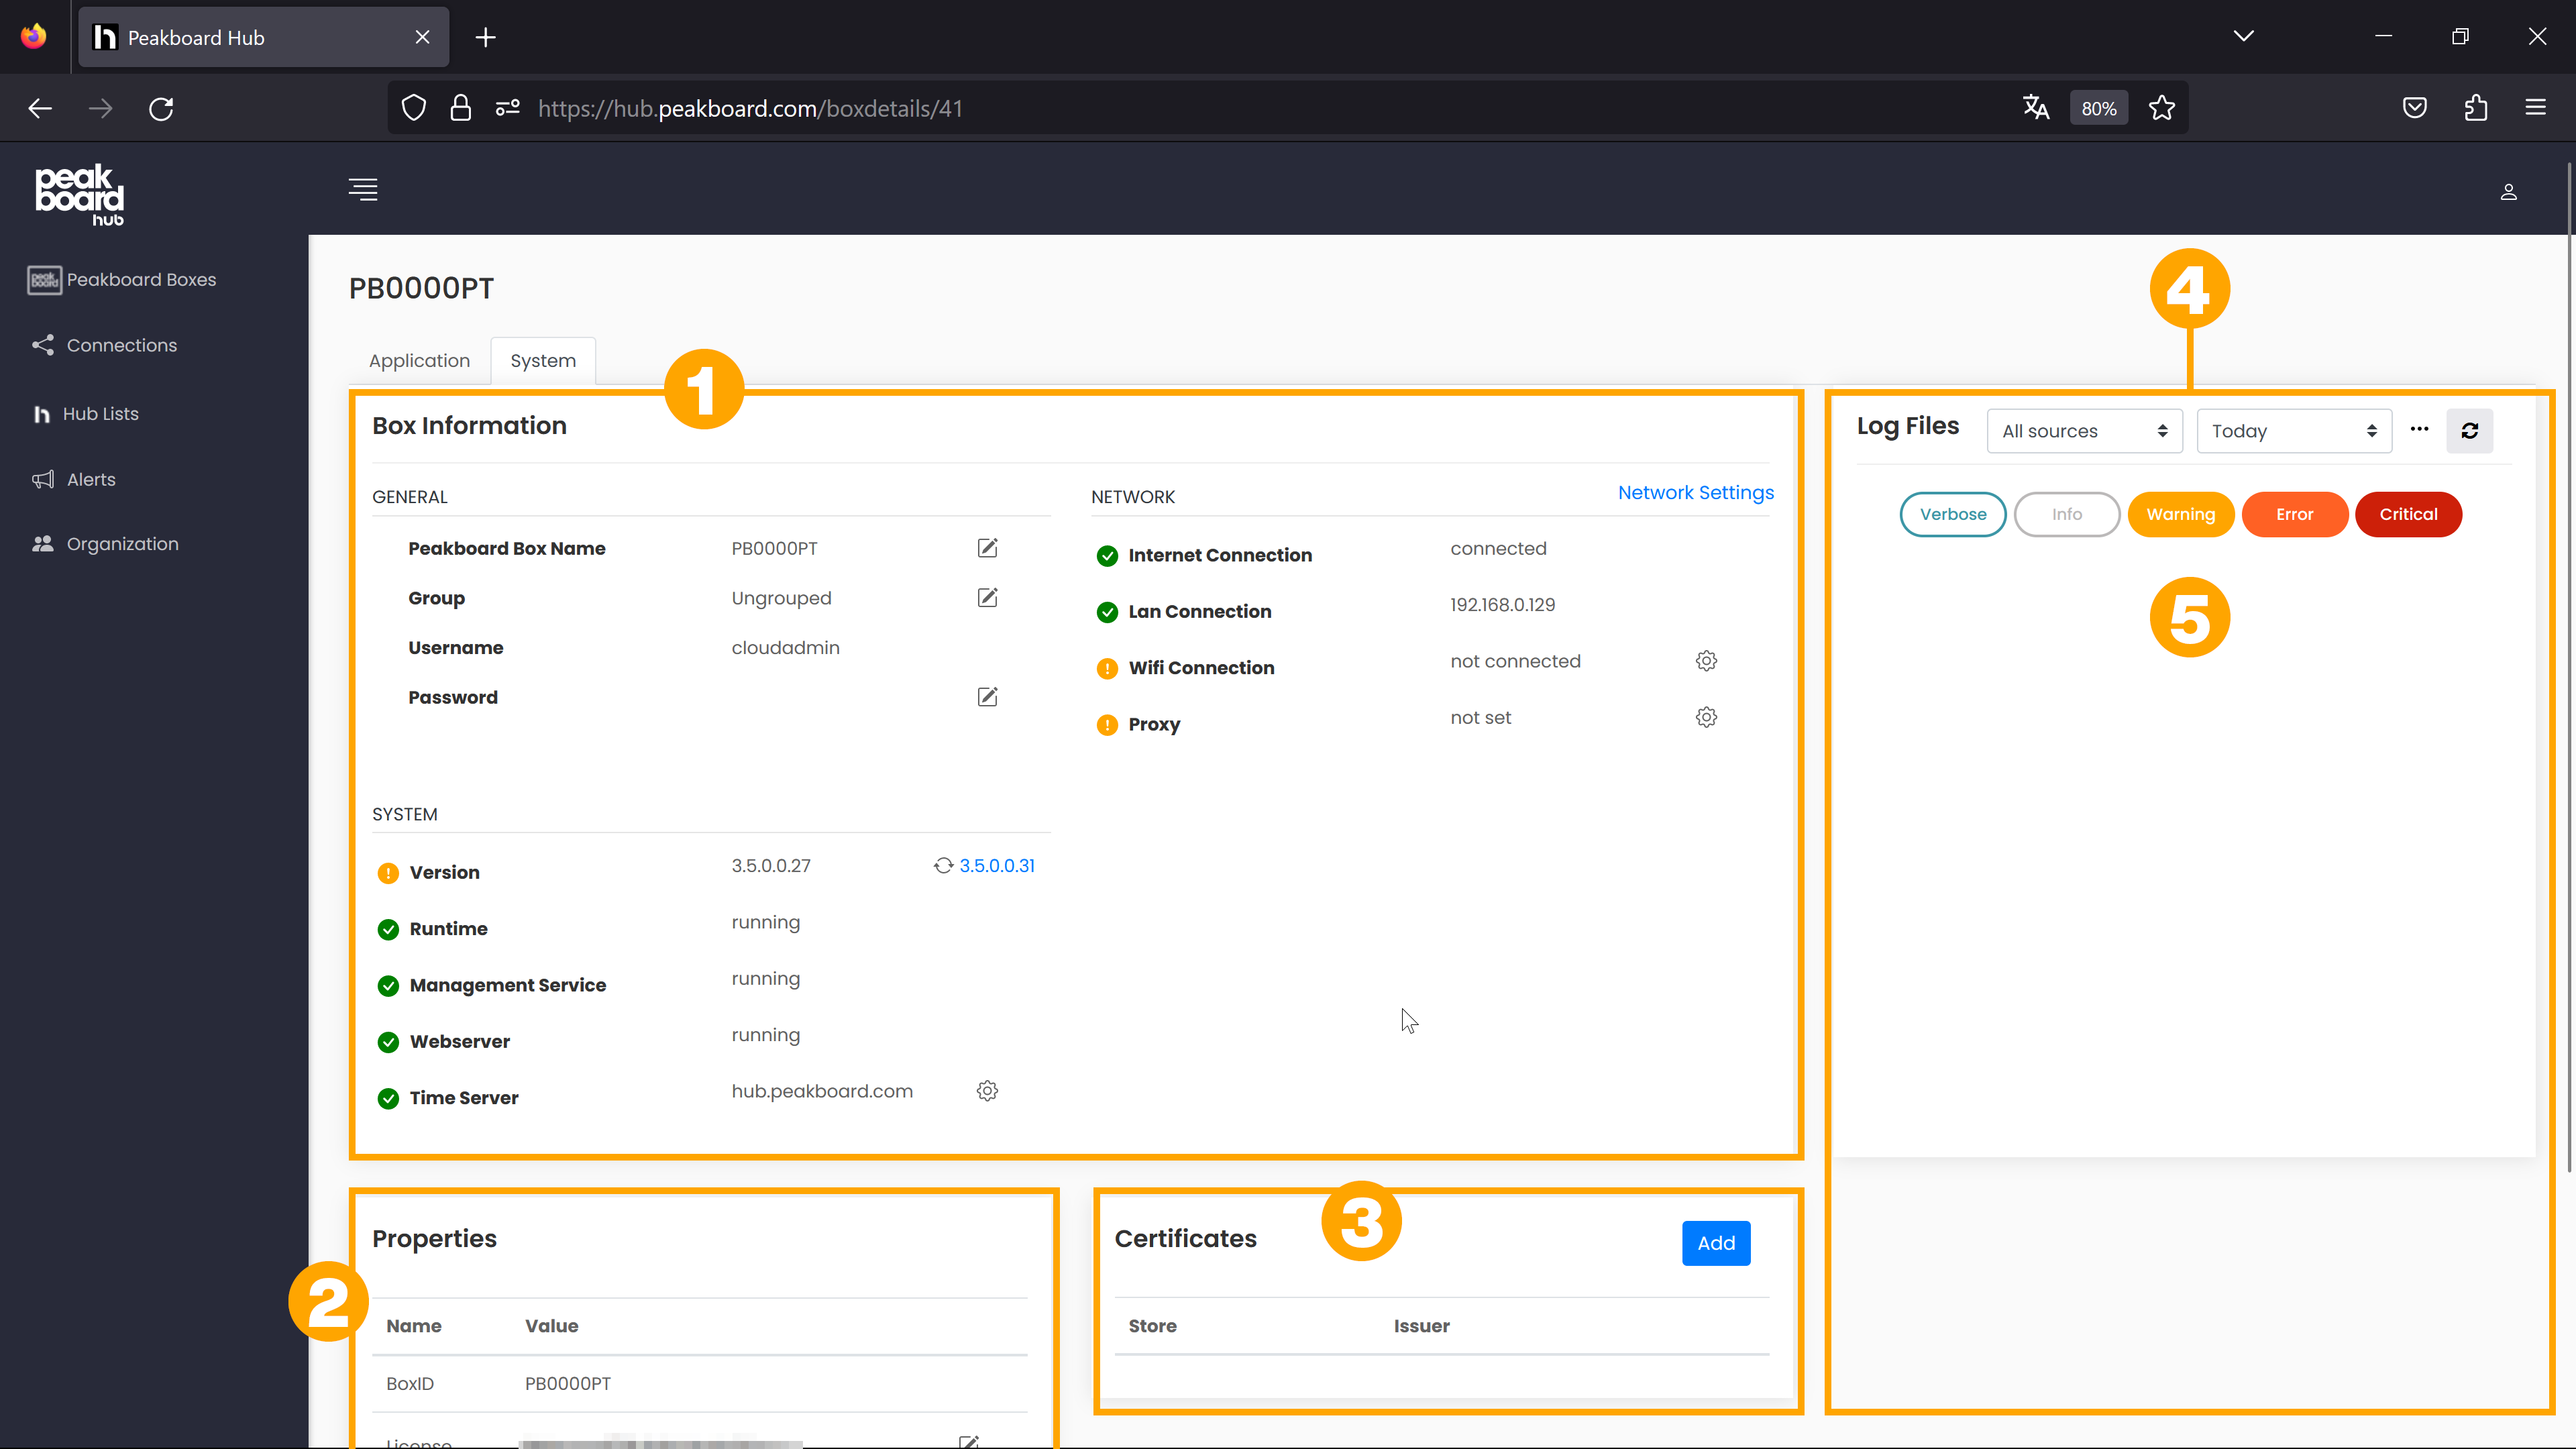
In the system tab you will find four areas:
- Box Information (1): Here you can find general information about your Peakboard Box and identify existing problems by colored markings and status indicators. Some items can be adjusted by clicking on the pencil or gear icon. Properties (2): The BoxID and the license of the selected Peakboard Box are displayed here. You can also change the license there. Certificates (3): In this area you can store certificates for your Peakboard Box.
- Log Files (4): Here you can see the logs of your Peakboard Box. You can filter them by different criteria (5). With the button […] you can also export the log files. You can either export the filtered logs with [Export] or all existing logs with [Export All]. In both cases the logs are exported in text format.
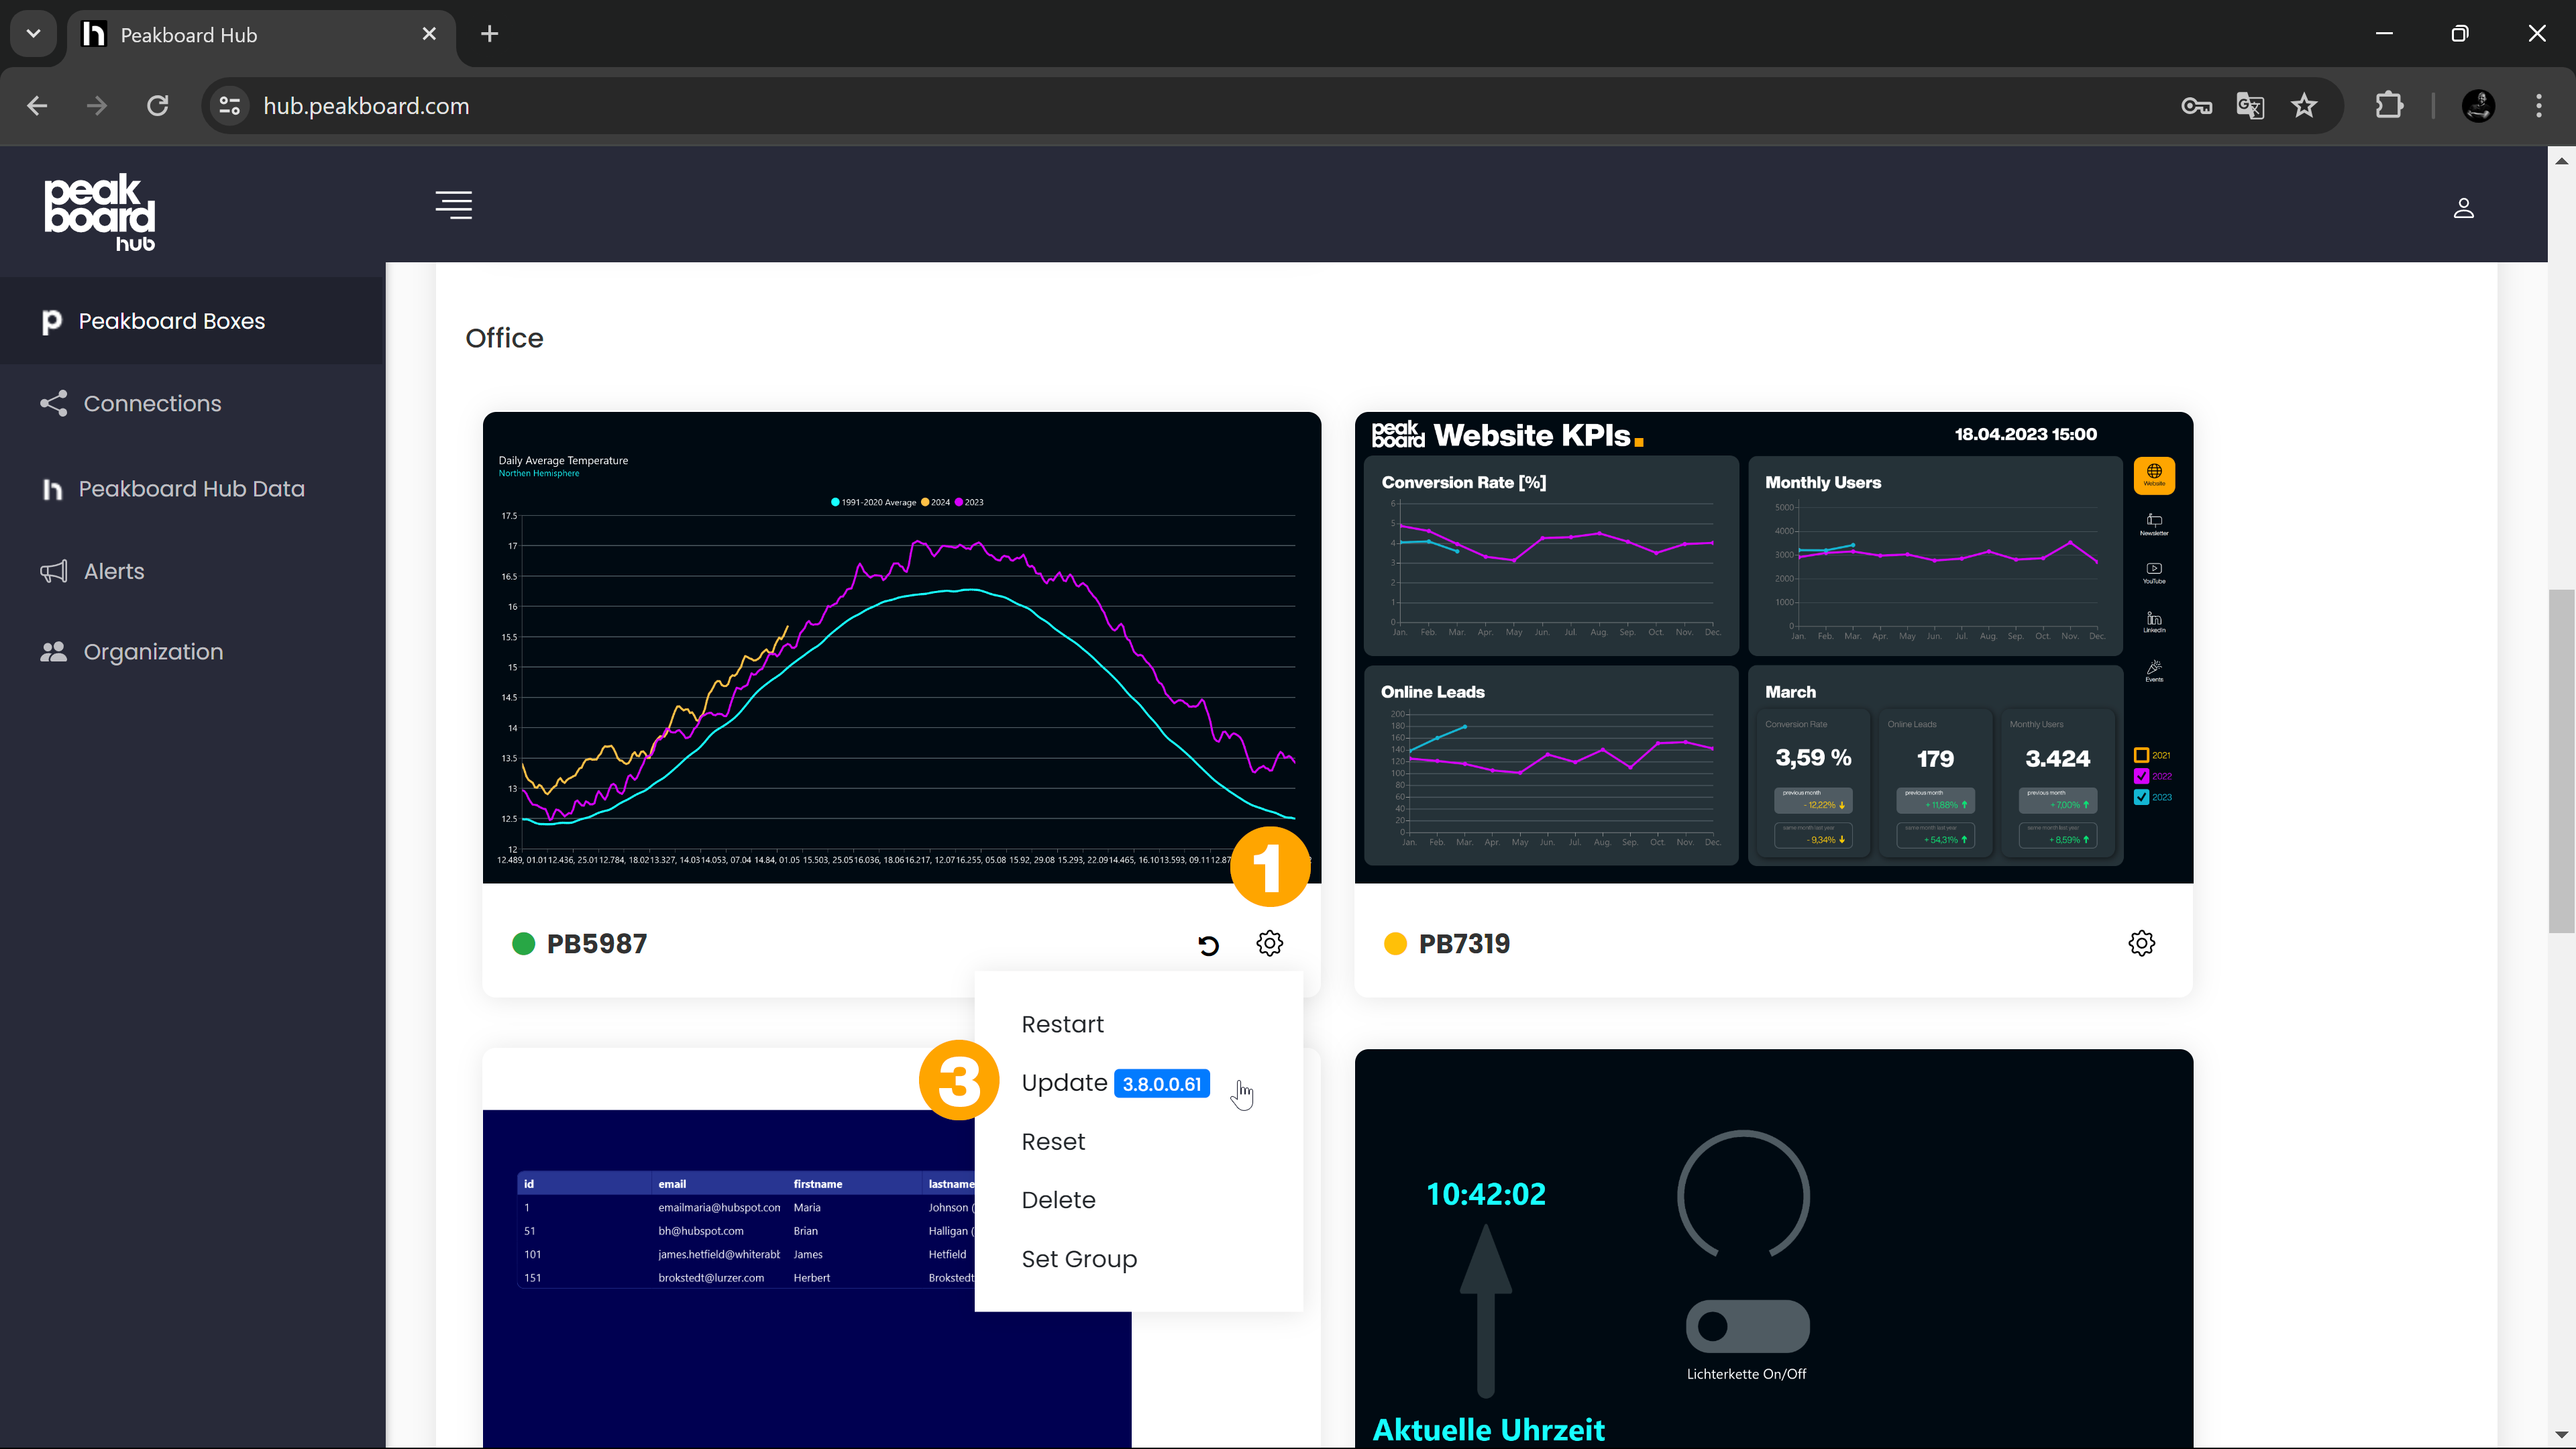
Update Peakboard Box
You can update your Peakboard Boxes directly via the Peakboard Hub online. This requires a working internet connection. The Peakboard Hub online always provides the latest version for the update process.
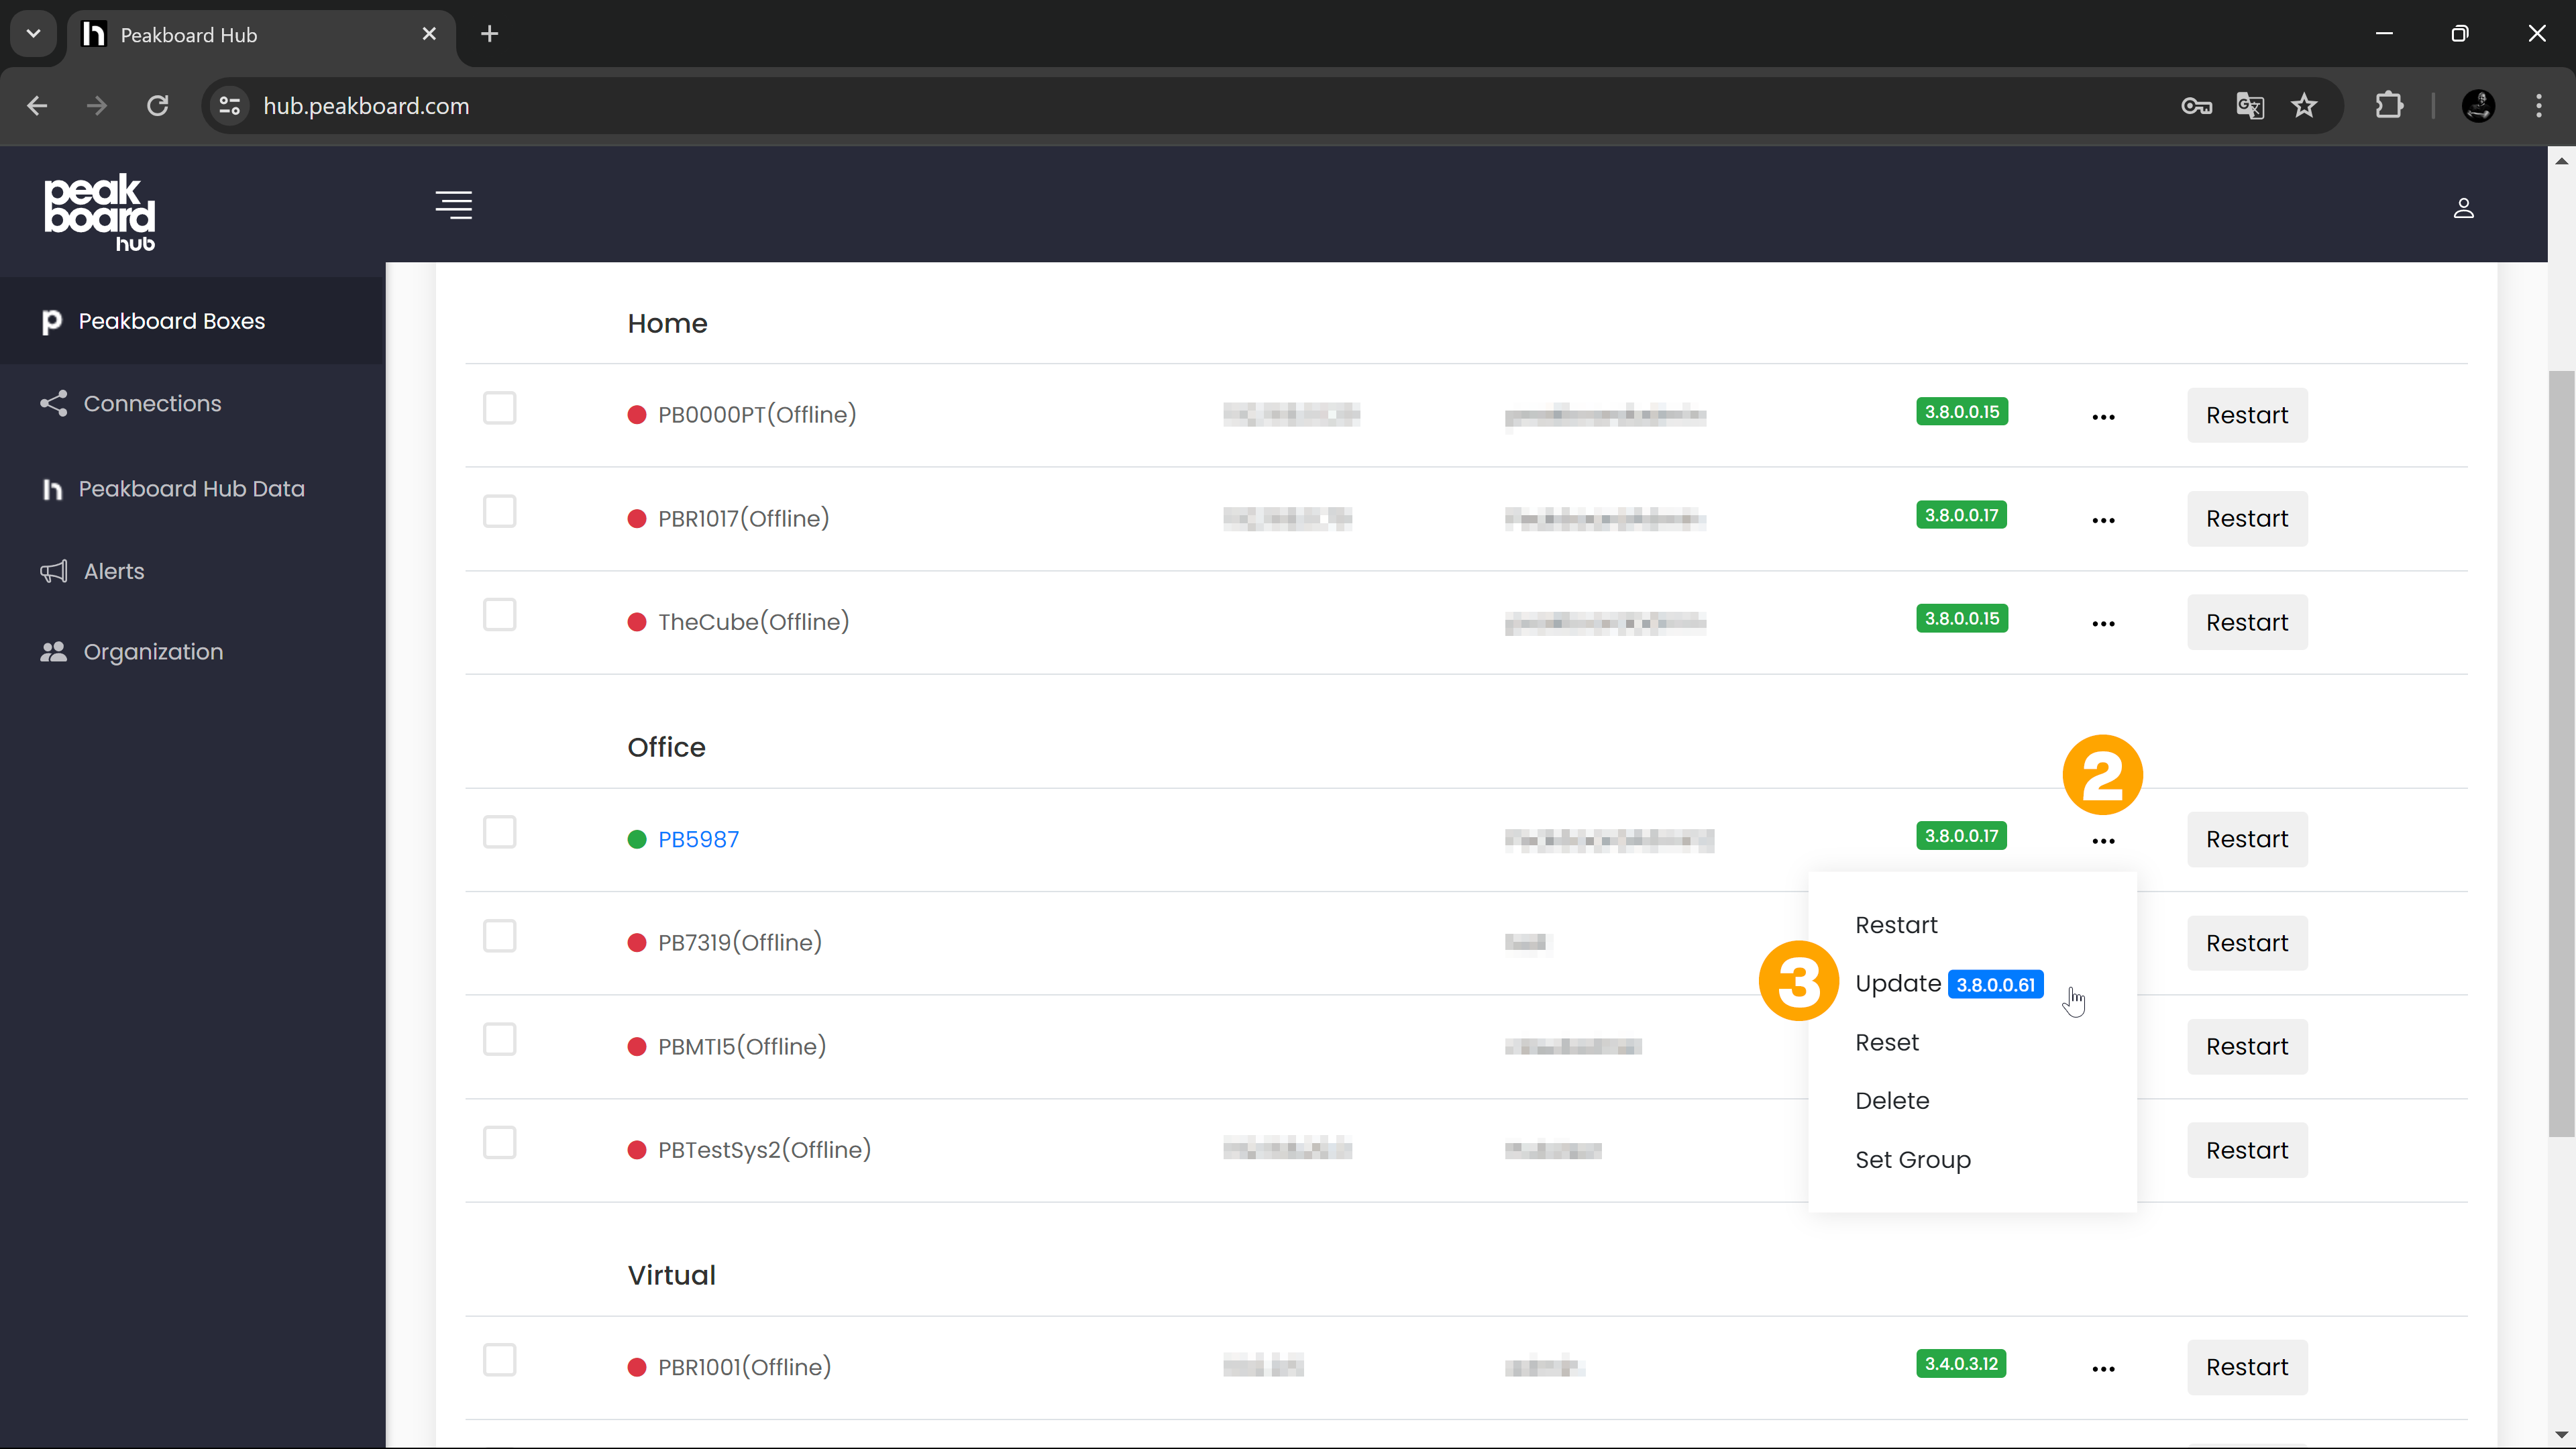
You have two options for carrying out the update. Depending on the view you have selected, you can click on the gear icon (1) or the […] icon (2) in the Peakboard Box overview and then select [Update] (3). The version that will be installed by the update is displayed behind the menu item.
Alternatively, you can see which version is currently installed in the detailed view of the Peakboard Box you want to update in the [System] tab (1) in the [System] section under [Version] (2). The version currently available for updates is displayed to the right. To perform the update, click on the update icon (3).