Data sources
MS Teams communication via MS Graph API extension
Peakboard enables two-way communication via Teams in your application. To integrate Teams into your application, you use the Microsoft Graph API extension. First read the article on the Microsoft Graph API extension data source to understand the basics.
It explains how to register an app in Microsoft Azure for communication between Peakboard and Microsoft Graph and how to install the Microsoft Graph API extension in the Peakboard Designer. Once you have completed these steps, you can start building your application for communicating in Teams in Peakboard.
Preparations in Microsoft Azure
App authorizations
For the application you need an app registered in Microsoft Azure with the following permissions:
user.read, offline_access and ChannelMessage.Read.All
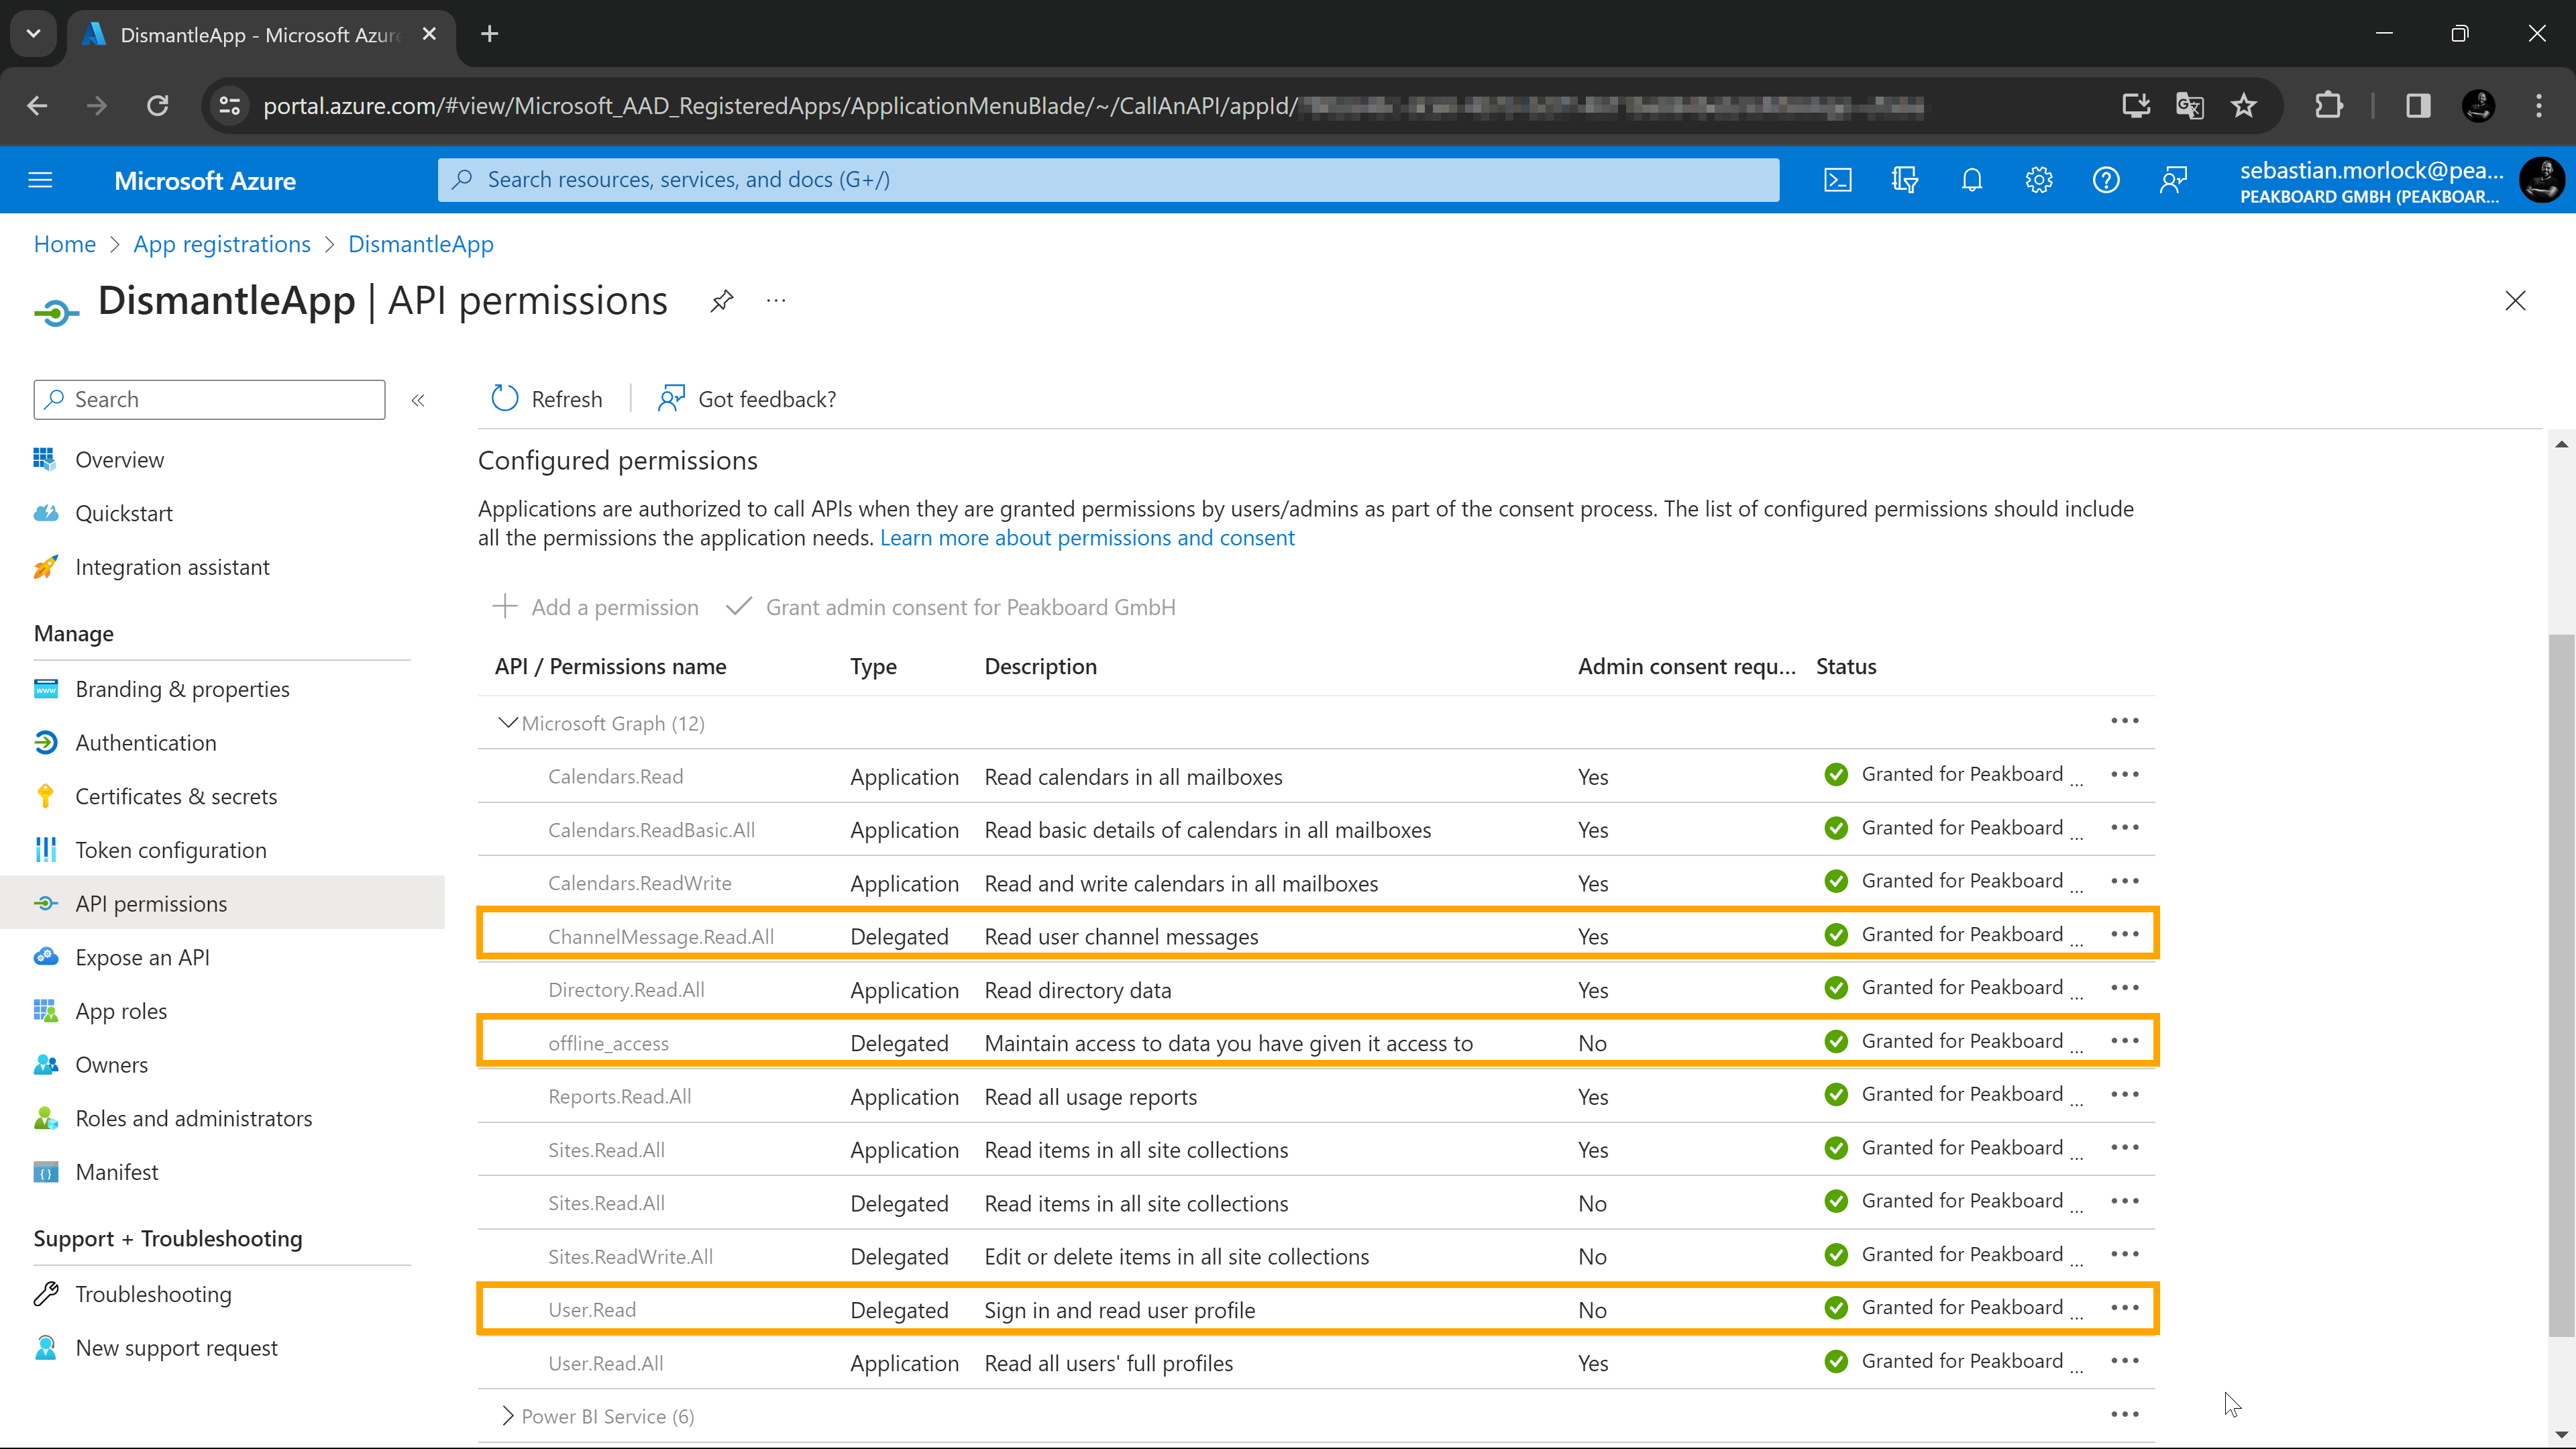
Also copy the tenant ID (1) and the client ID (2) of the app. You will need these later in the Peakboard Designer.
Find out Microsoft Teams group ID and channel ID
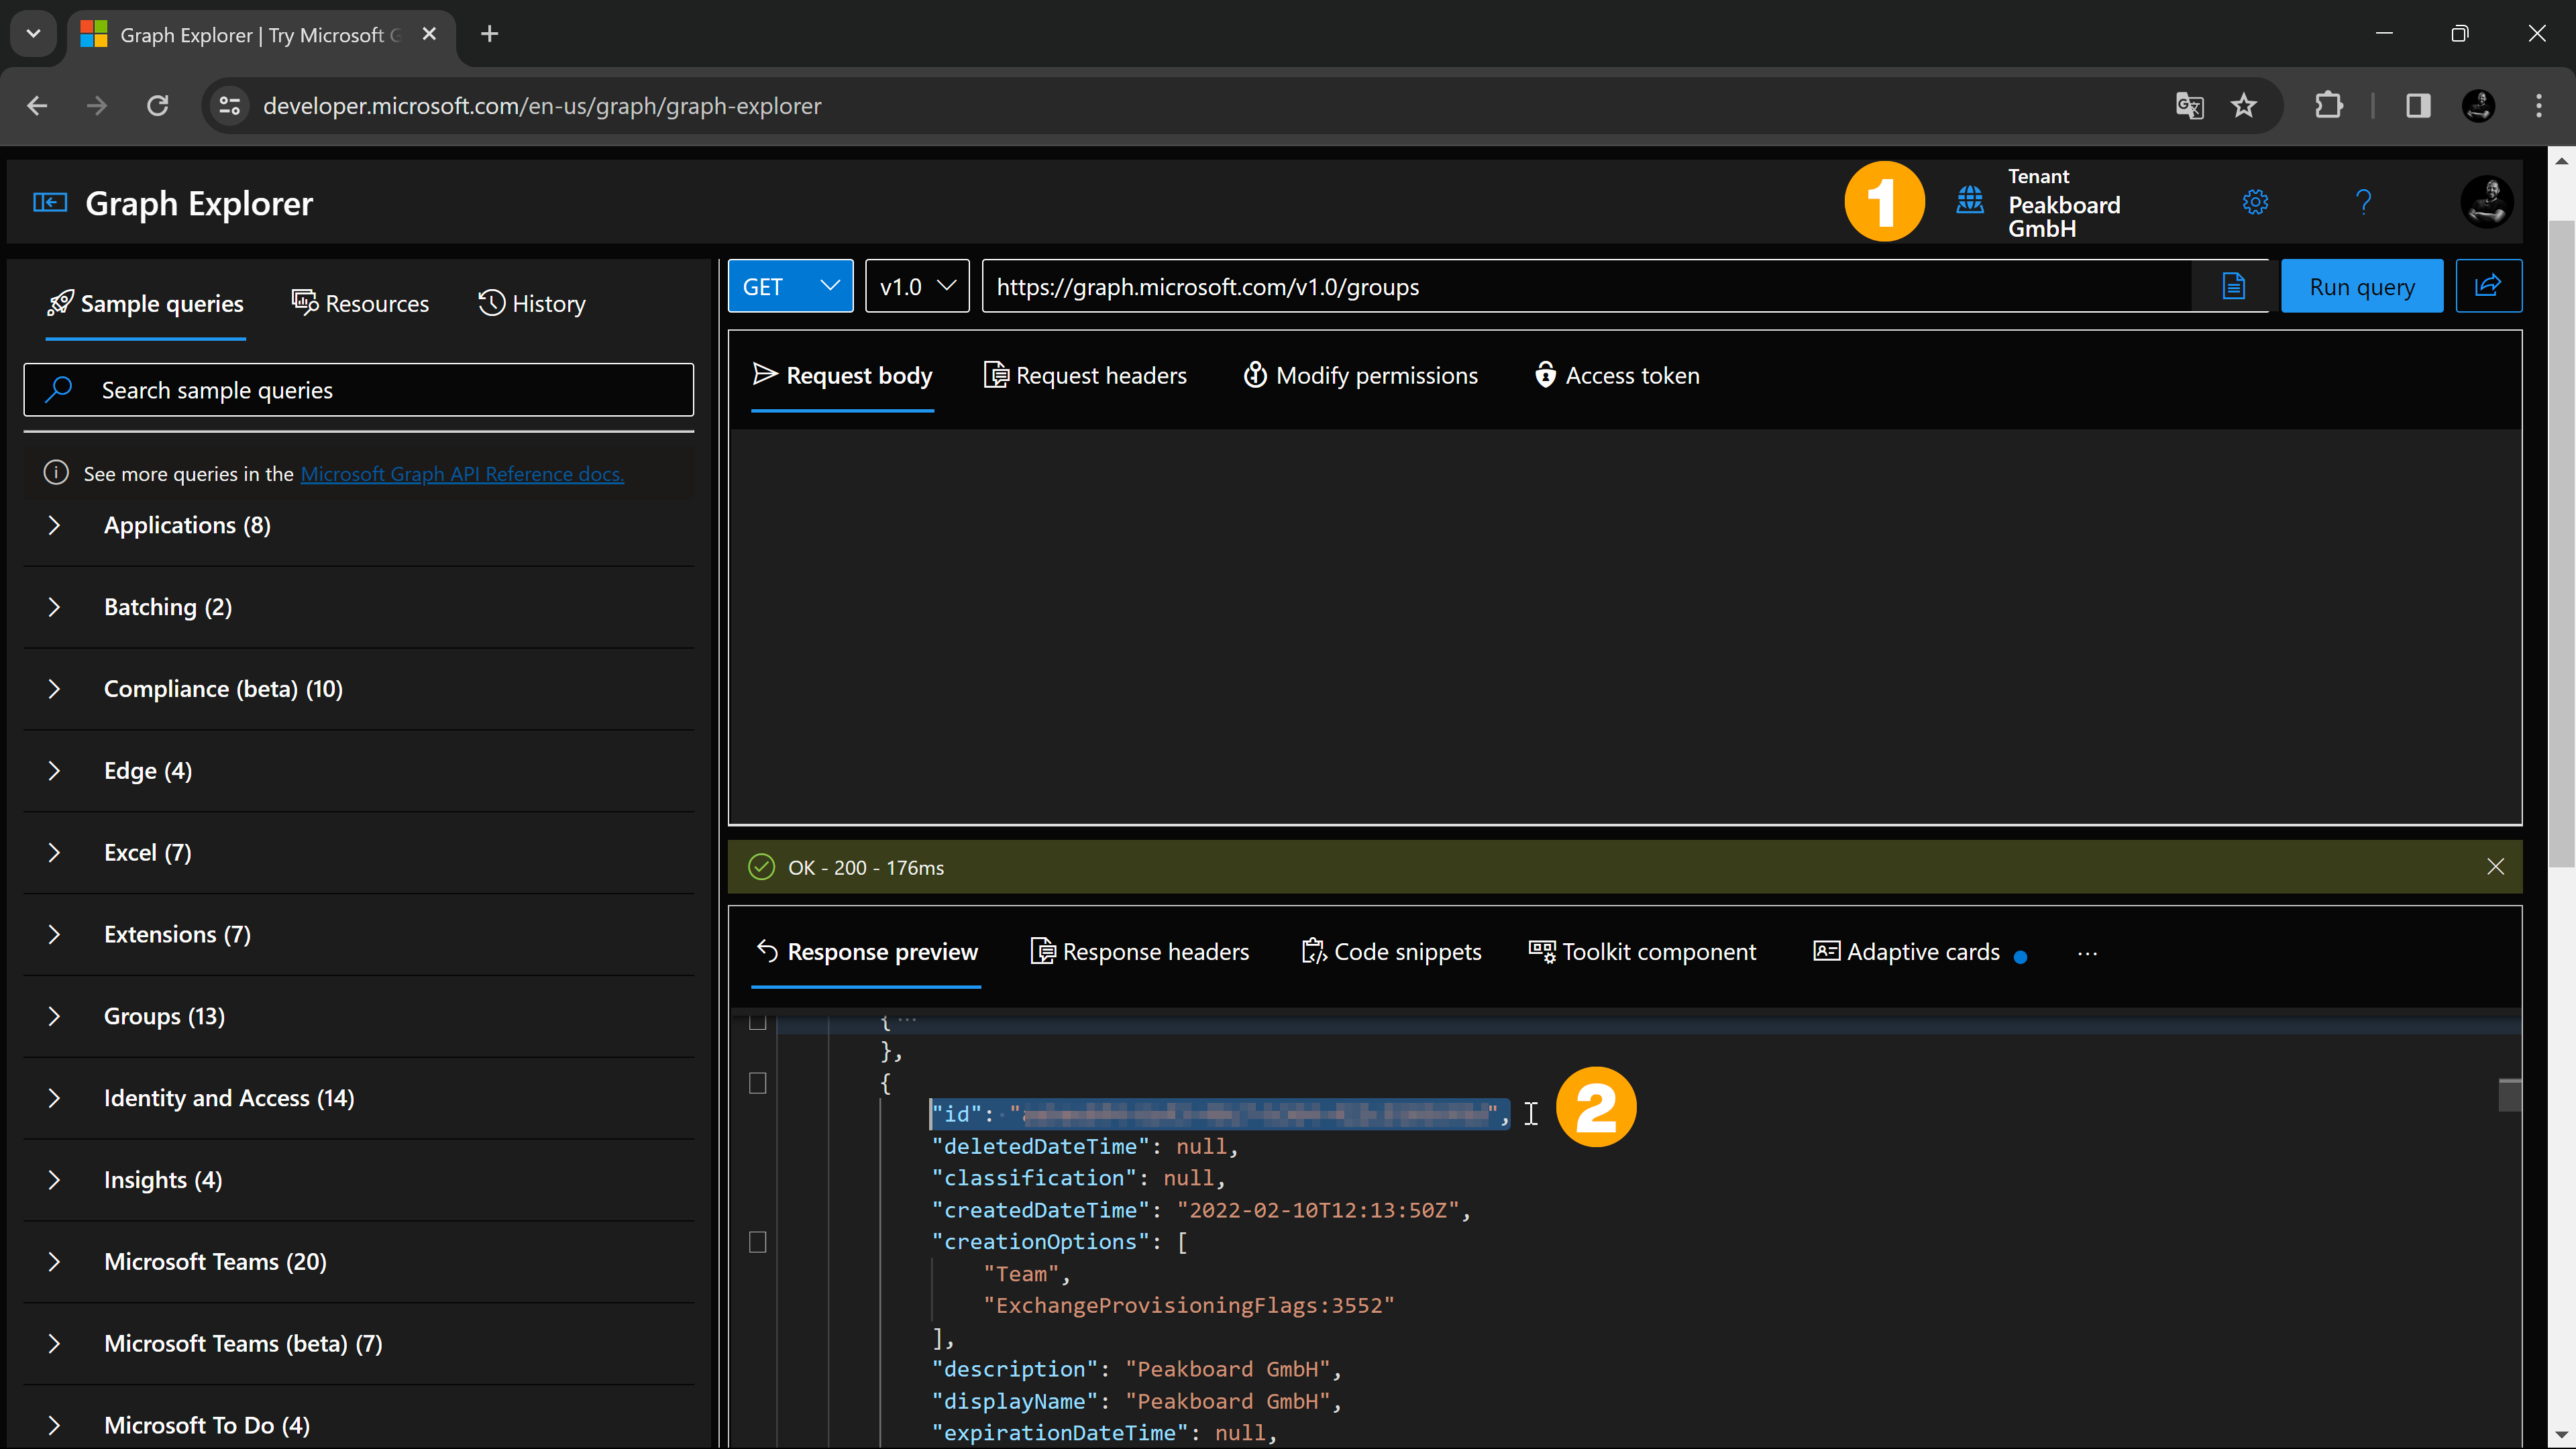
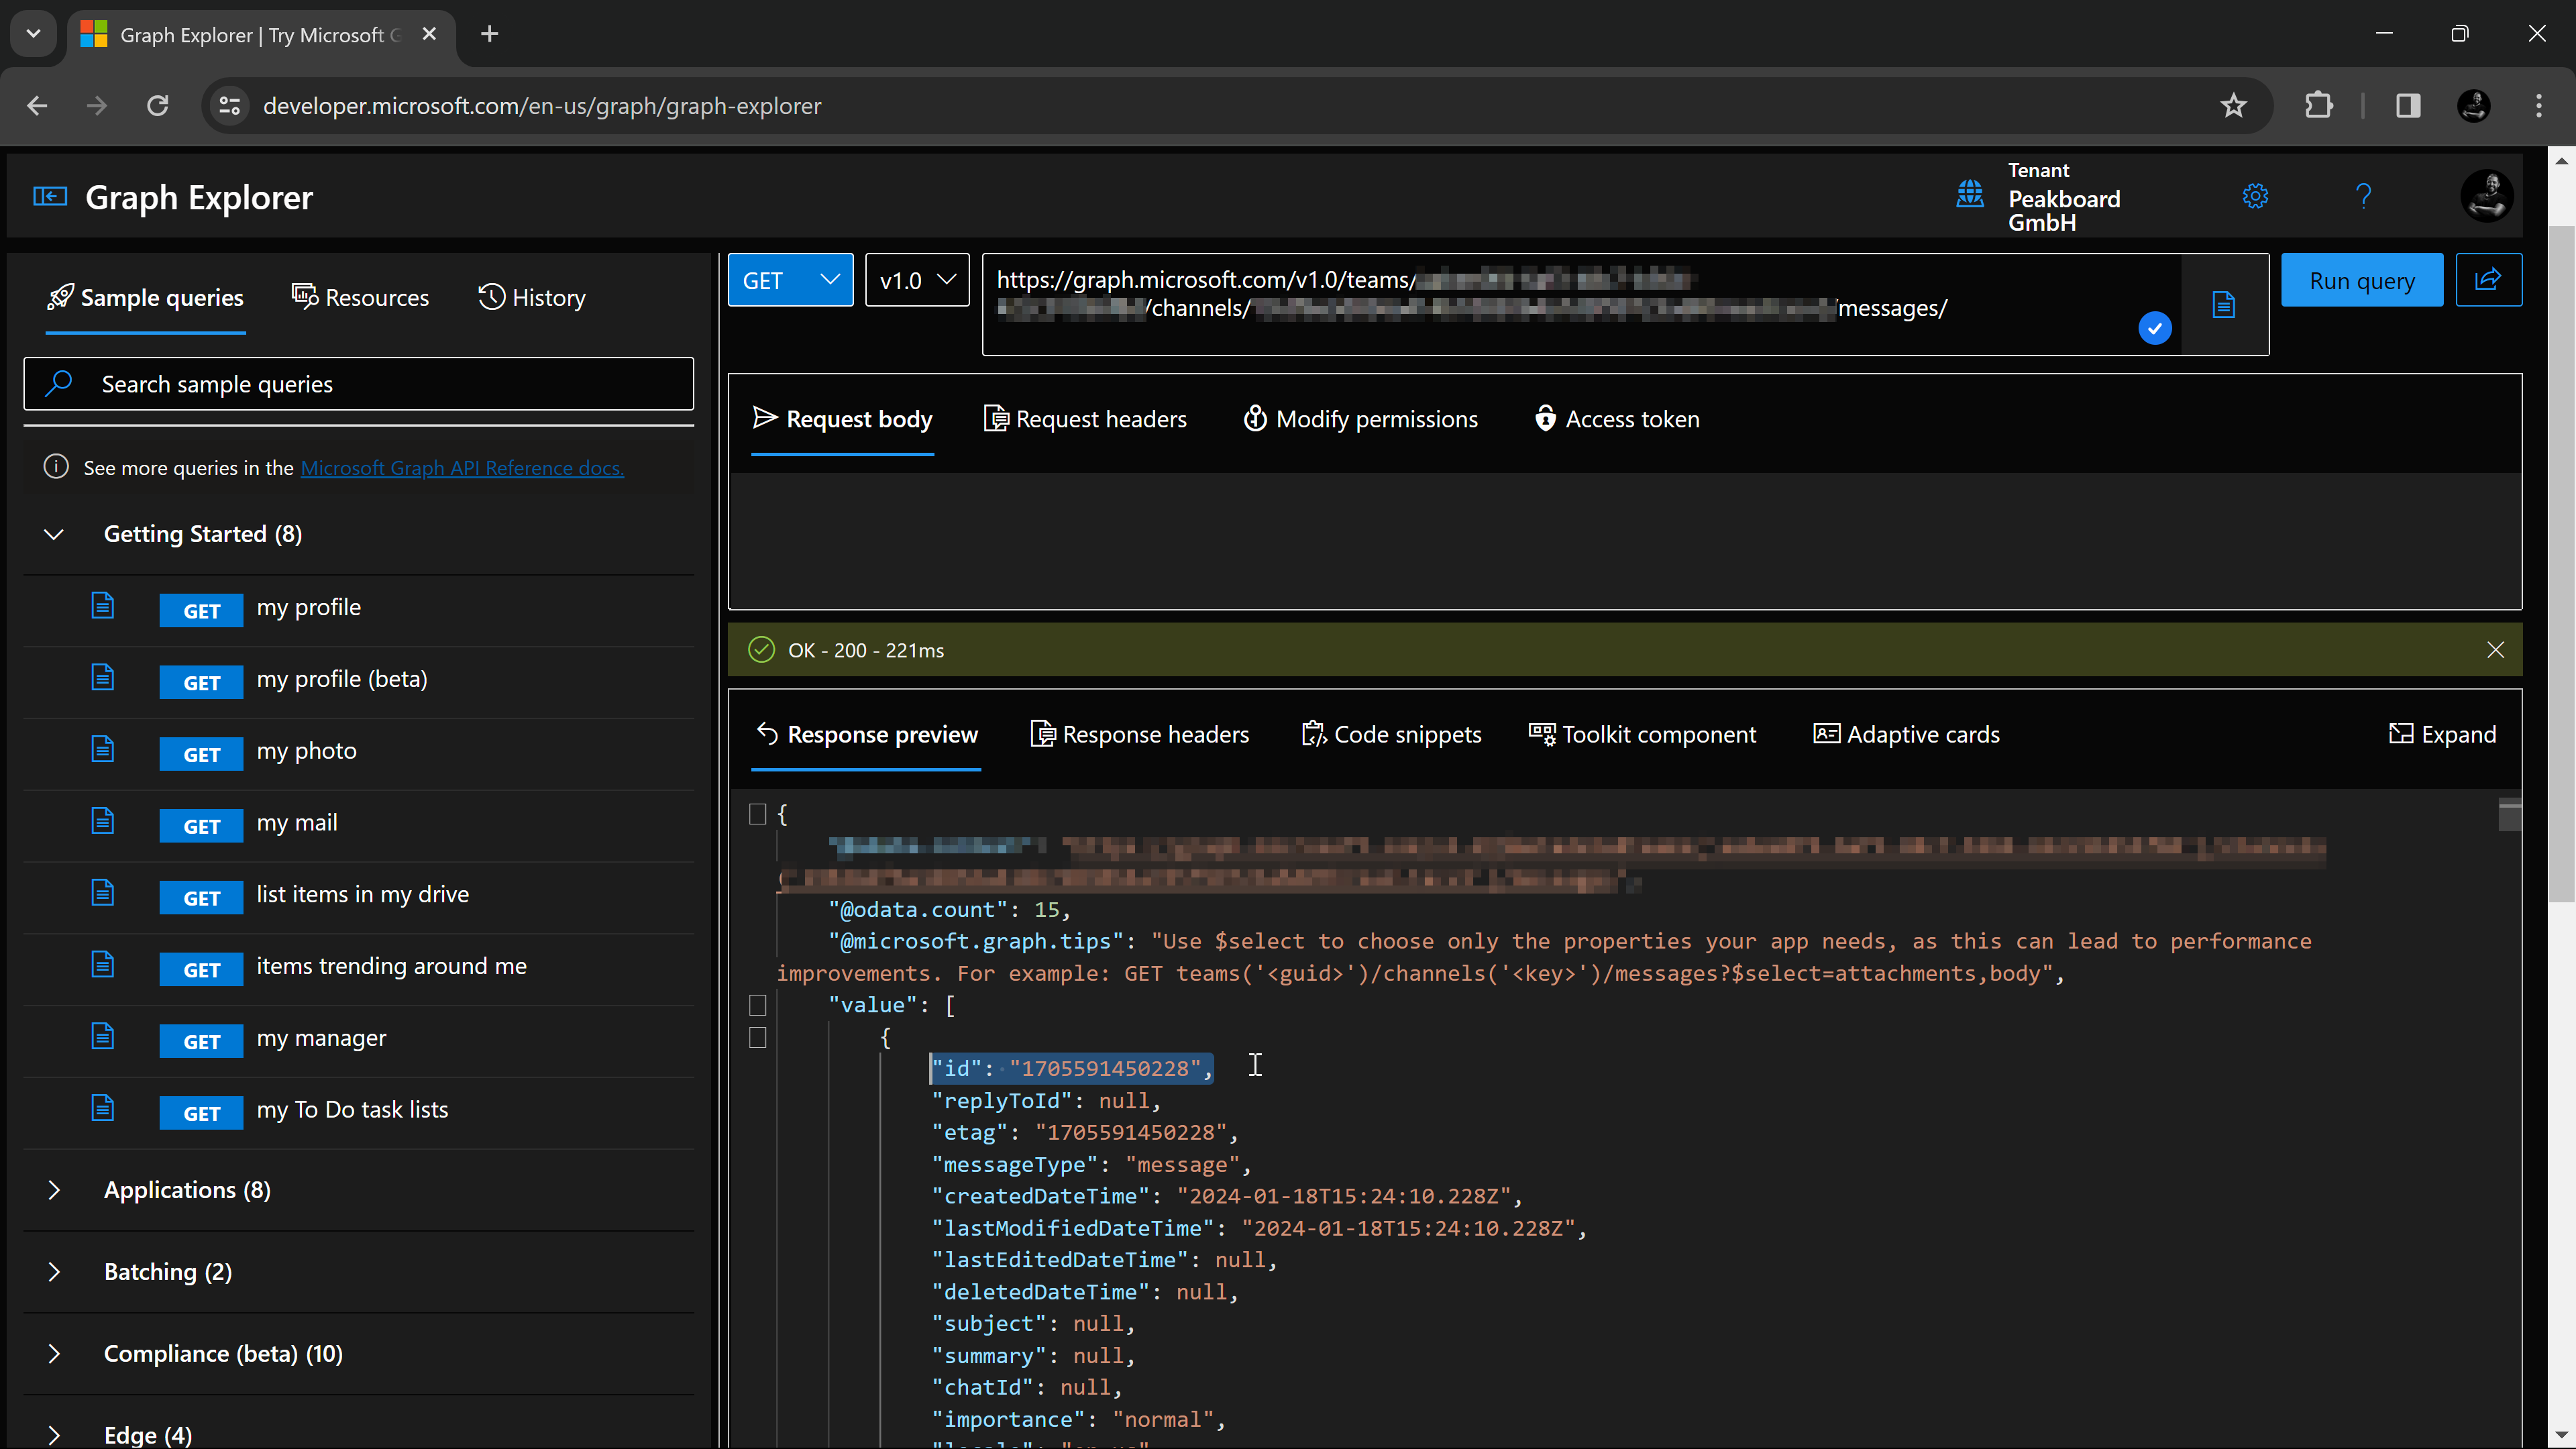
To send messages to Teams and receive messages, you use an API call. For these API calls you need the Microsoft Teams group ID and channel ID. You can find these out using the Microsoft Graph Explorer. To do this, log in to Graph Explorer with your Microsoft account (1).
Then call the following endpoint to get a list and metadata of all available teams and groups.
https://graph.microsoft.com/v1.0/groups
In the response, search for the team in which you want to communicate and copy its ID (2).
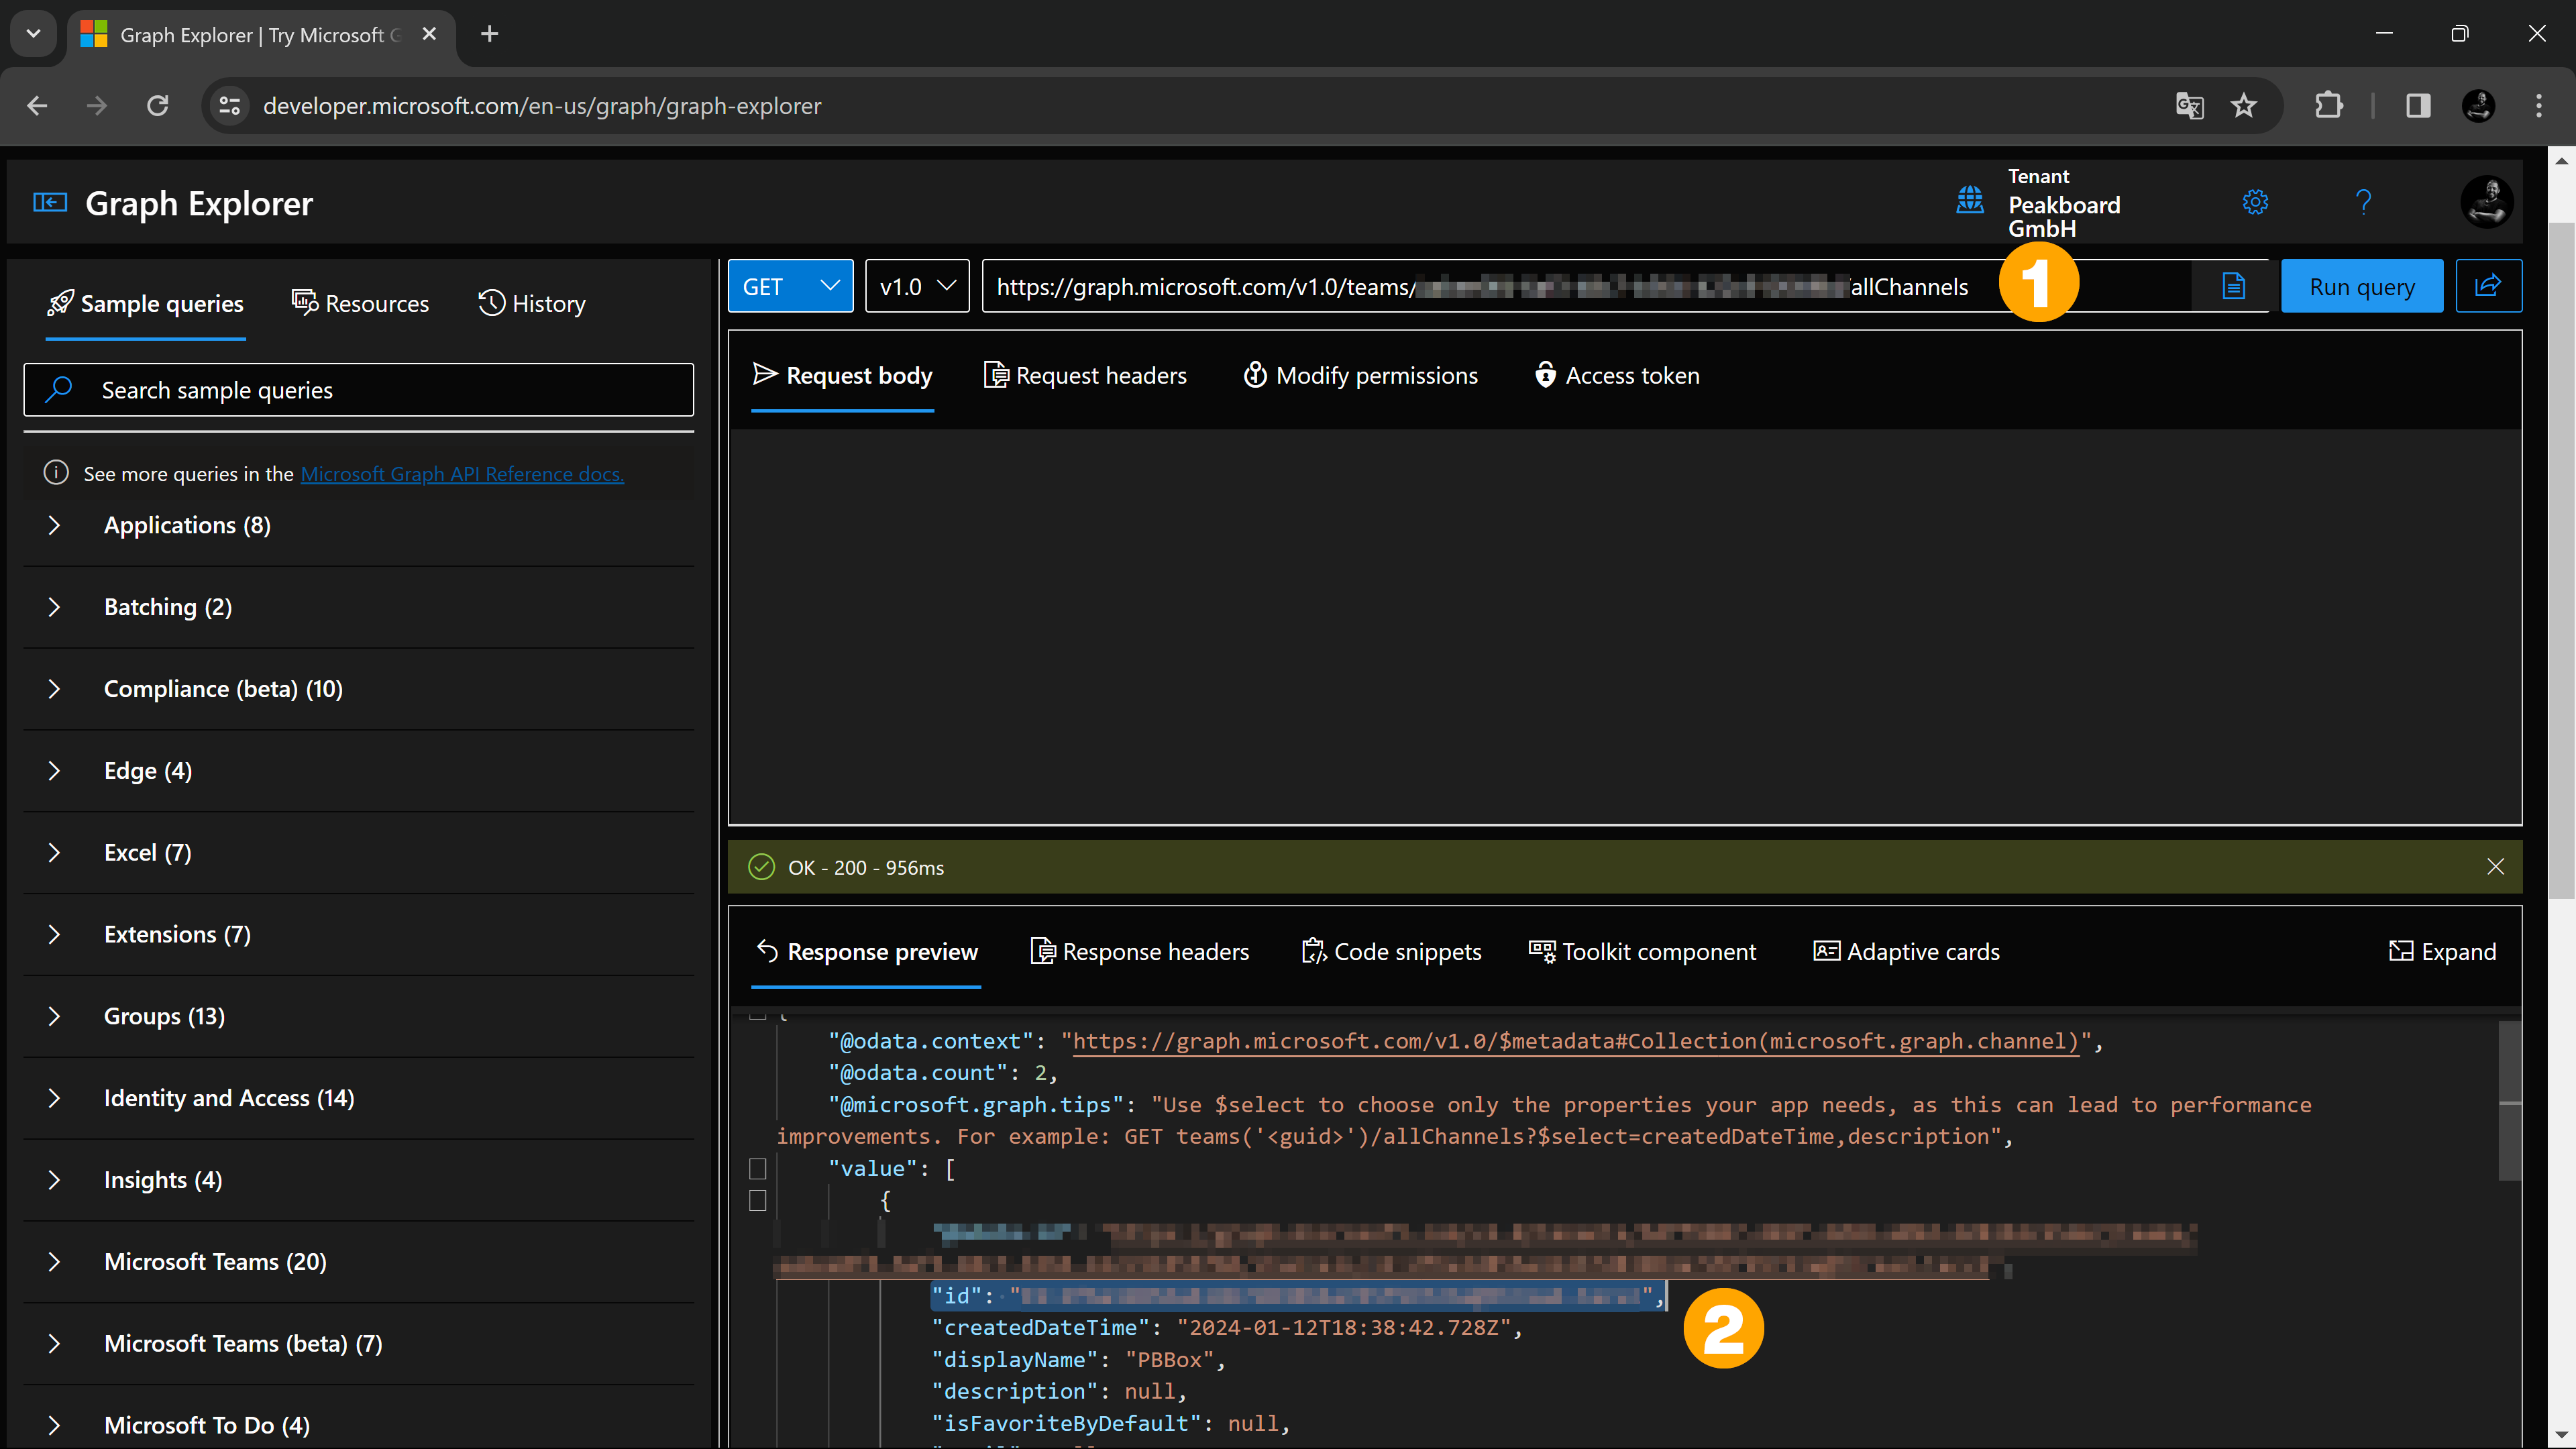
Then call the following endpoint and replace [GroupID] with the group ID you just copied (1).
https://graph.microsoft.com/v1.0/teams/[GroupID]/allChannels
In the response, search for the channel you want to use for communication and copy its ID (2).
Preparations in the Peakboard Designer
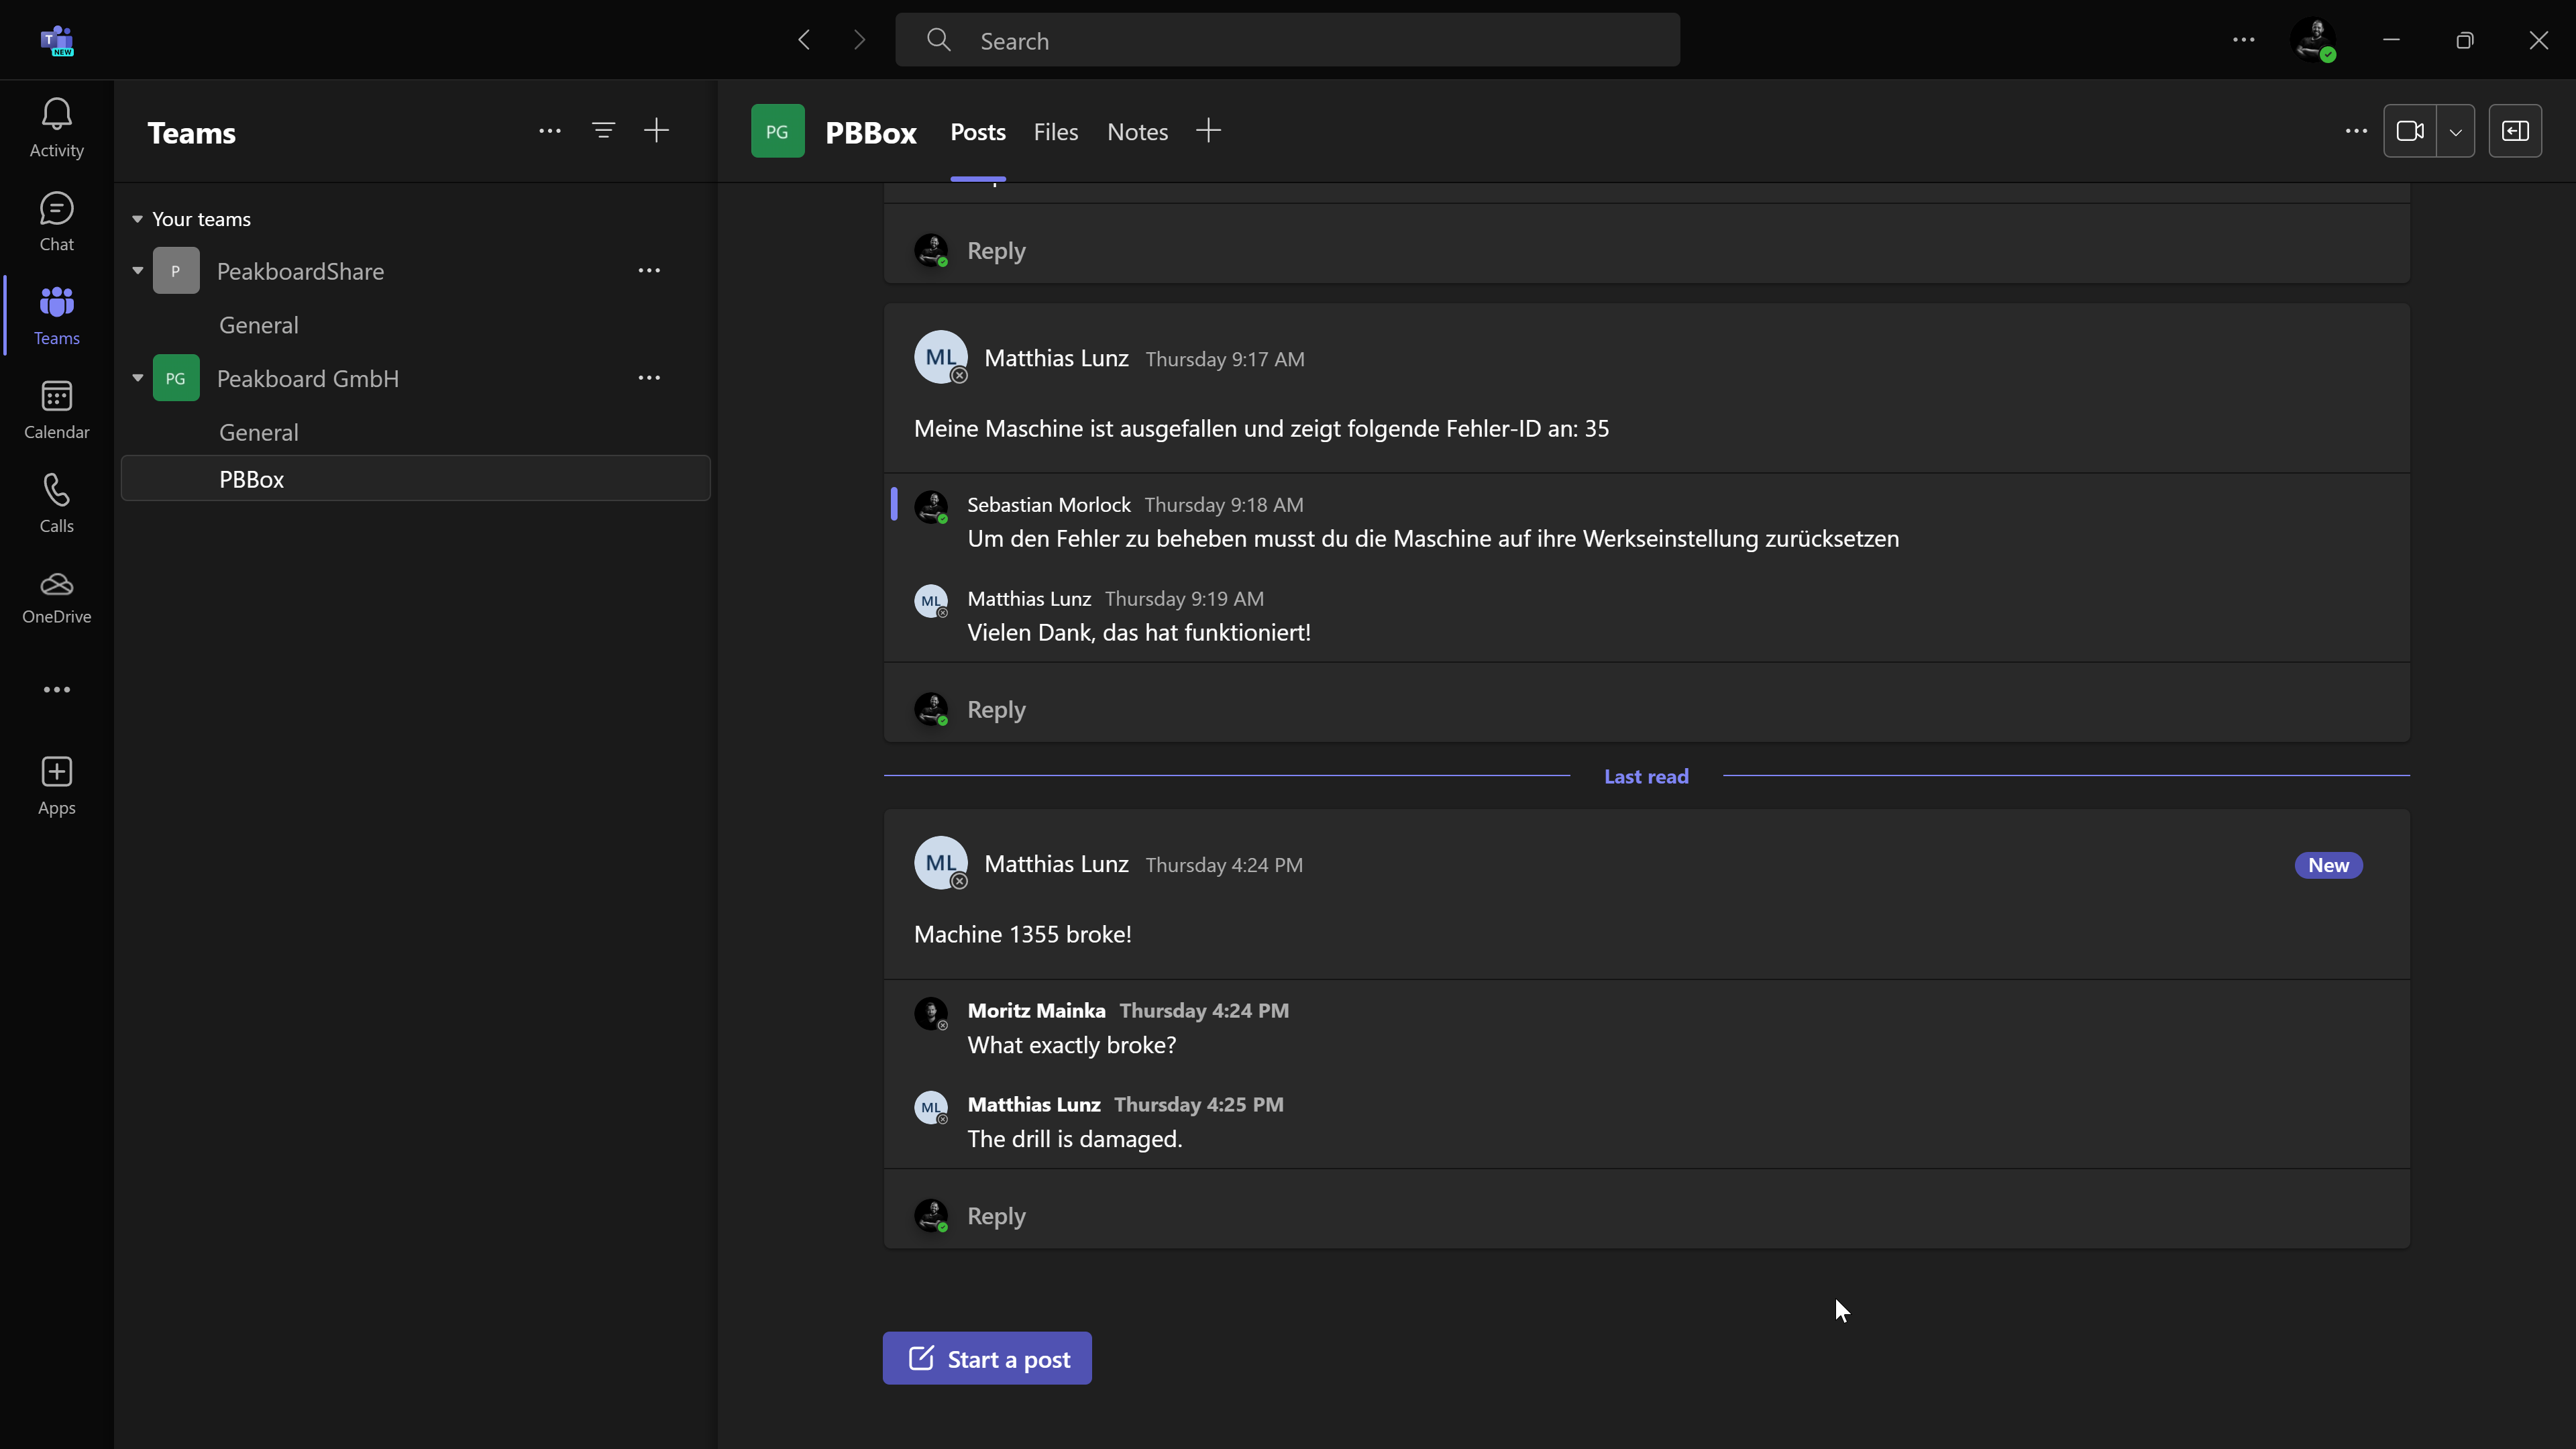
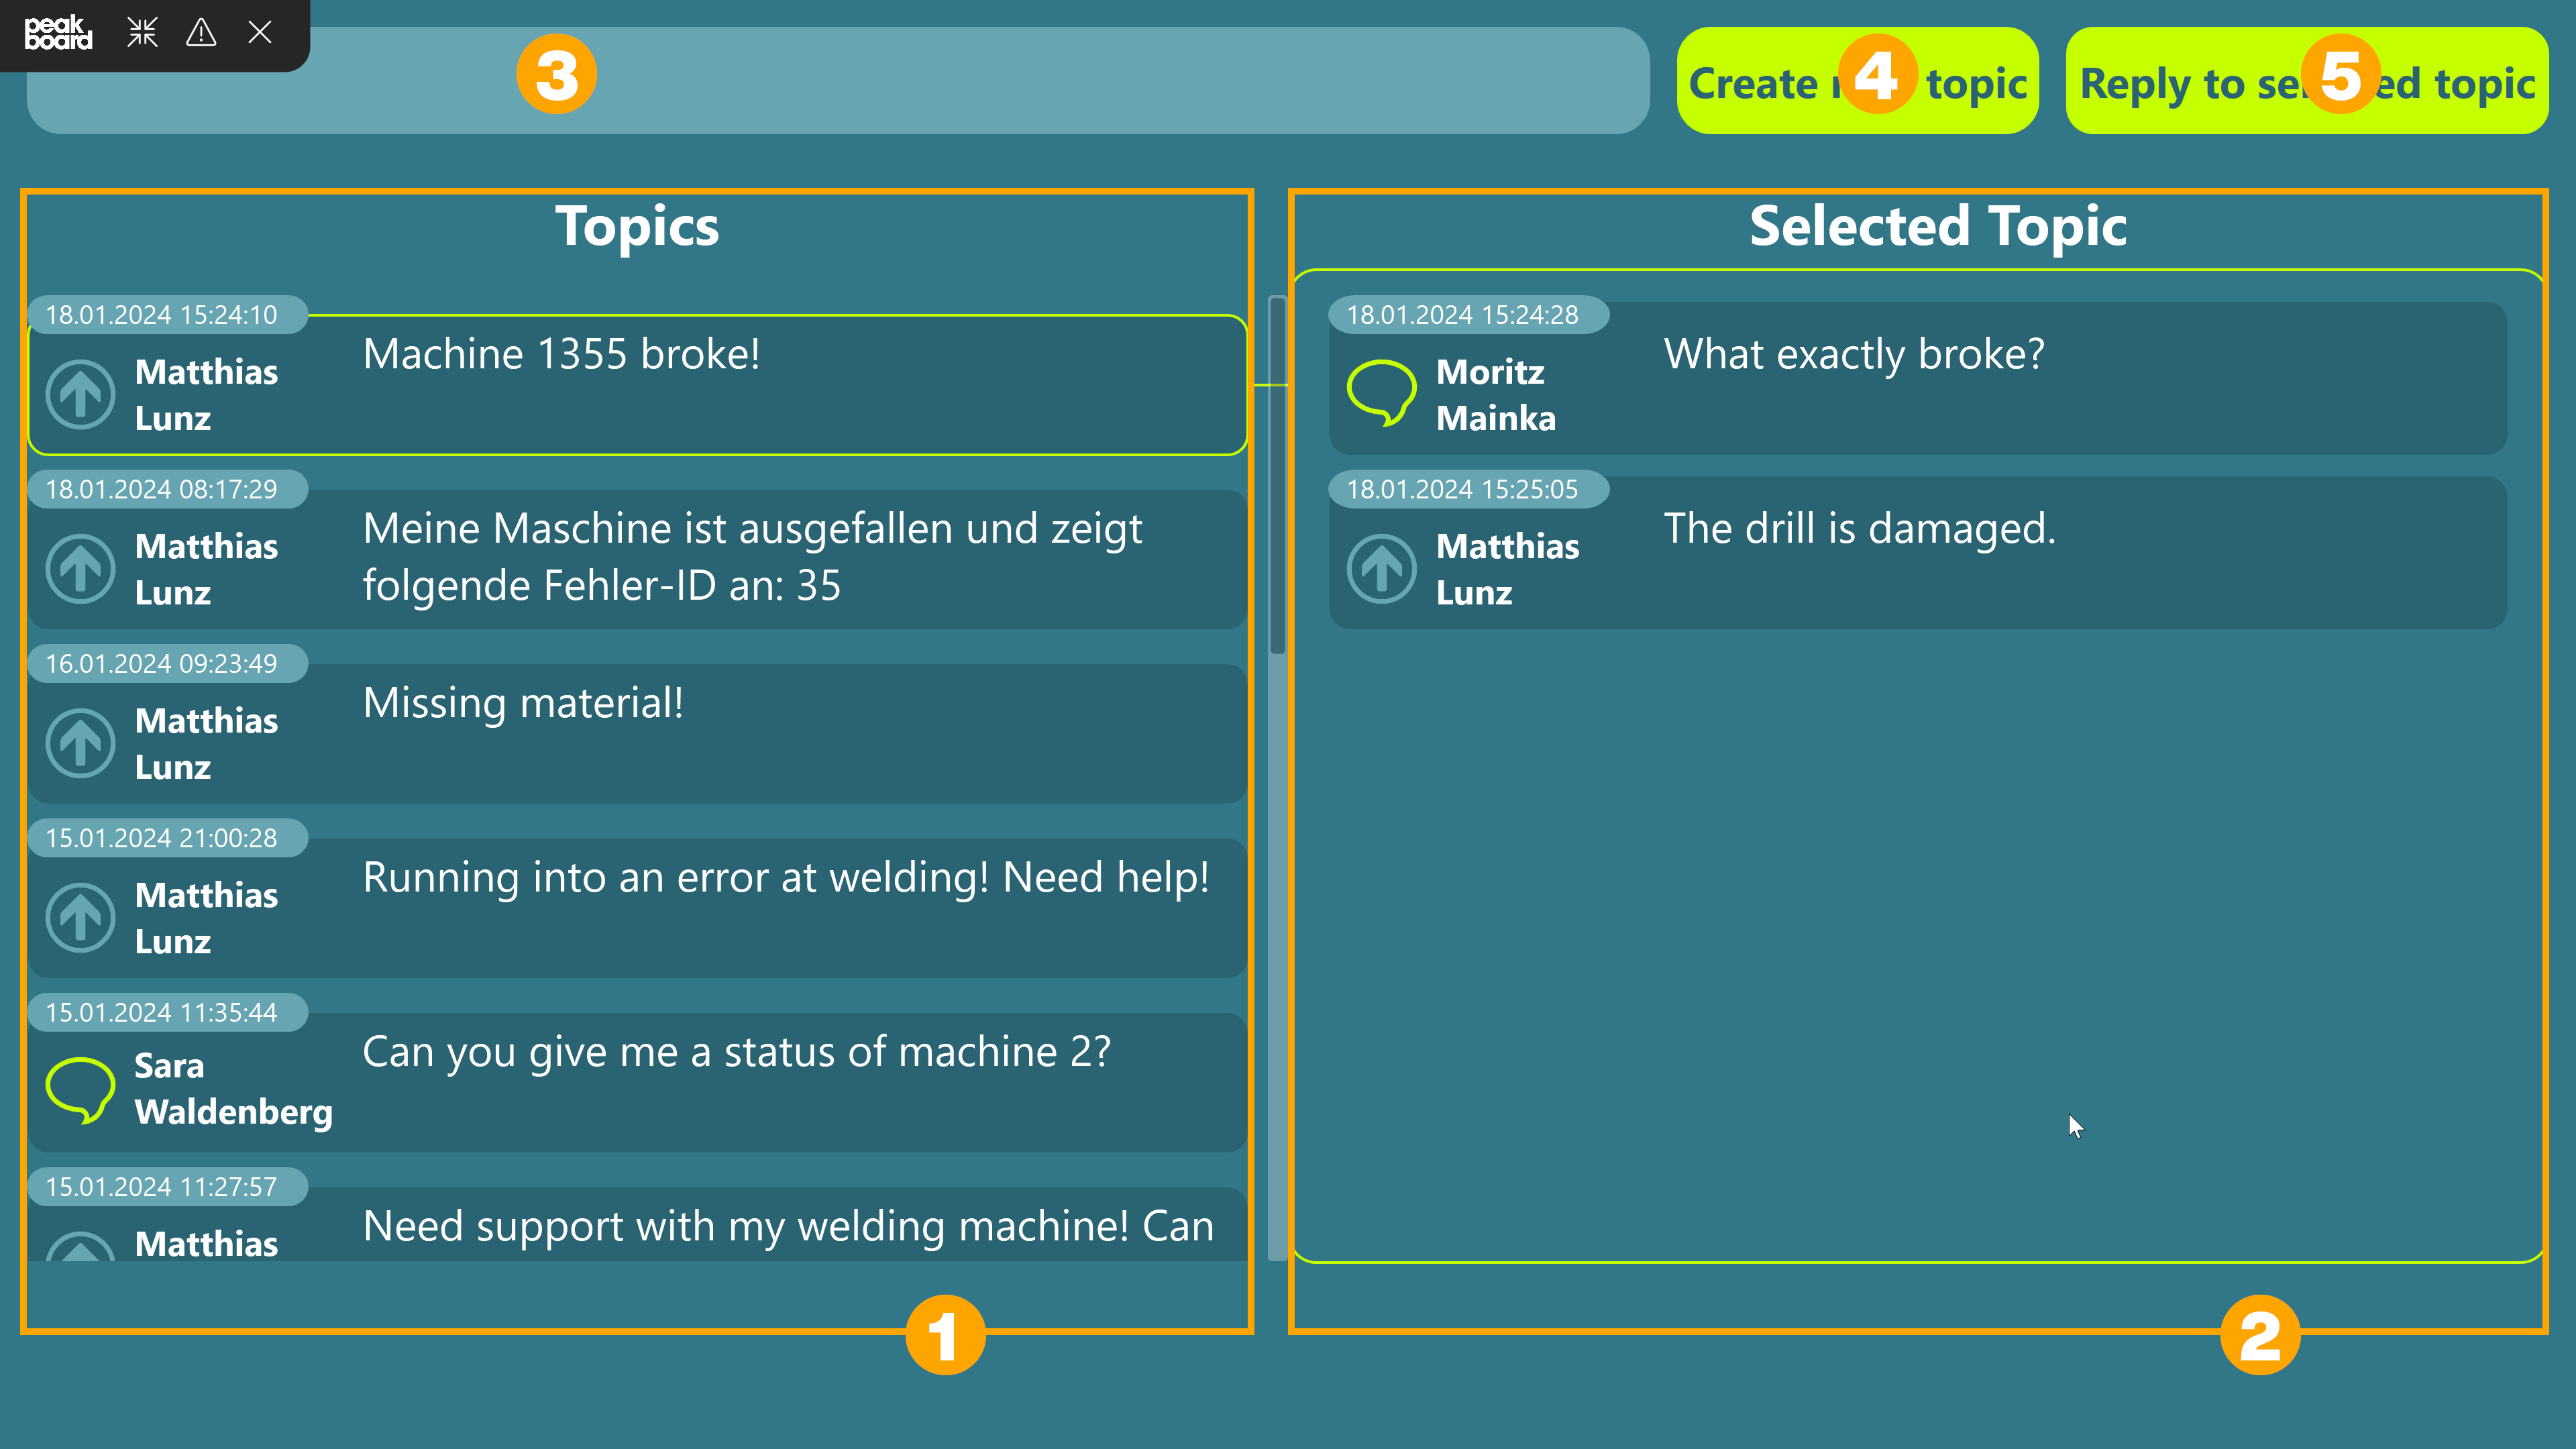
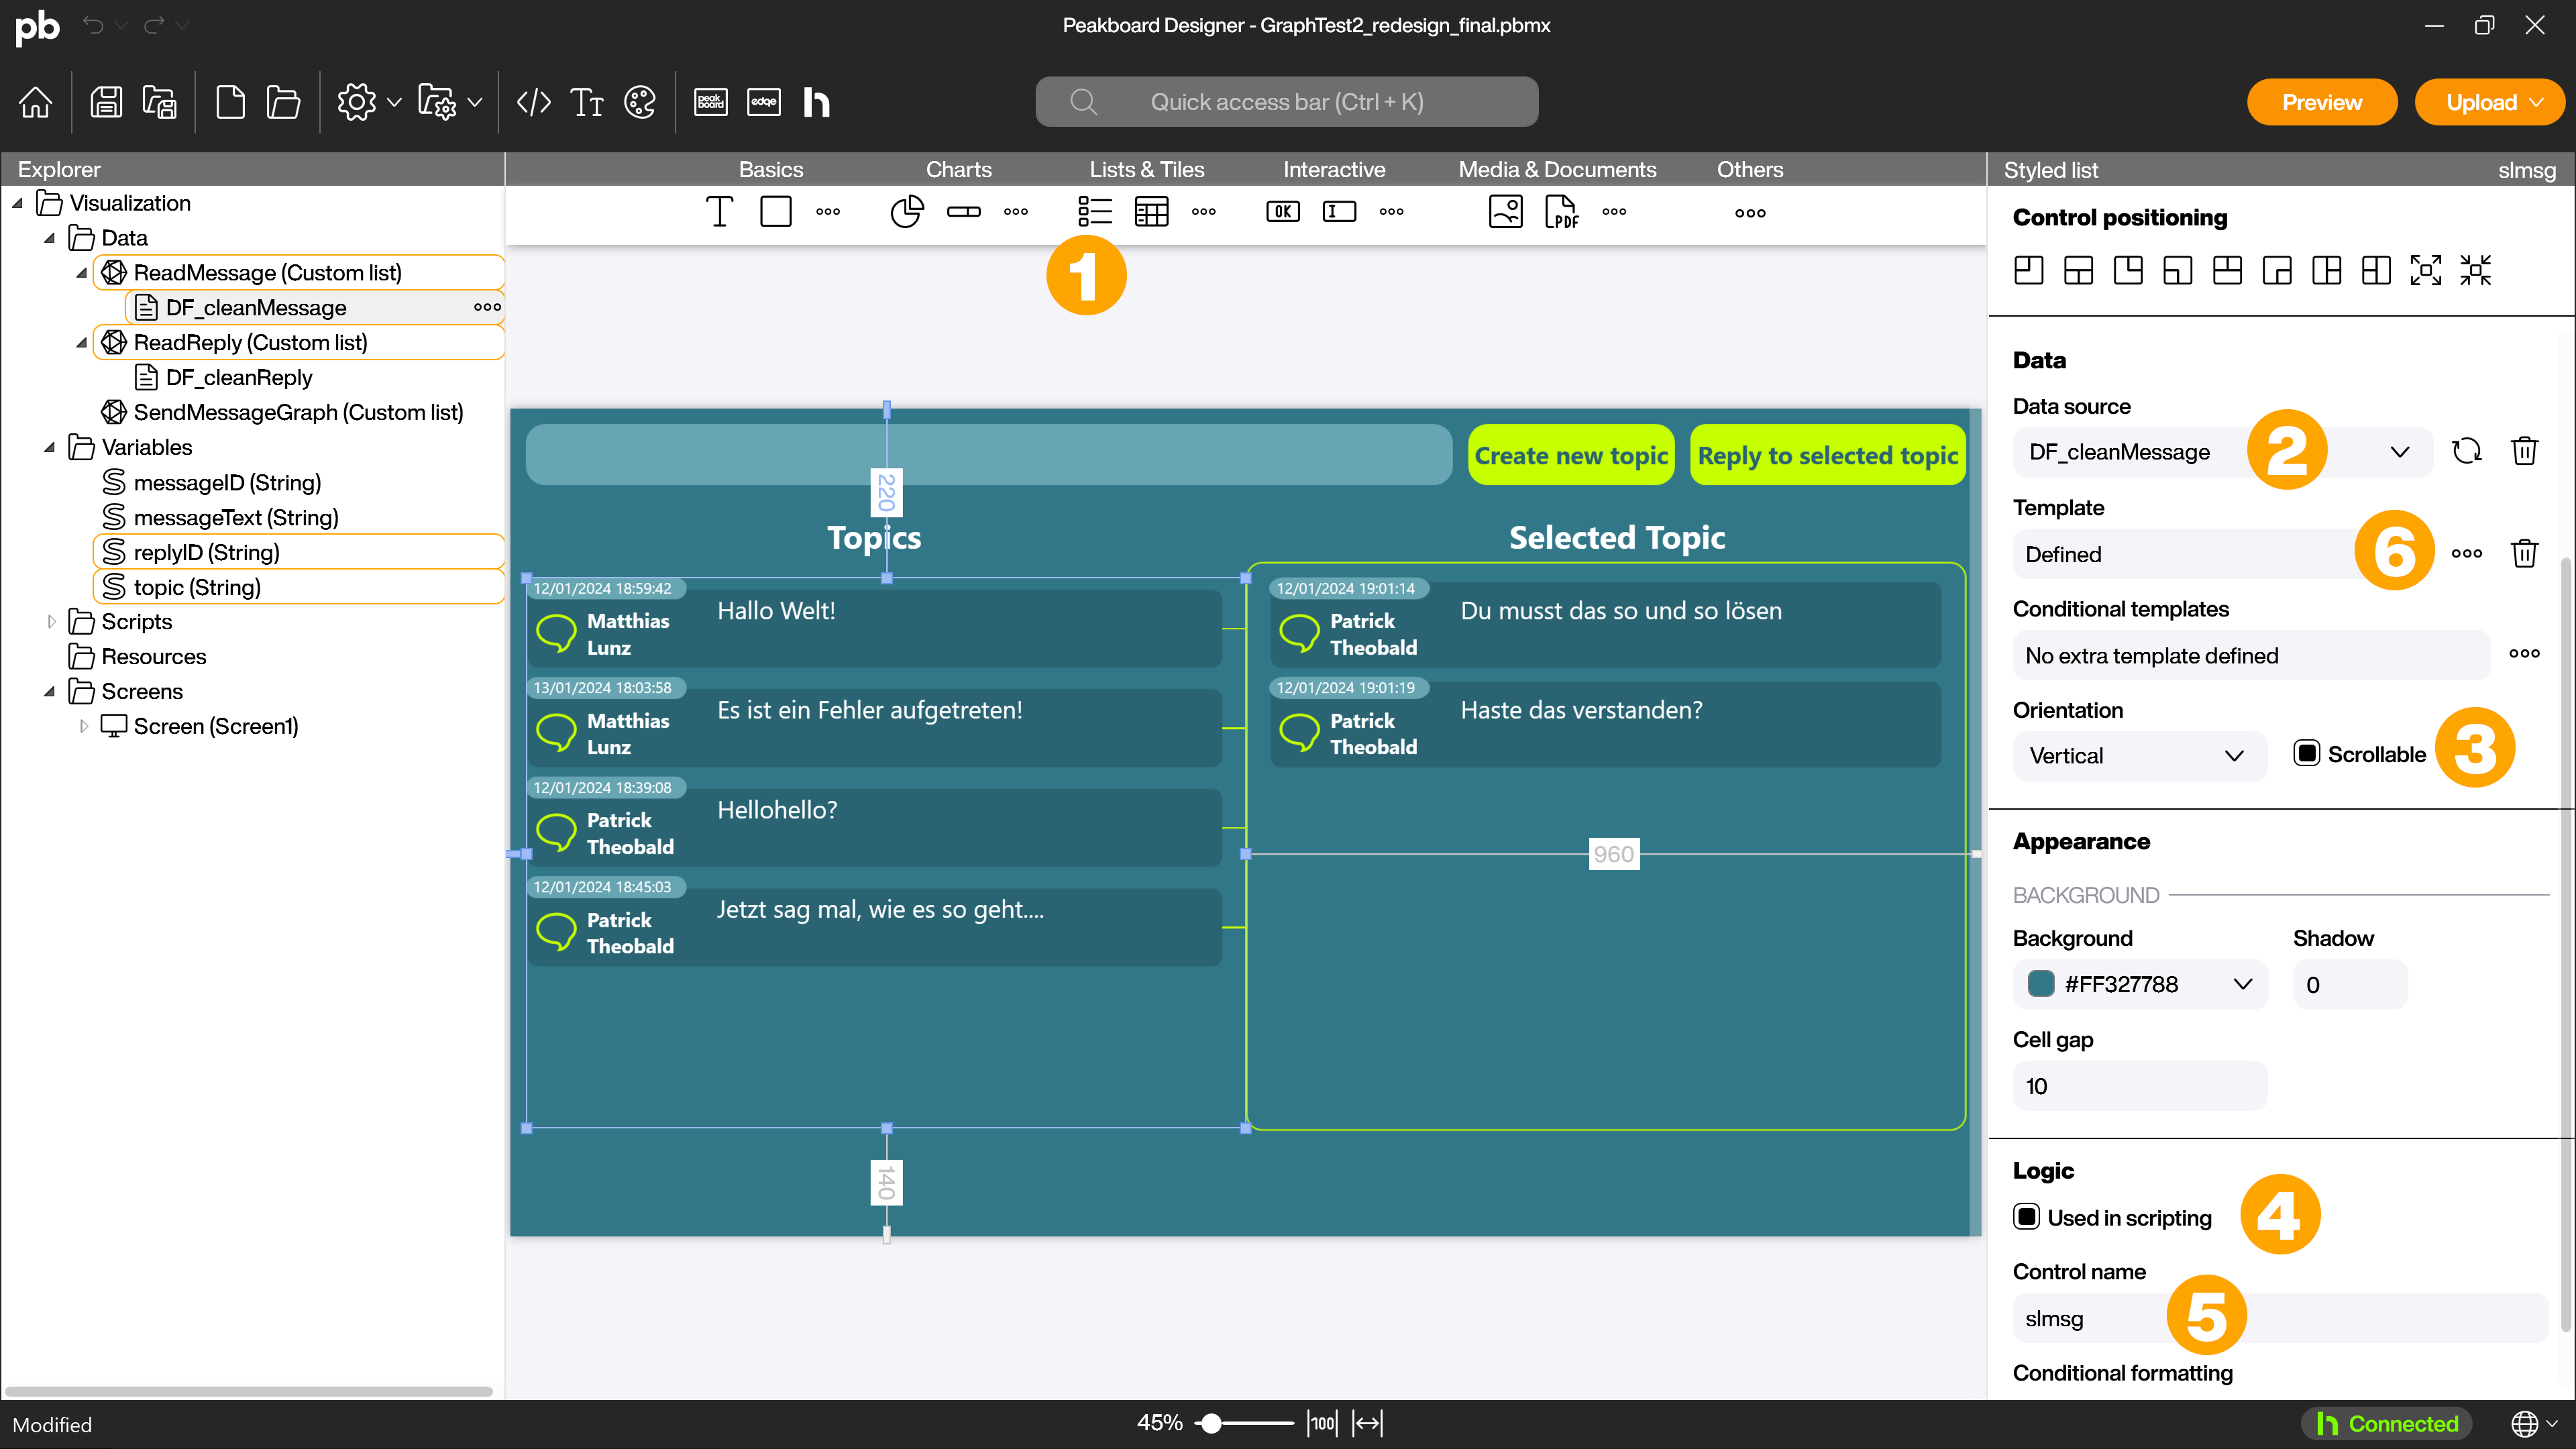
The aim is to create a message board via which all communication from the application can take place. The left-hand section (1) lists the messages available in the channel. In the right-hand area (2) you will find the replies to the message that you have selected in the left-hand area. In the upper area there is an input field (3) and two sending options. Use [New topic] (4) to create a new Teams message in the channel. Use [Reply to selected topic] (5) to send the input as a reply to the message currently selected in the left-hand area.
Creating the variables
You will need variables both for the API calls themselves and for scripts later on. Create the following four variables by right-clicking on [Variables] and selecting [Add variable]
messageID
Give the variable its name (1), select the data type string (2) and enter your Teams channel ID (3) as the value. Activate the checkbox [Save variable on Peakboard box] (4) and confirm the creation with [OK] (5).
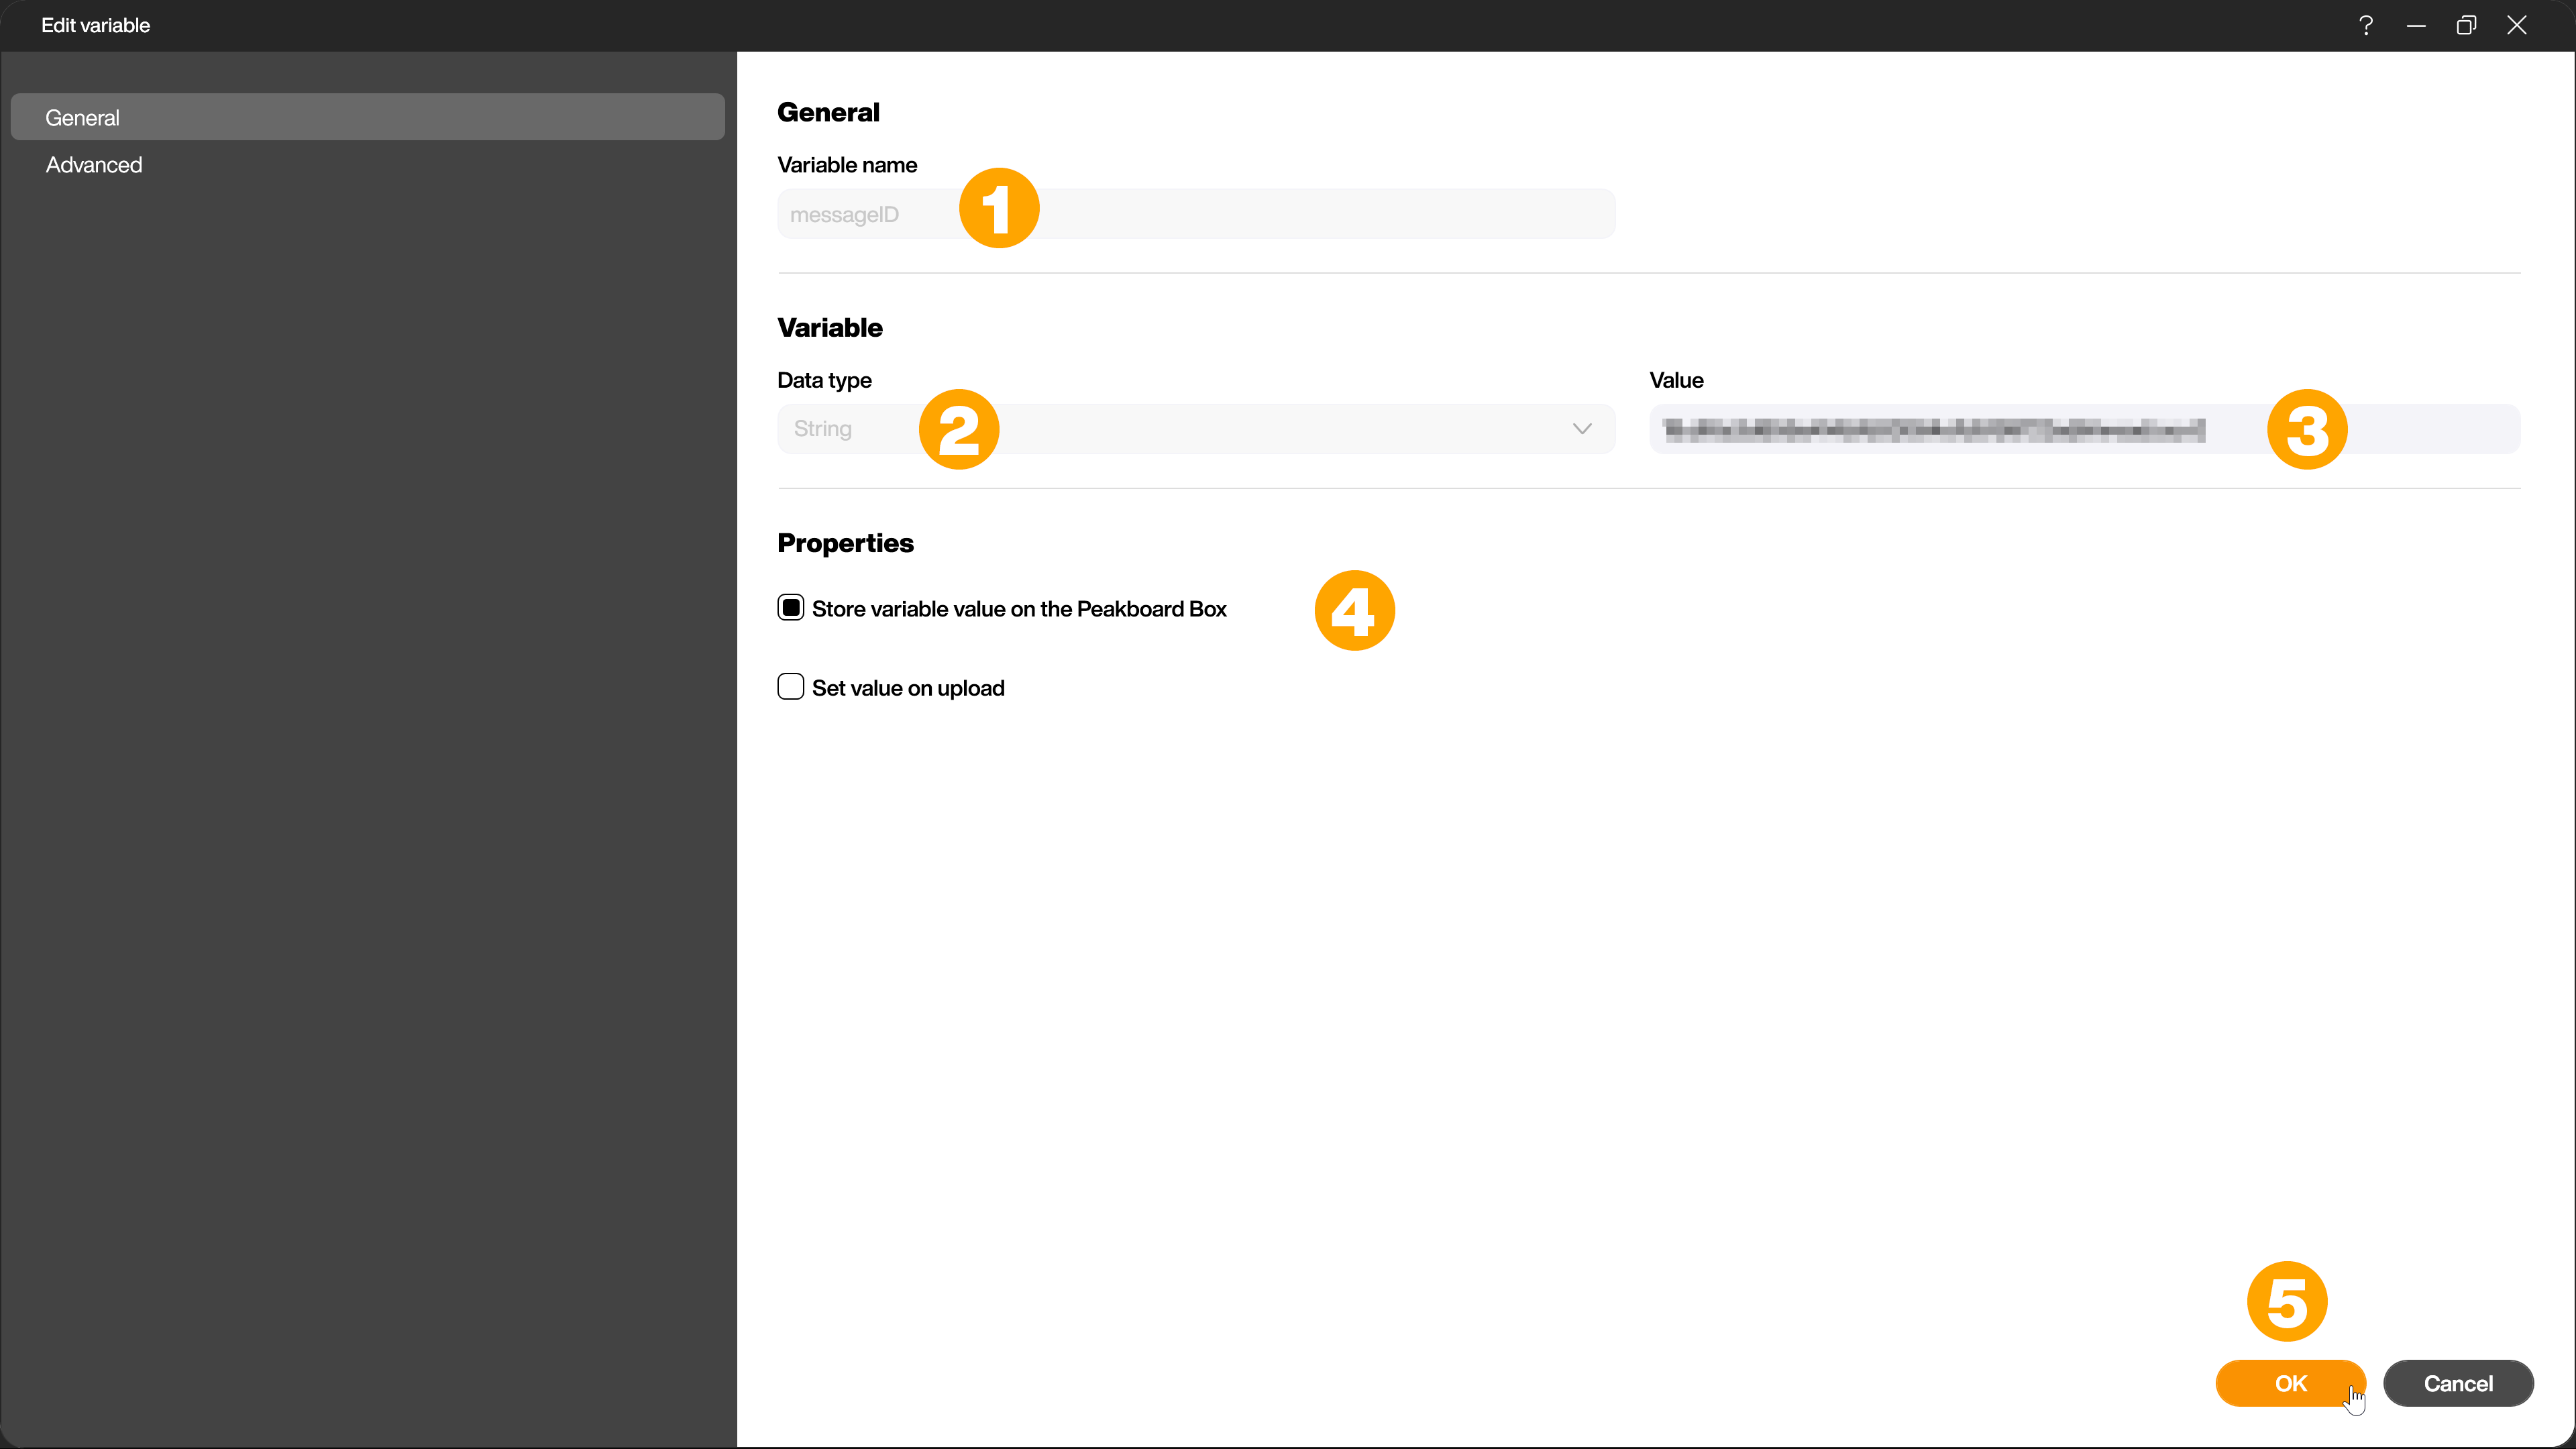
This variable is used in the data sources to address the correct Teams channel.
messageText
Give the variable its name (1), select the data type string (2) and confirm the creation with [OK] (3).
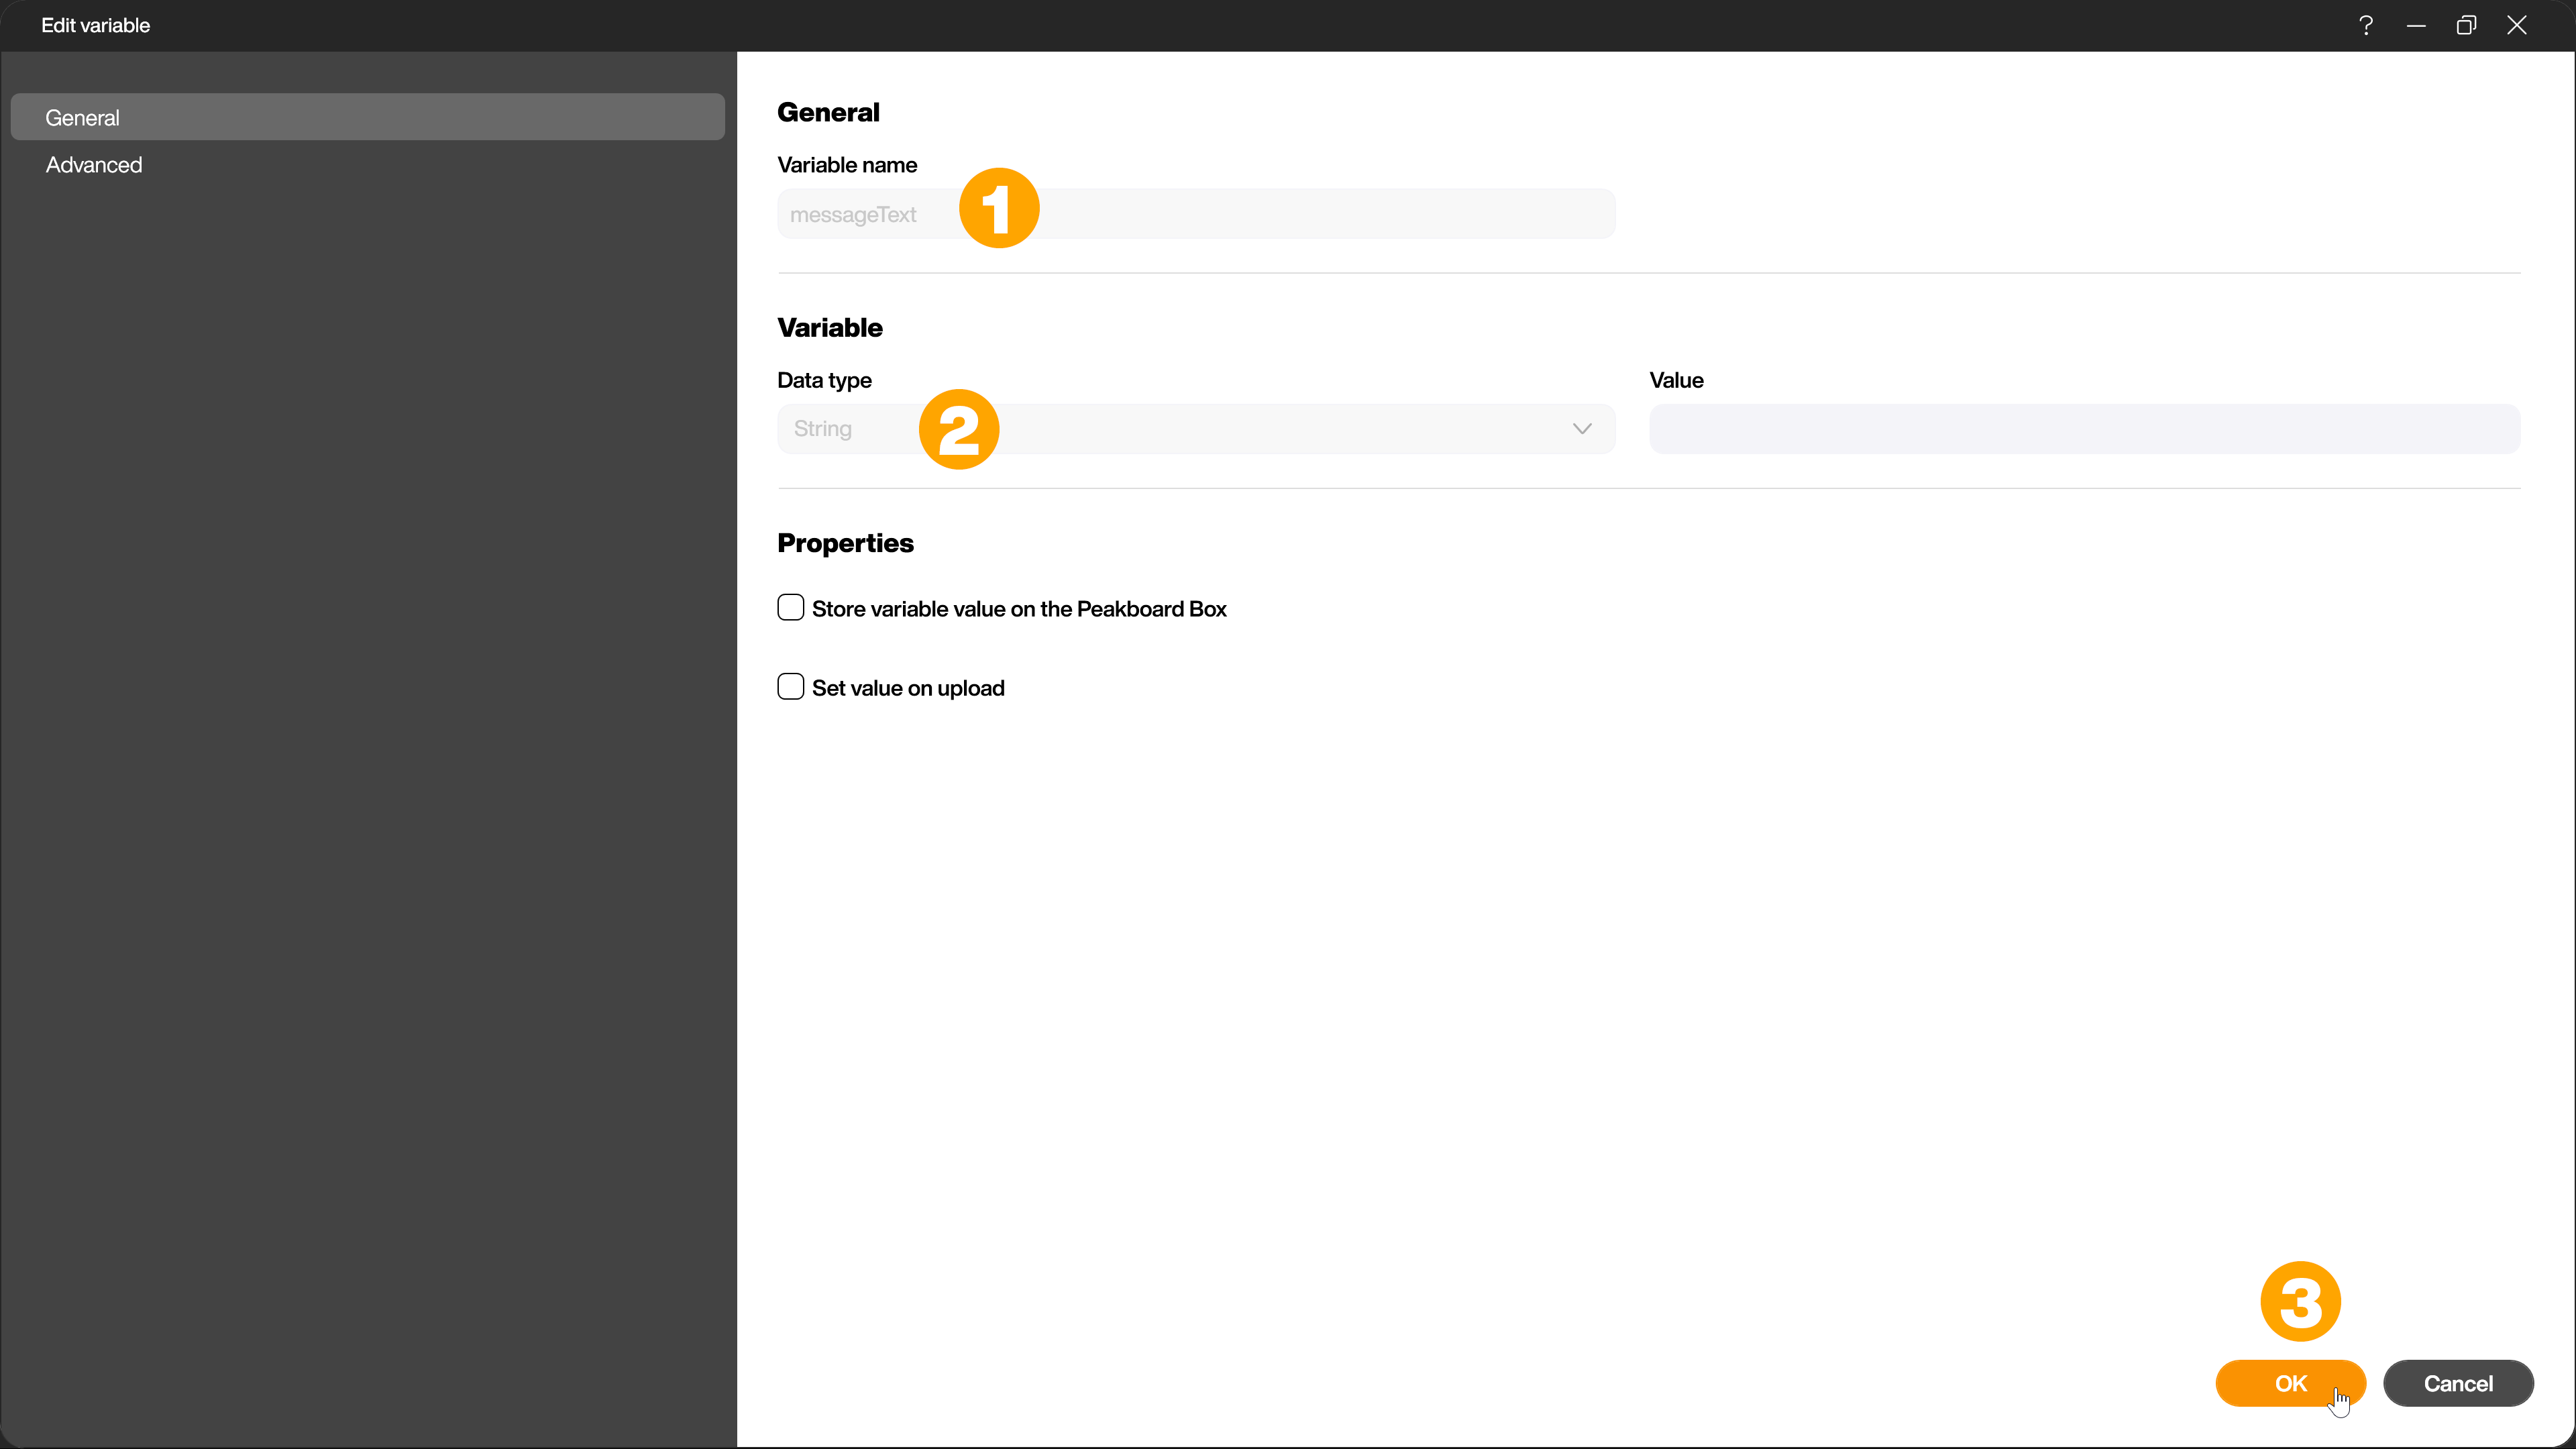
This variable is used for the message that is entered in the text field of the application.
replyID
For this variable, you need the ID of a message from the Teams channel in which the communication should take place. The prerequisite is therefore that a message has already been created there.
You can then use the following endpoint to search for this message in the Graph Explorer and copy its ID. Replace [GroupID] and [ChannelID] with your respective Teams ID.
https://graph.microsoft.com/v1.0/teams/[GroupID]/channels/[ChannelID]/messages/
Now create a variable in the Peakboard Designer. Give the variable its name (1), select the data type string (2) and enter the message ID you just found out as the value (3). Activate the checkbox [Save variable on Peakboard box] (4) and confirm the creation with [OK] (5).
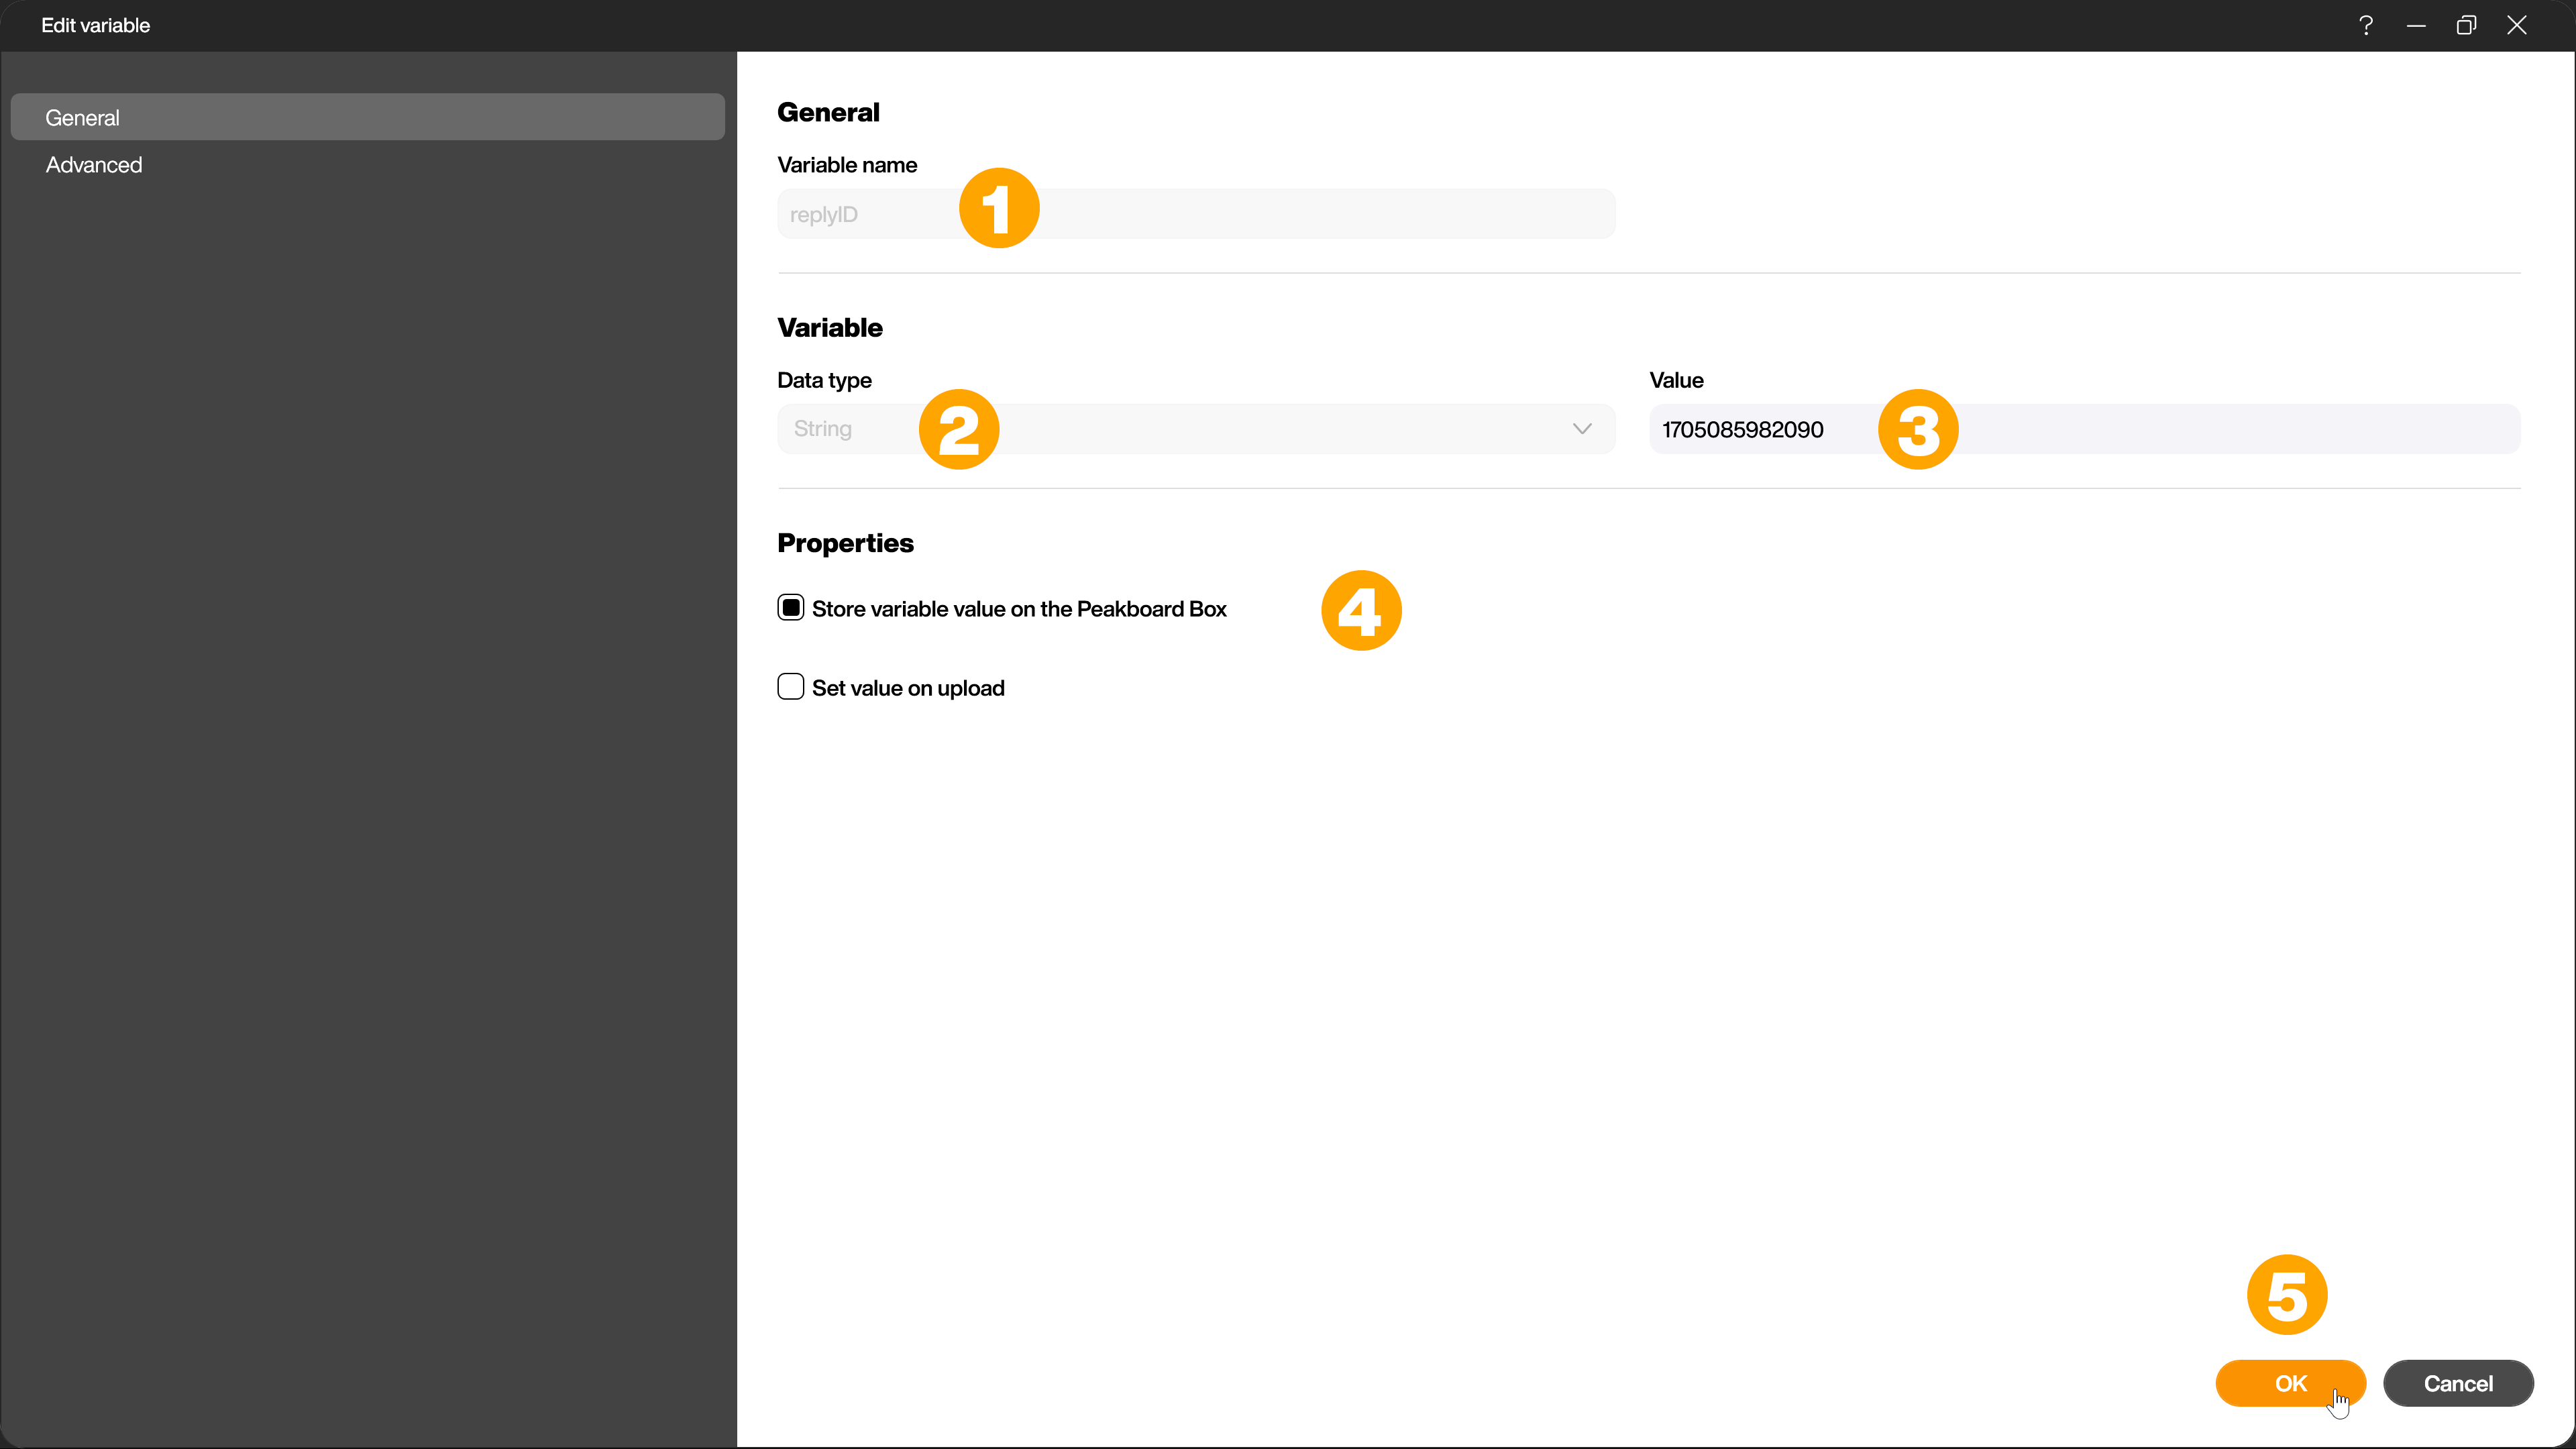
This variable is used in the data sources to read messages later and send replies to the correct message.
topicID
Give the variable its name (1), select the data type string (2) and activate the checkbox [Save variable on Peakboard Box] (3). Confirm the creation with [OK] (4).
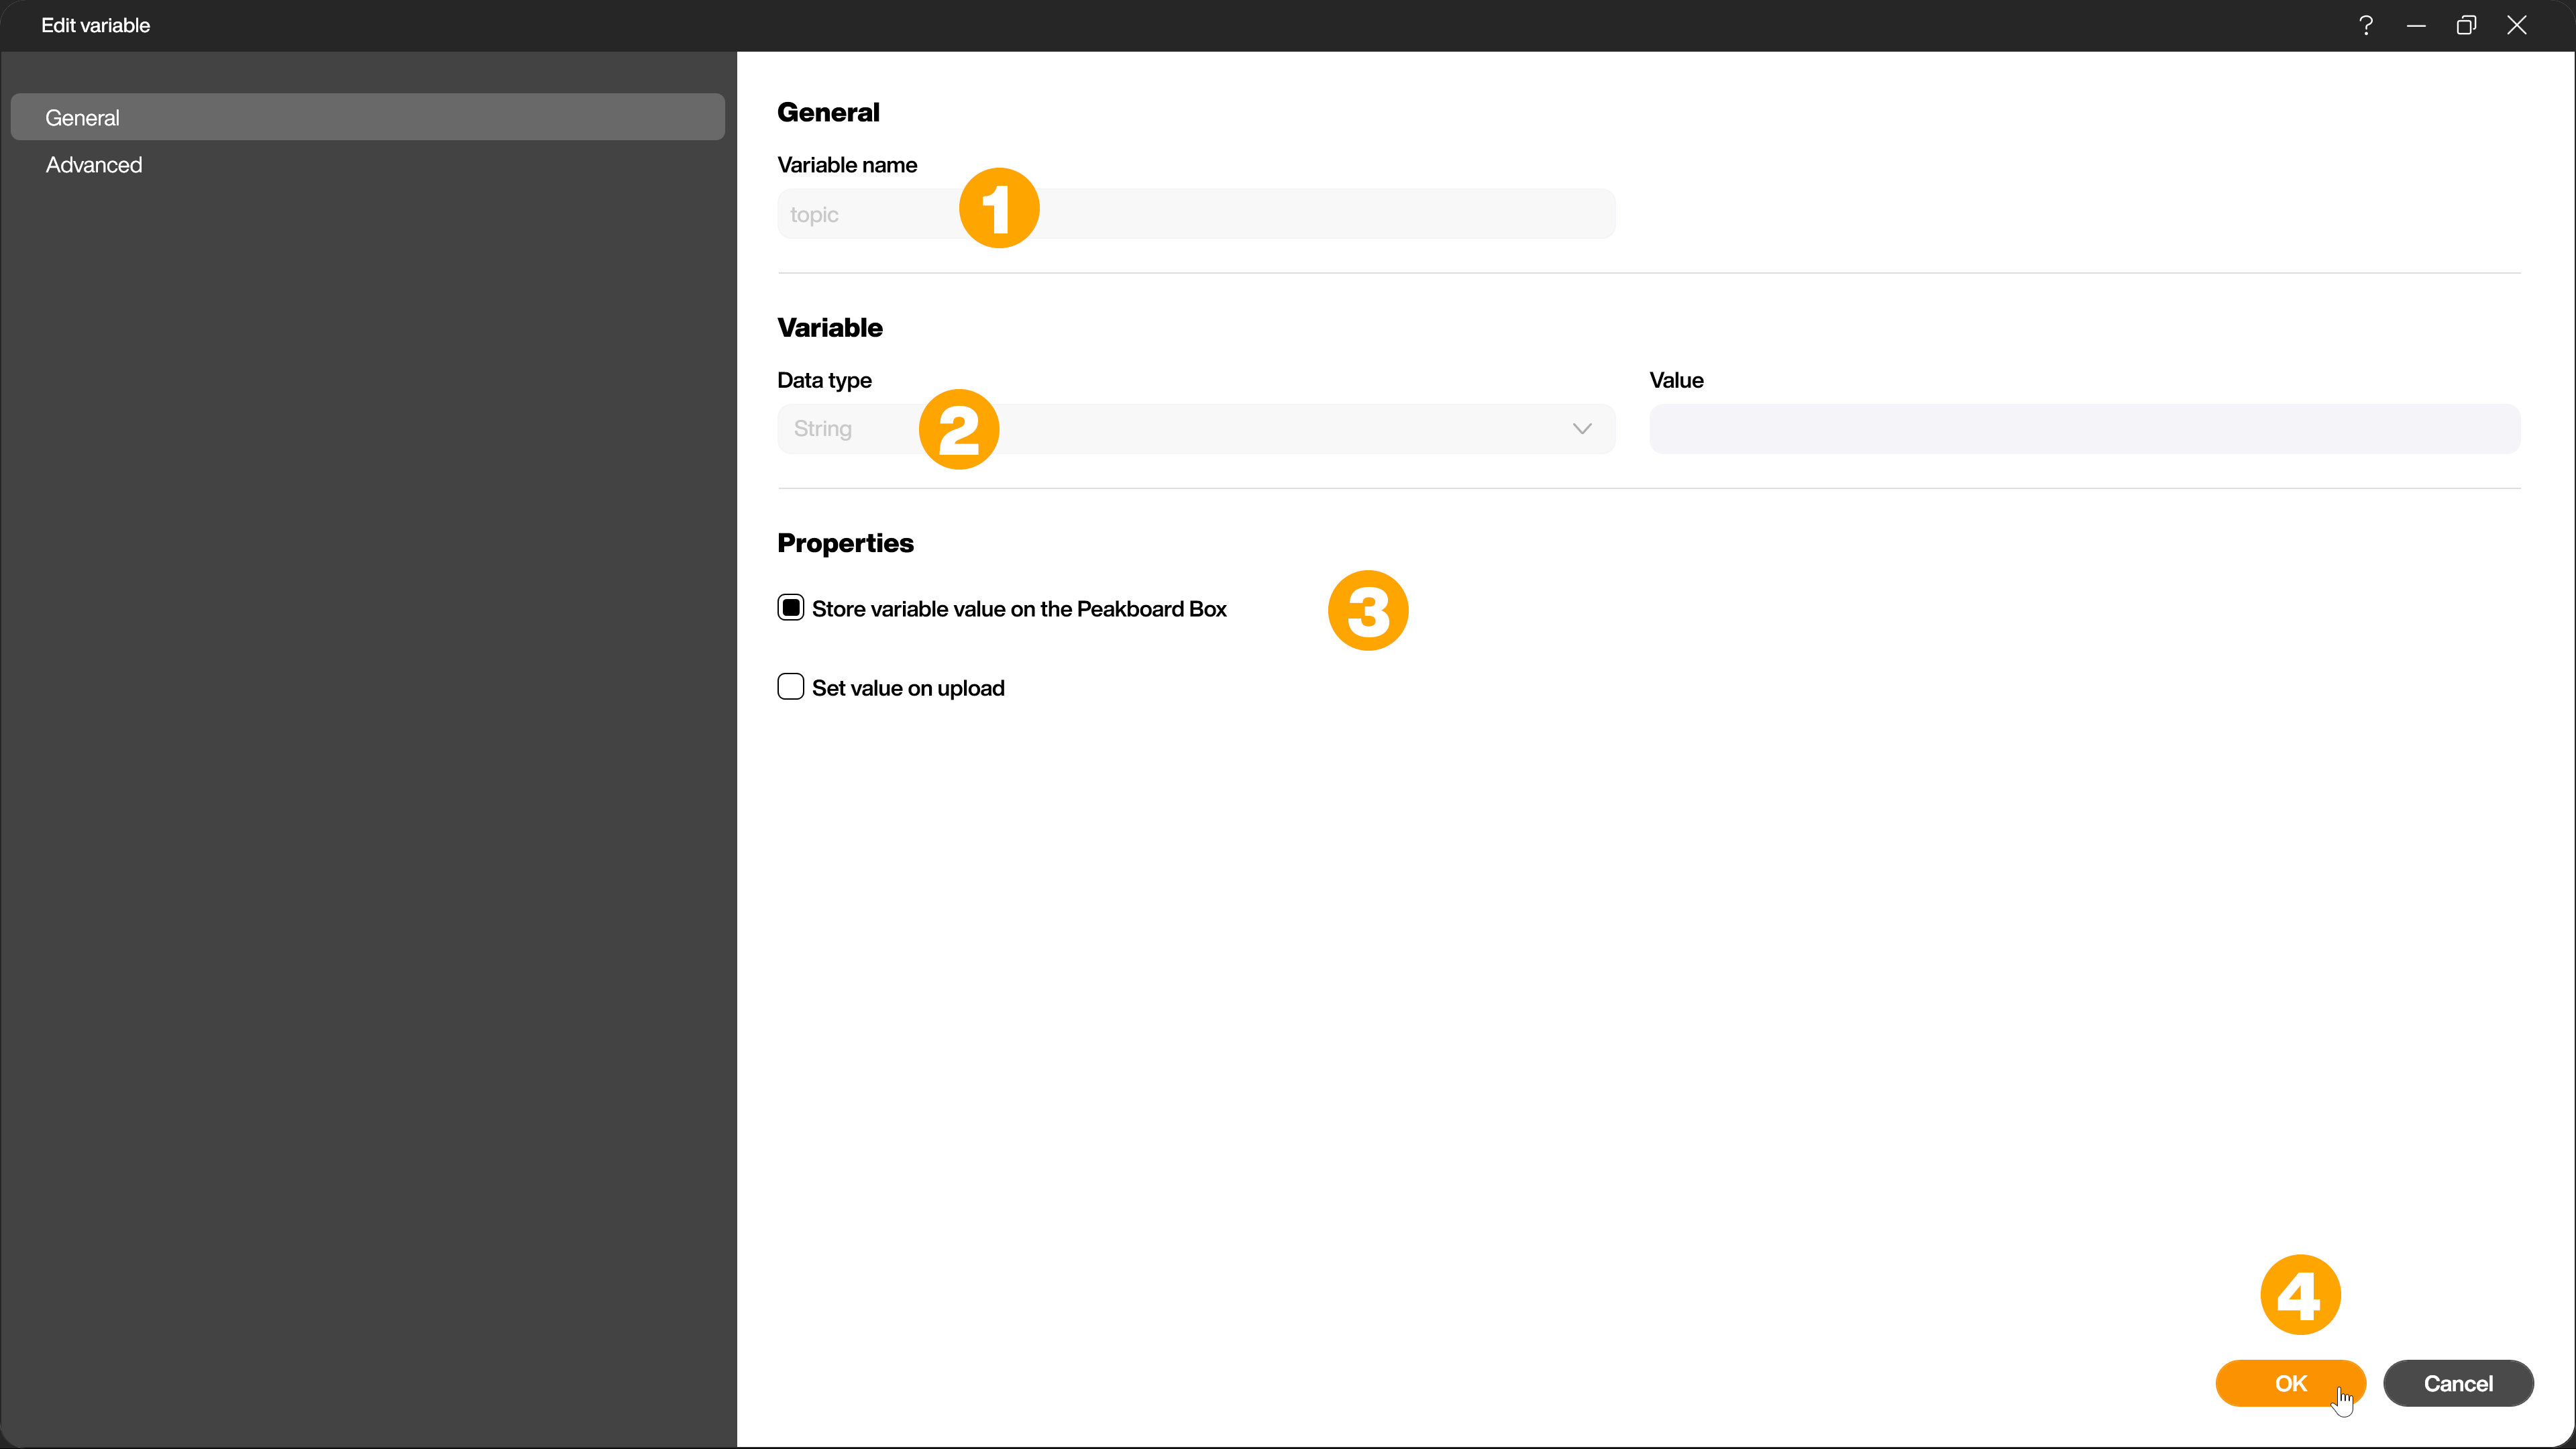
This variable is used to display the messages in the application.
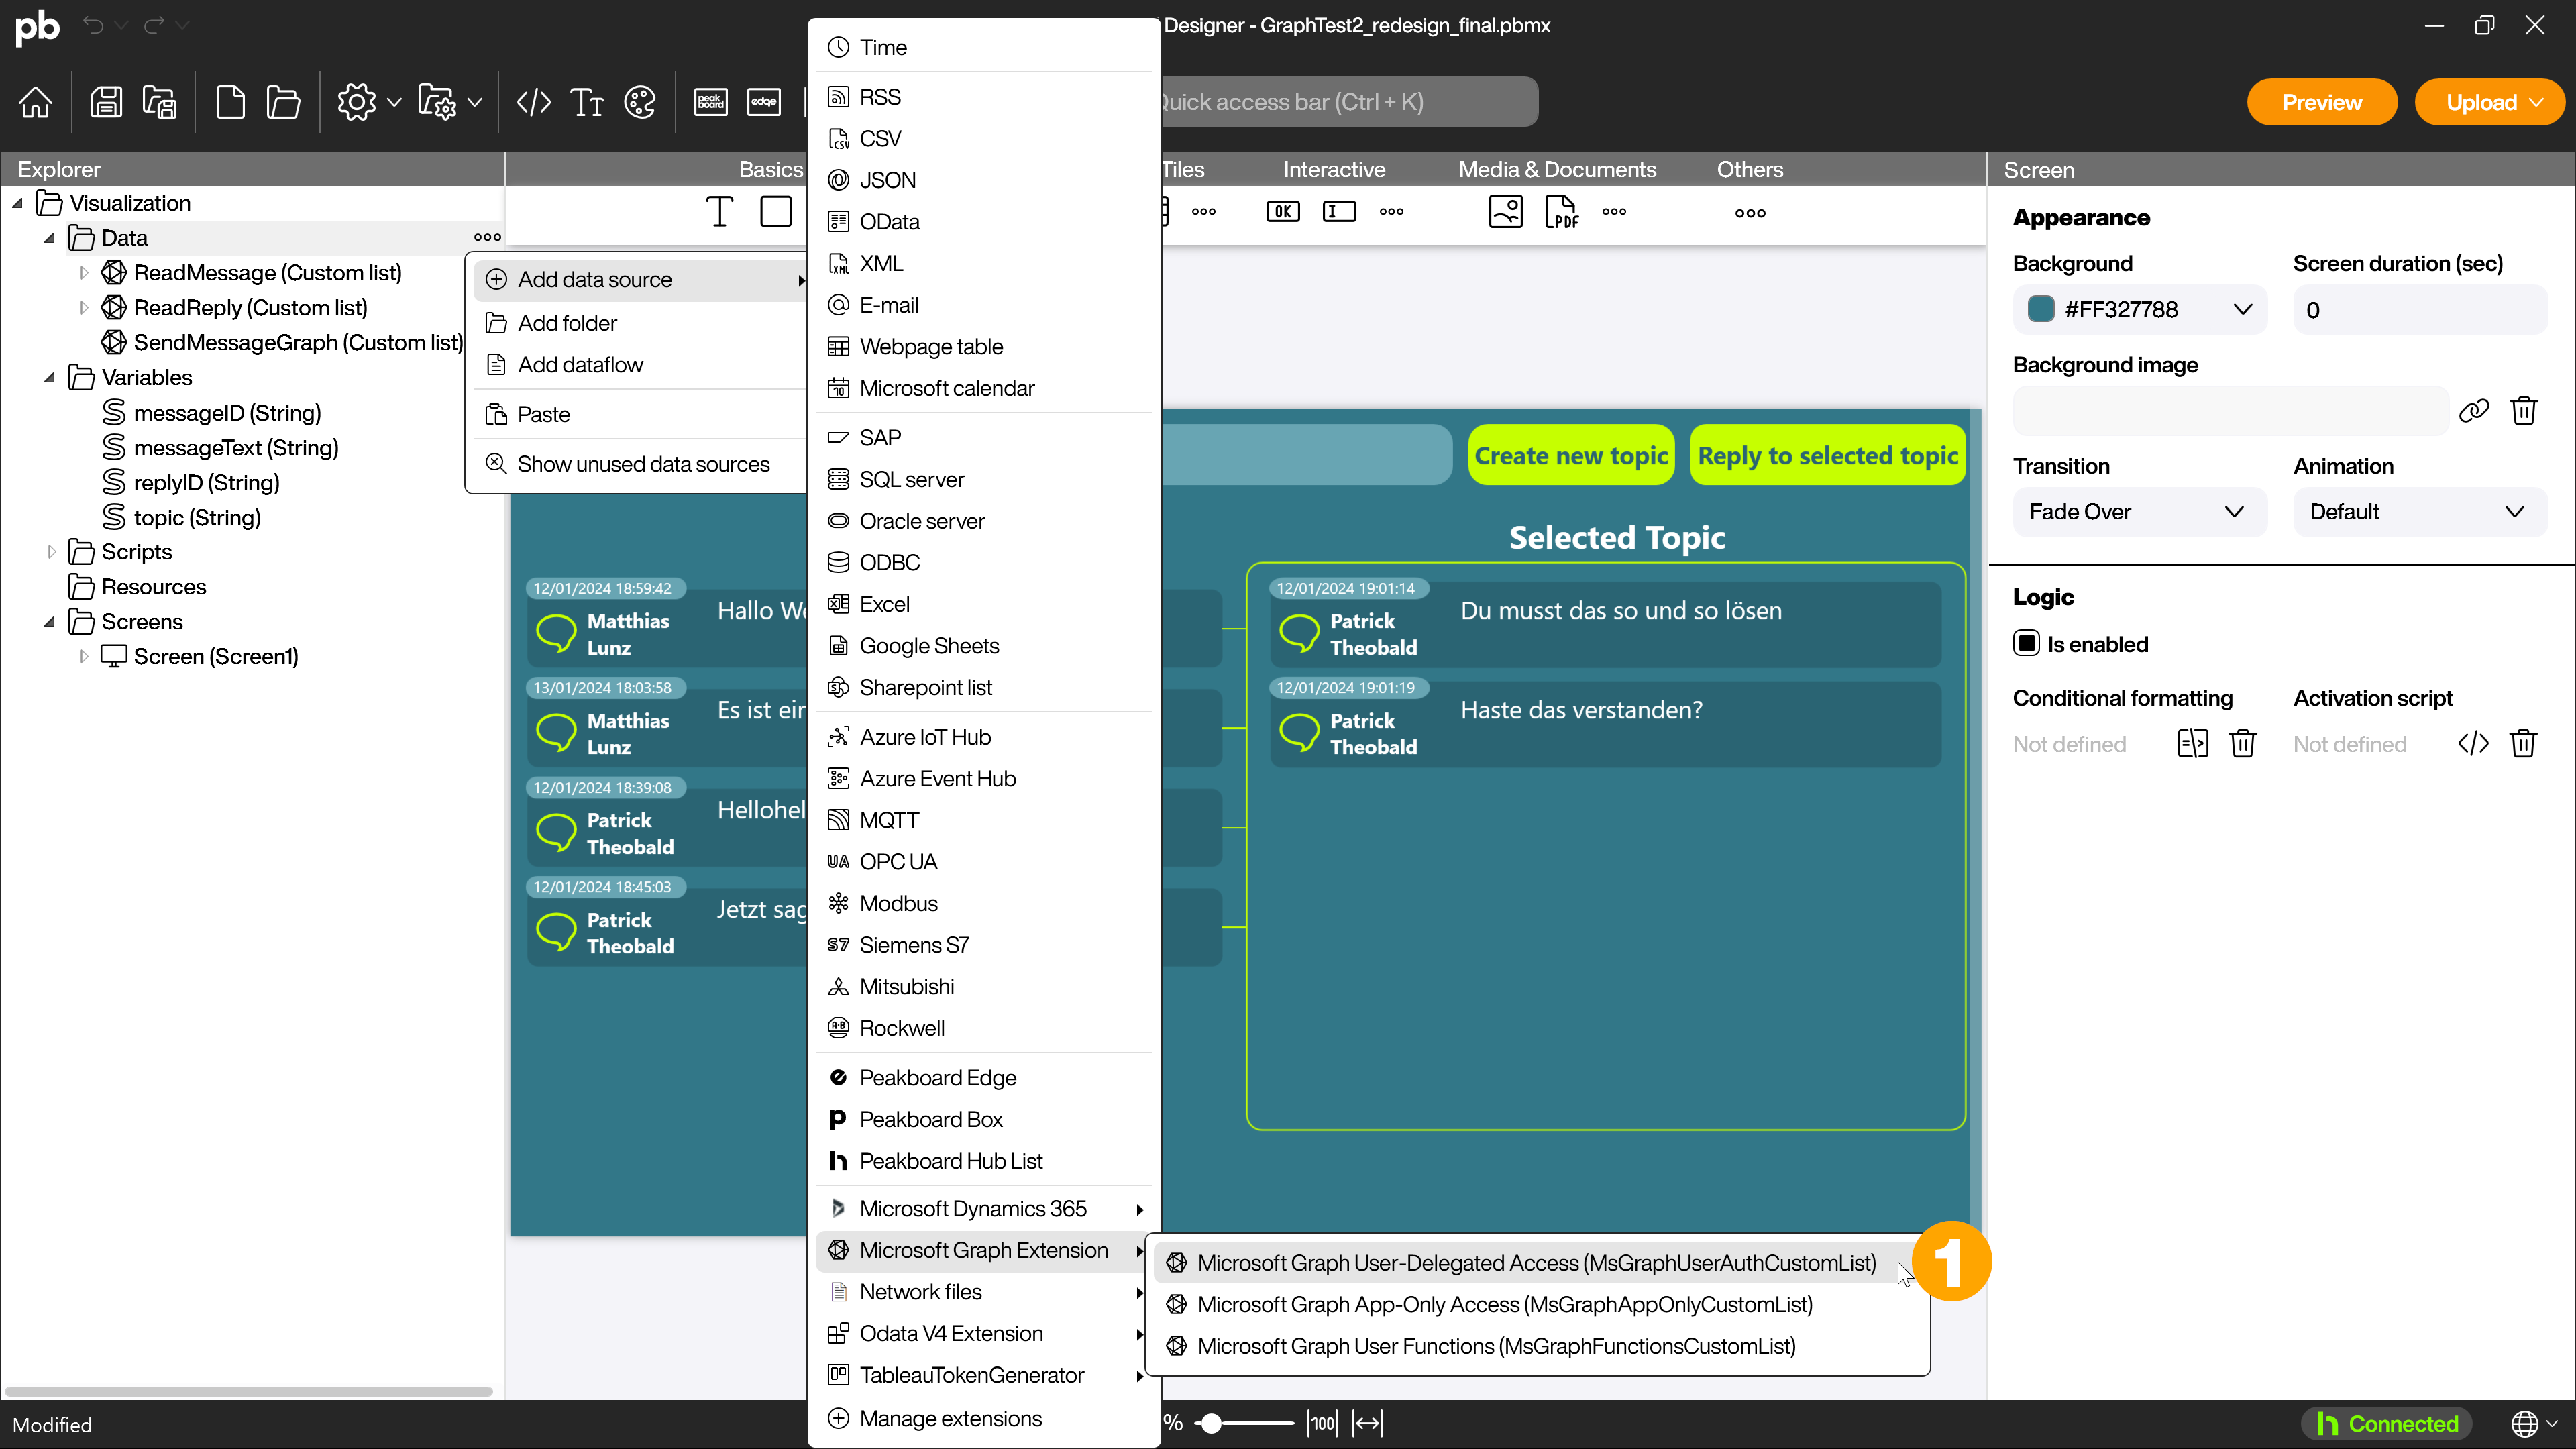
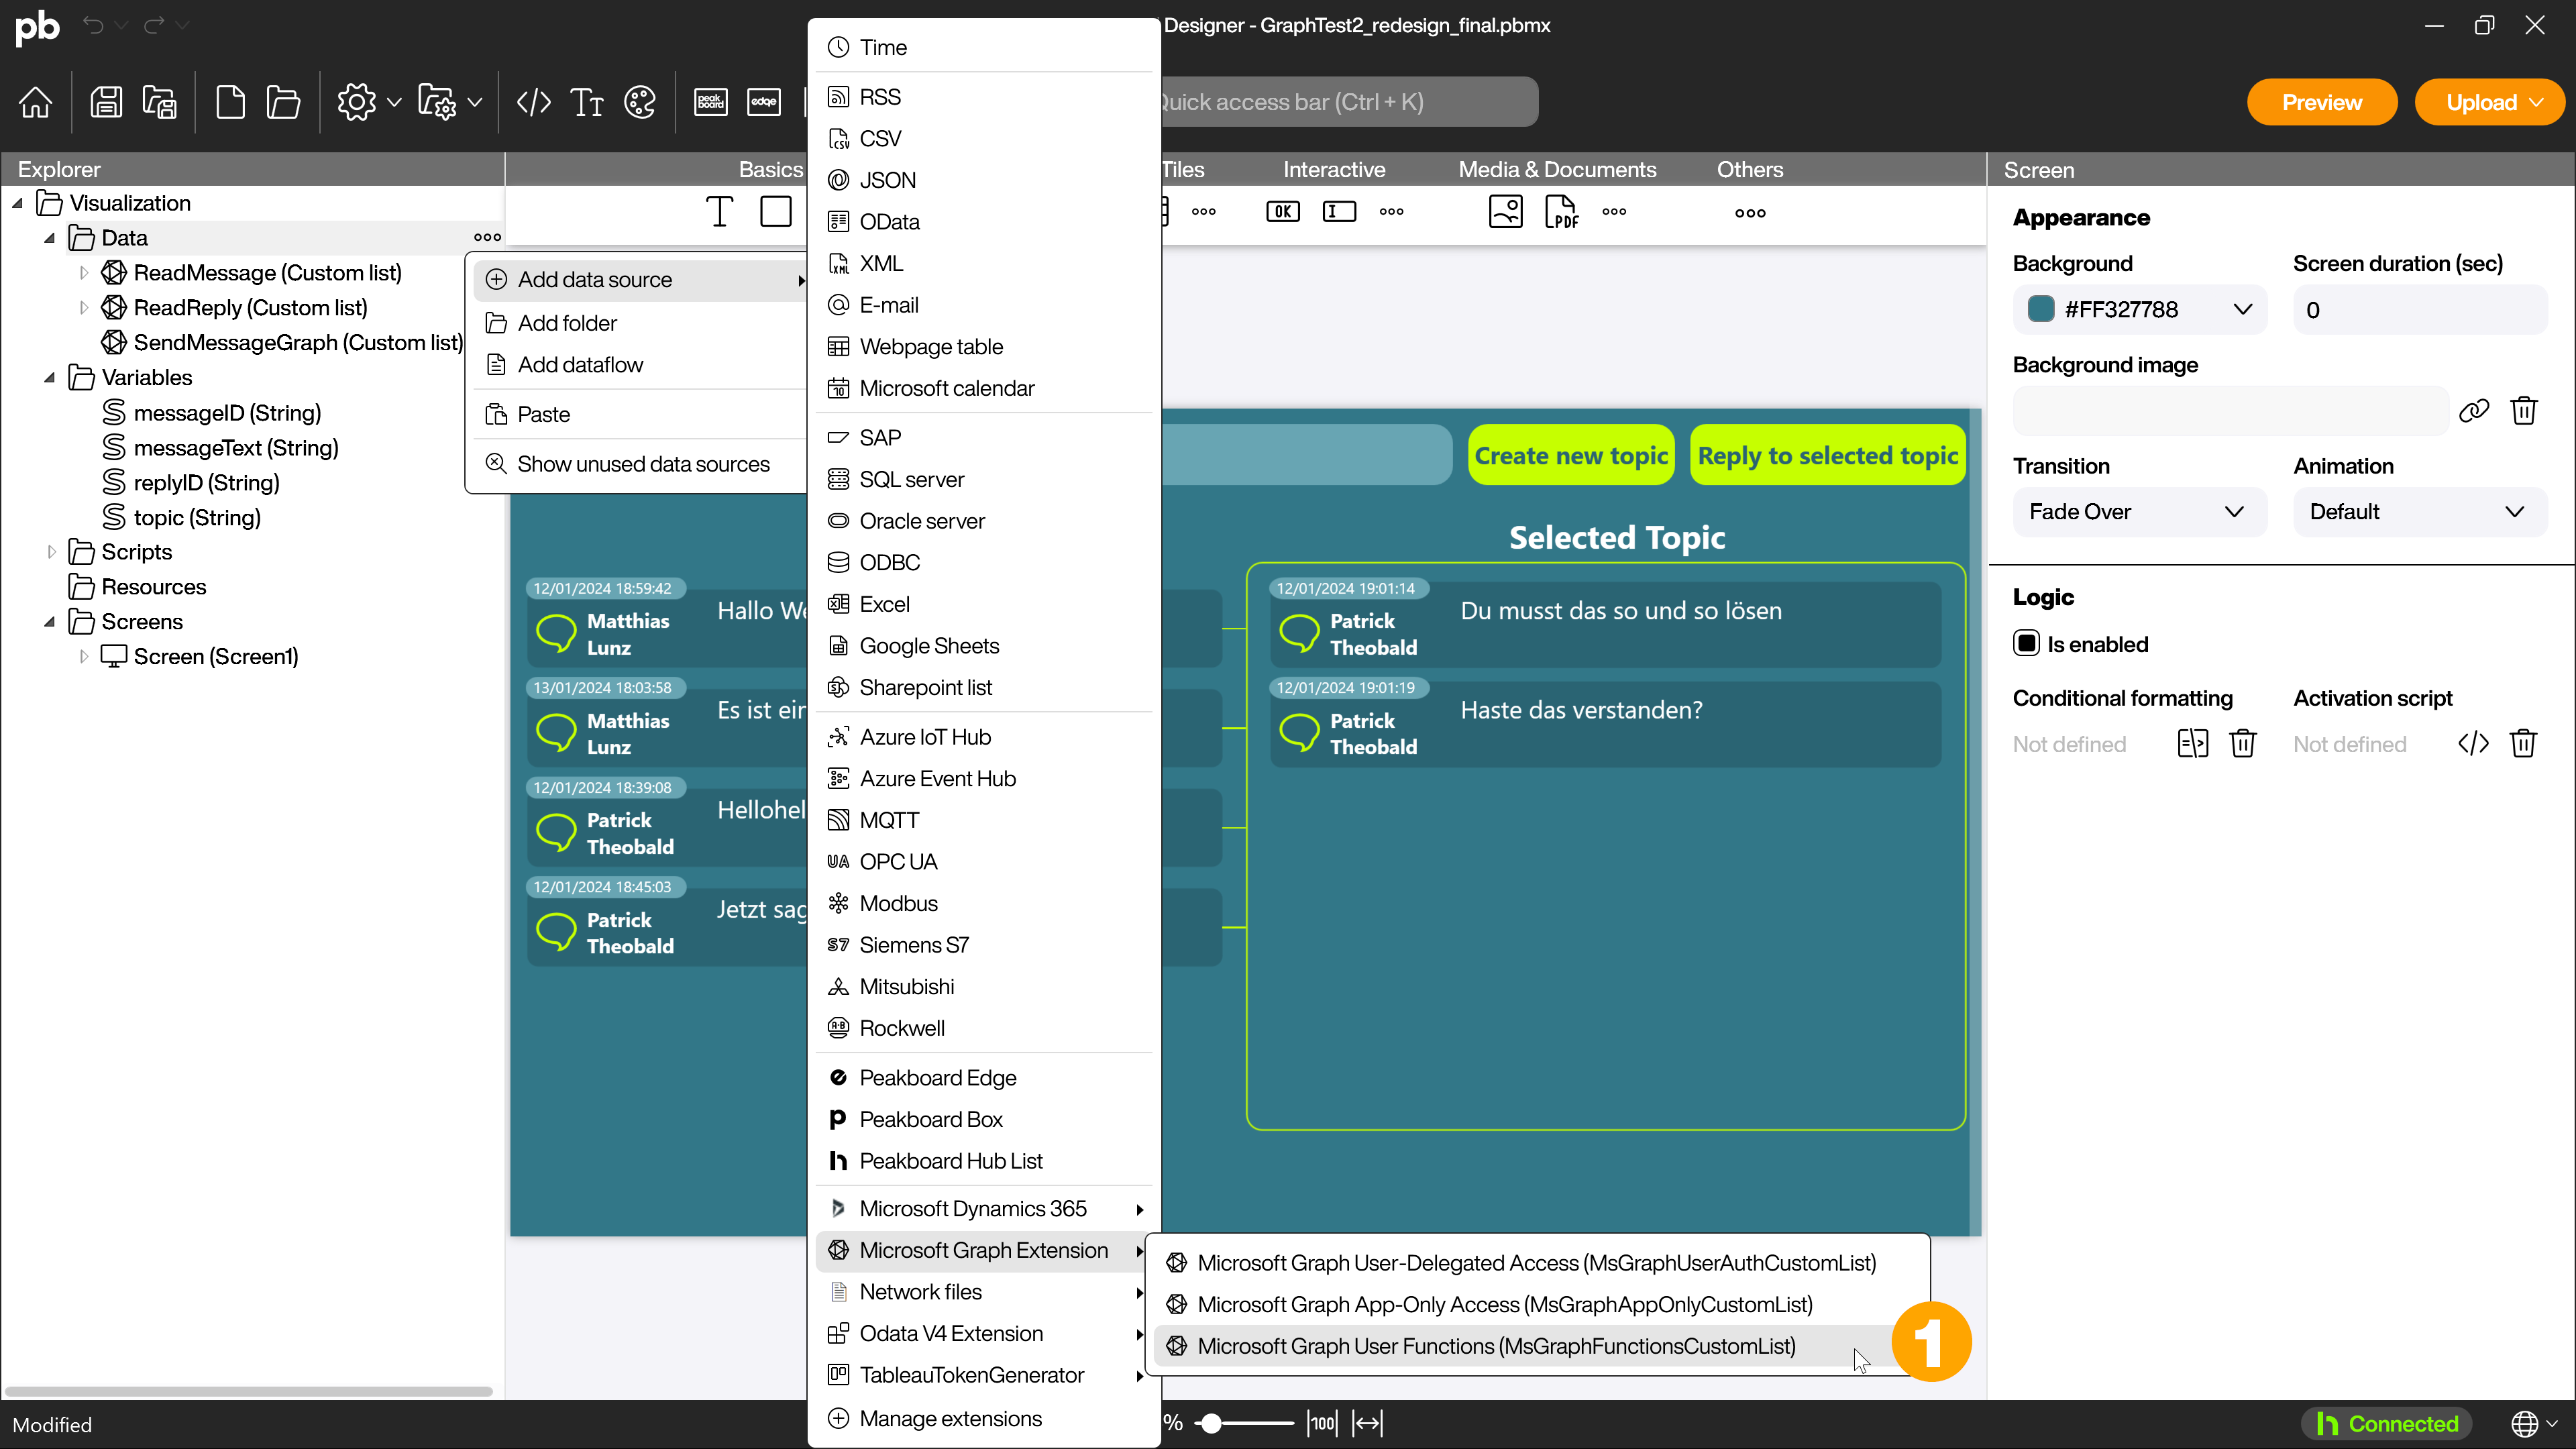
Creating the data sources
To retrieve the existing messages in the channel, send new messages and retrieve replies to messages, you need three different API calls. To do this, create three Microsoft Graph API extension data sources in the Peakboard Designer.
Retrieve messages - ReadMessage
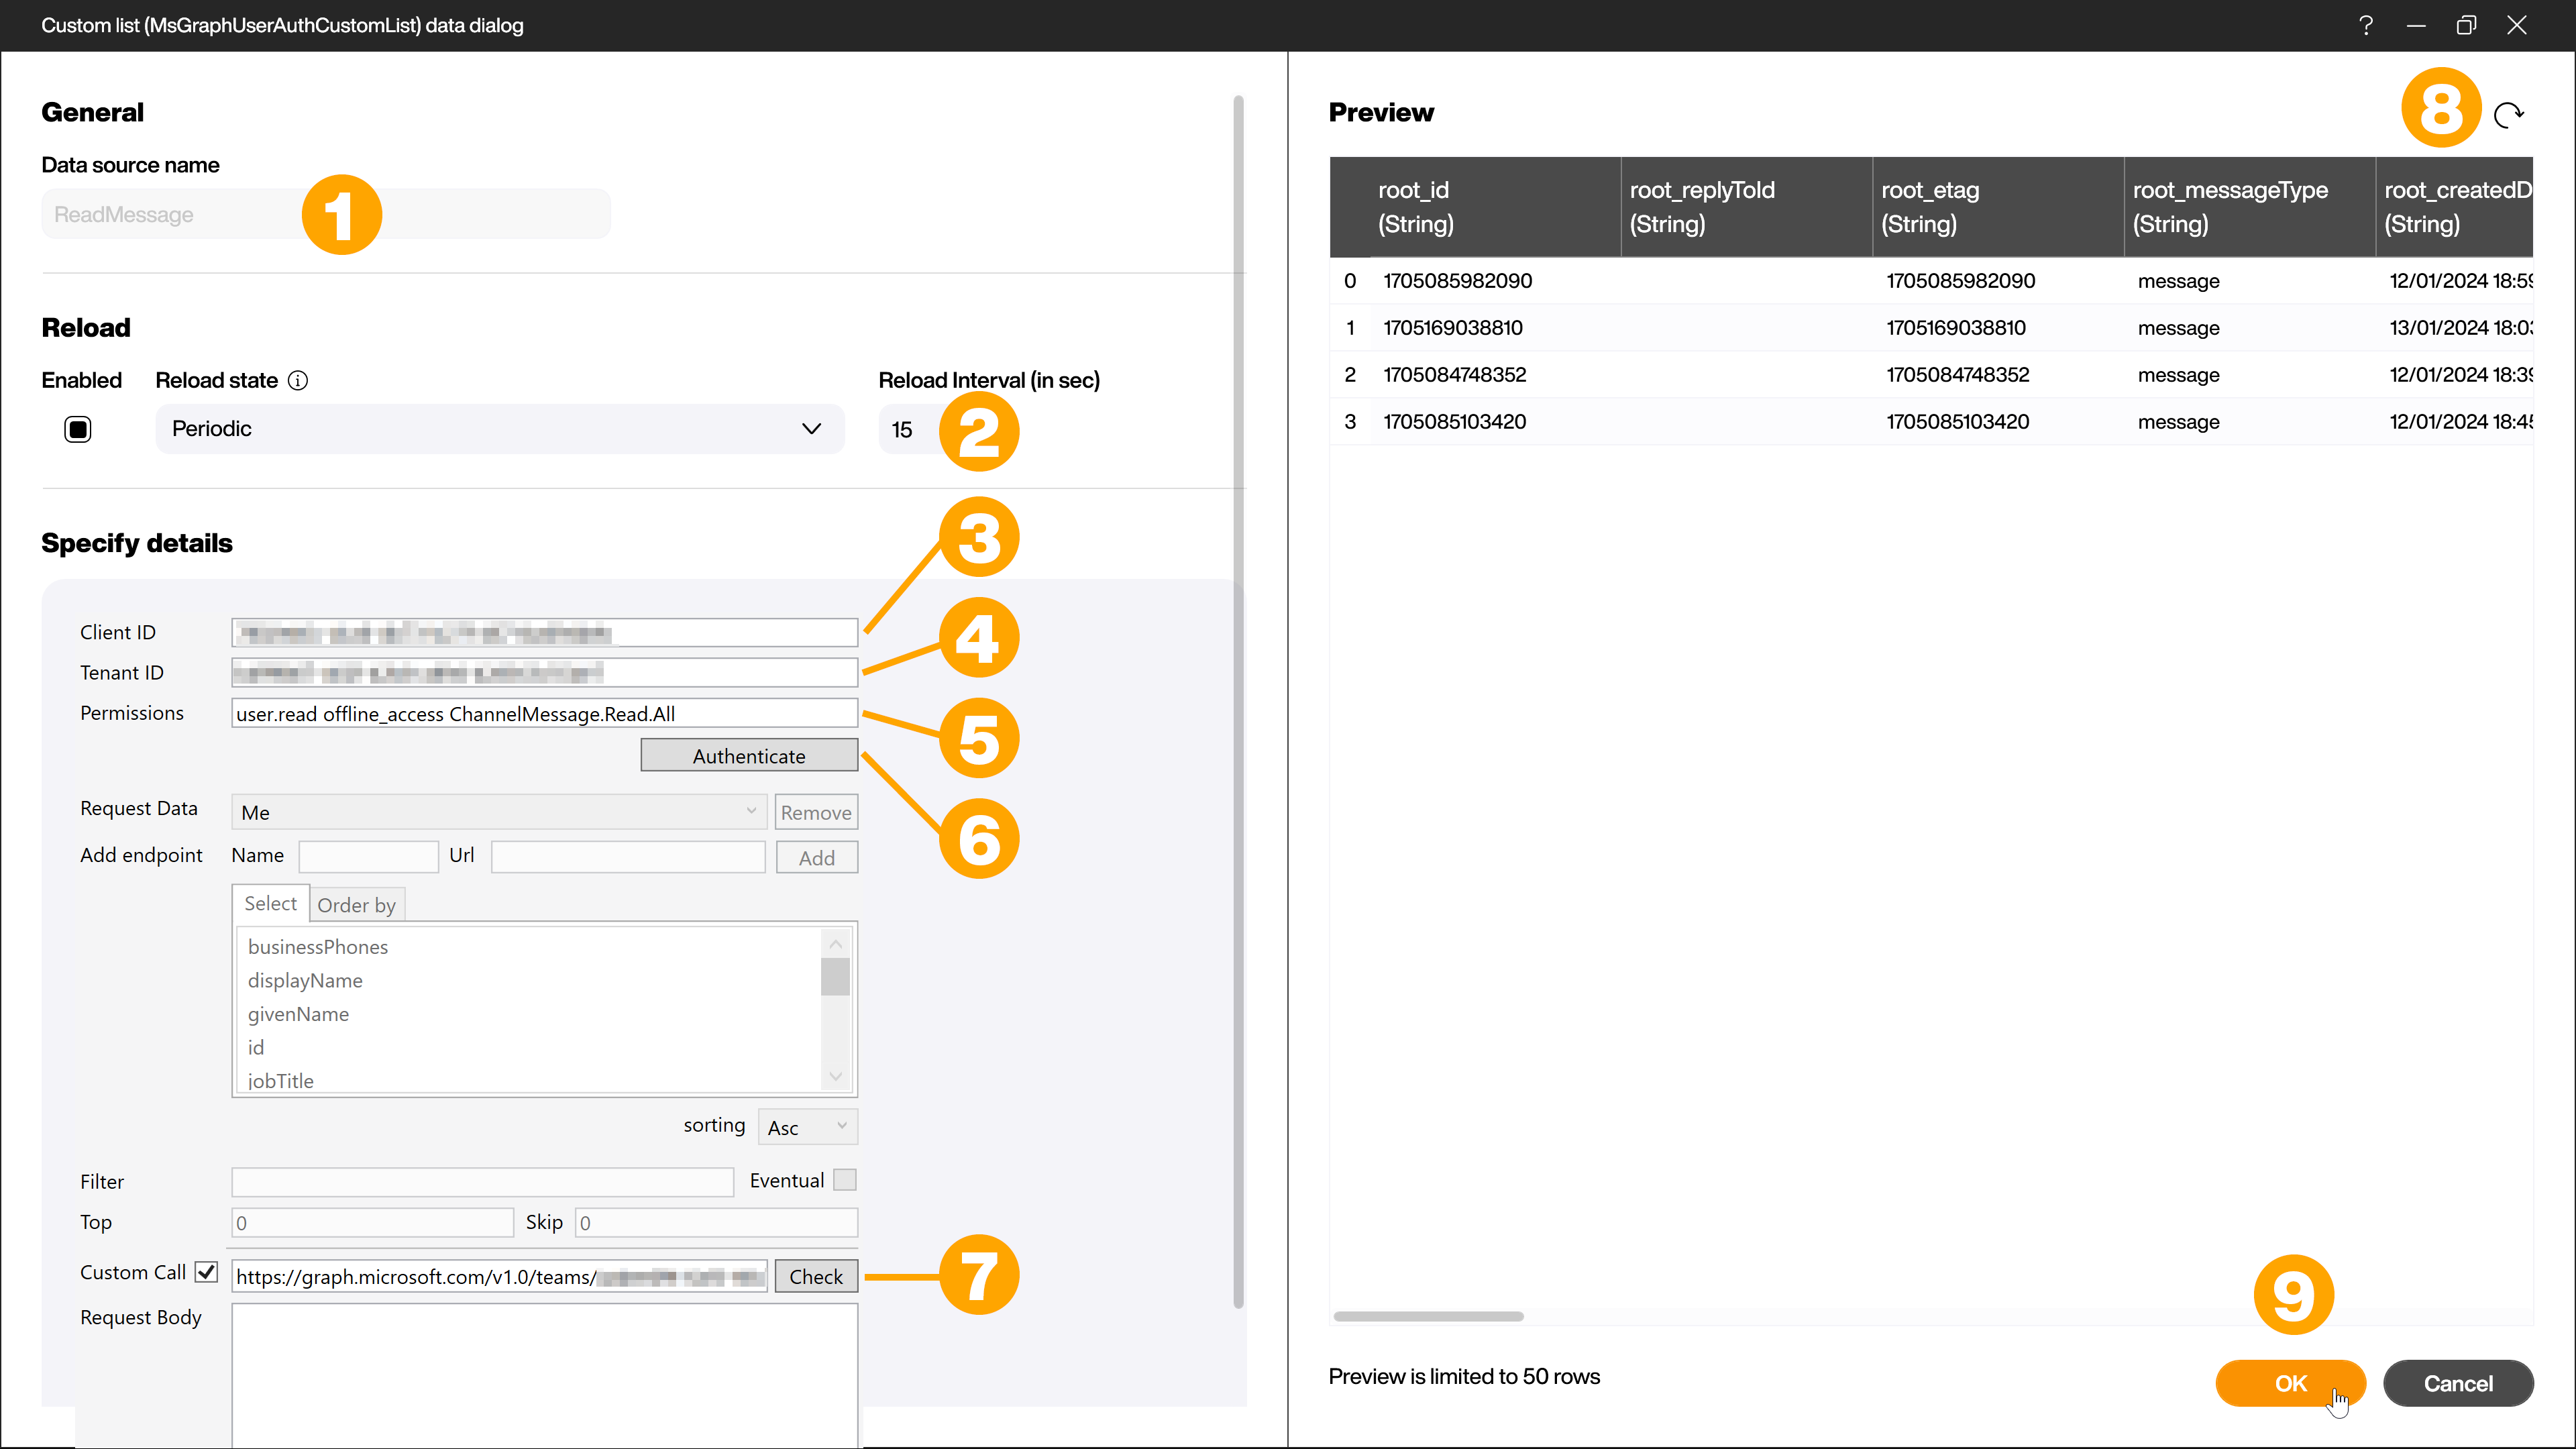
To retrieve messages, create a data source with the access type [Microsoft Graph User-Delegated Access] (1).
Give the data source a name (1) and change the reload interval to 15 seconds (2). Enter the client ID (3) and the tenant ID (4) of your registered app in the [Specify details] area. Add the permissions (5) and click on the [Authenticate] button to authenticate yourself with your Microsoft account.
Then activate the [CustomCall] checkbox (6) and add the following call:
https://graph.microsoft.com/v1.0/teams/[GroupID]/channels/#[messageID]#/messages/
Replace [GroupID] with your Teams group ID. Then check the call with the [Check] button (7) and click on [Load data] (8) to verify that the messages are loaded. Then confirm the creation of the data source with [OK] (9).
Retrieve answers - ReadReply
The data source for retrieving the responses to messages is created identically to the first data source; it is also the [Microsoft Graph User-Delegated Access] access type.
The custom call for this data source looks as follows:
https://graph.microsoft.com/v1.0/teams/[GroupID]/channels/#[messageID]#/messages/#[replayid]#/replies
Replace [GroupID] with your Teams group ID here as well.
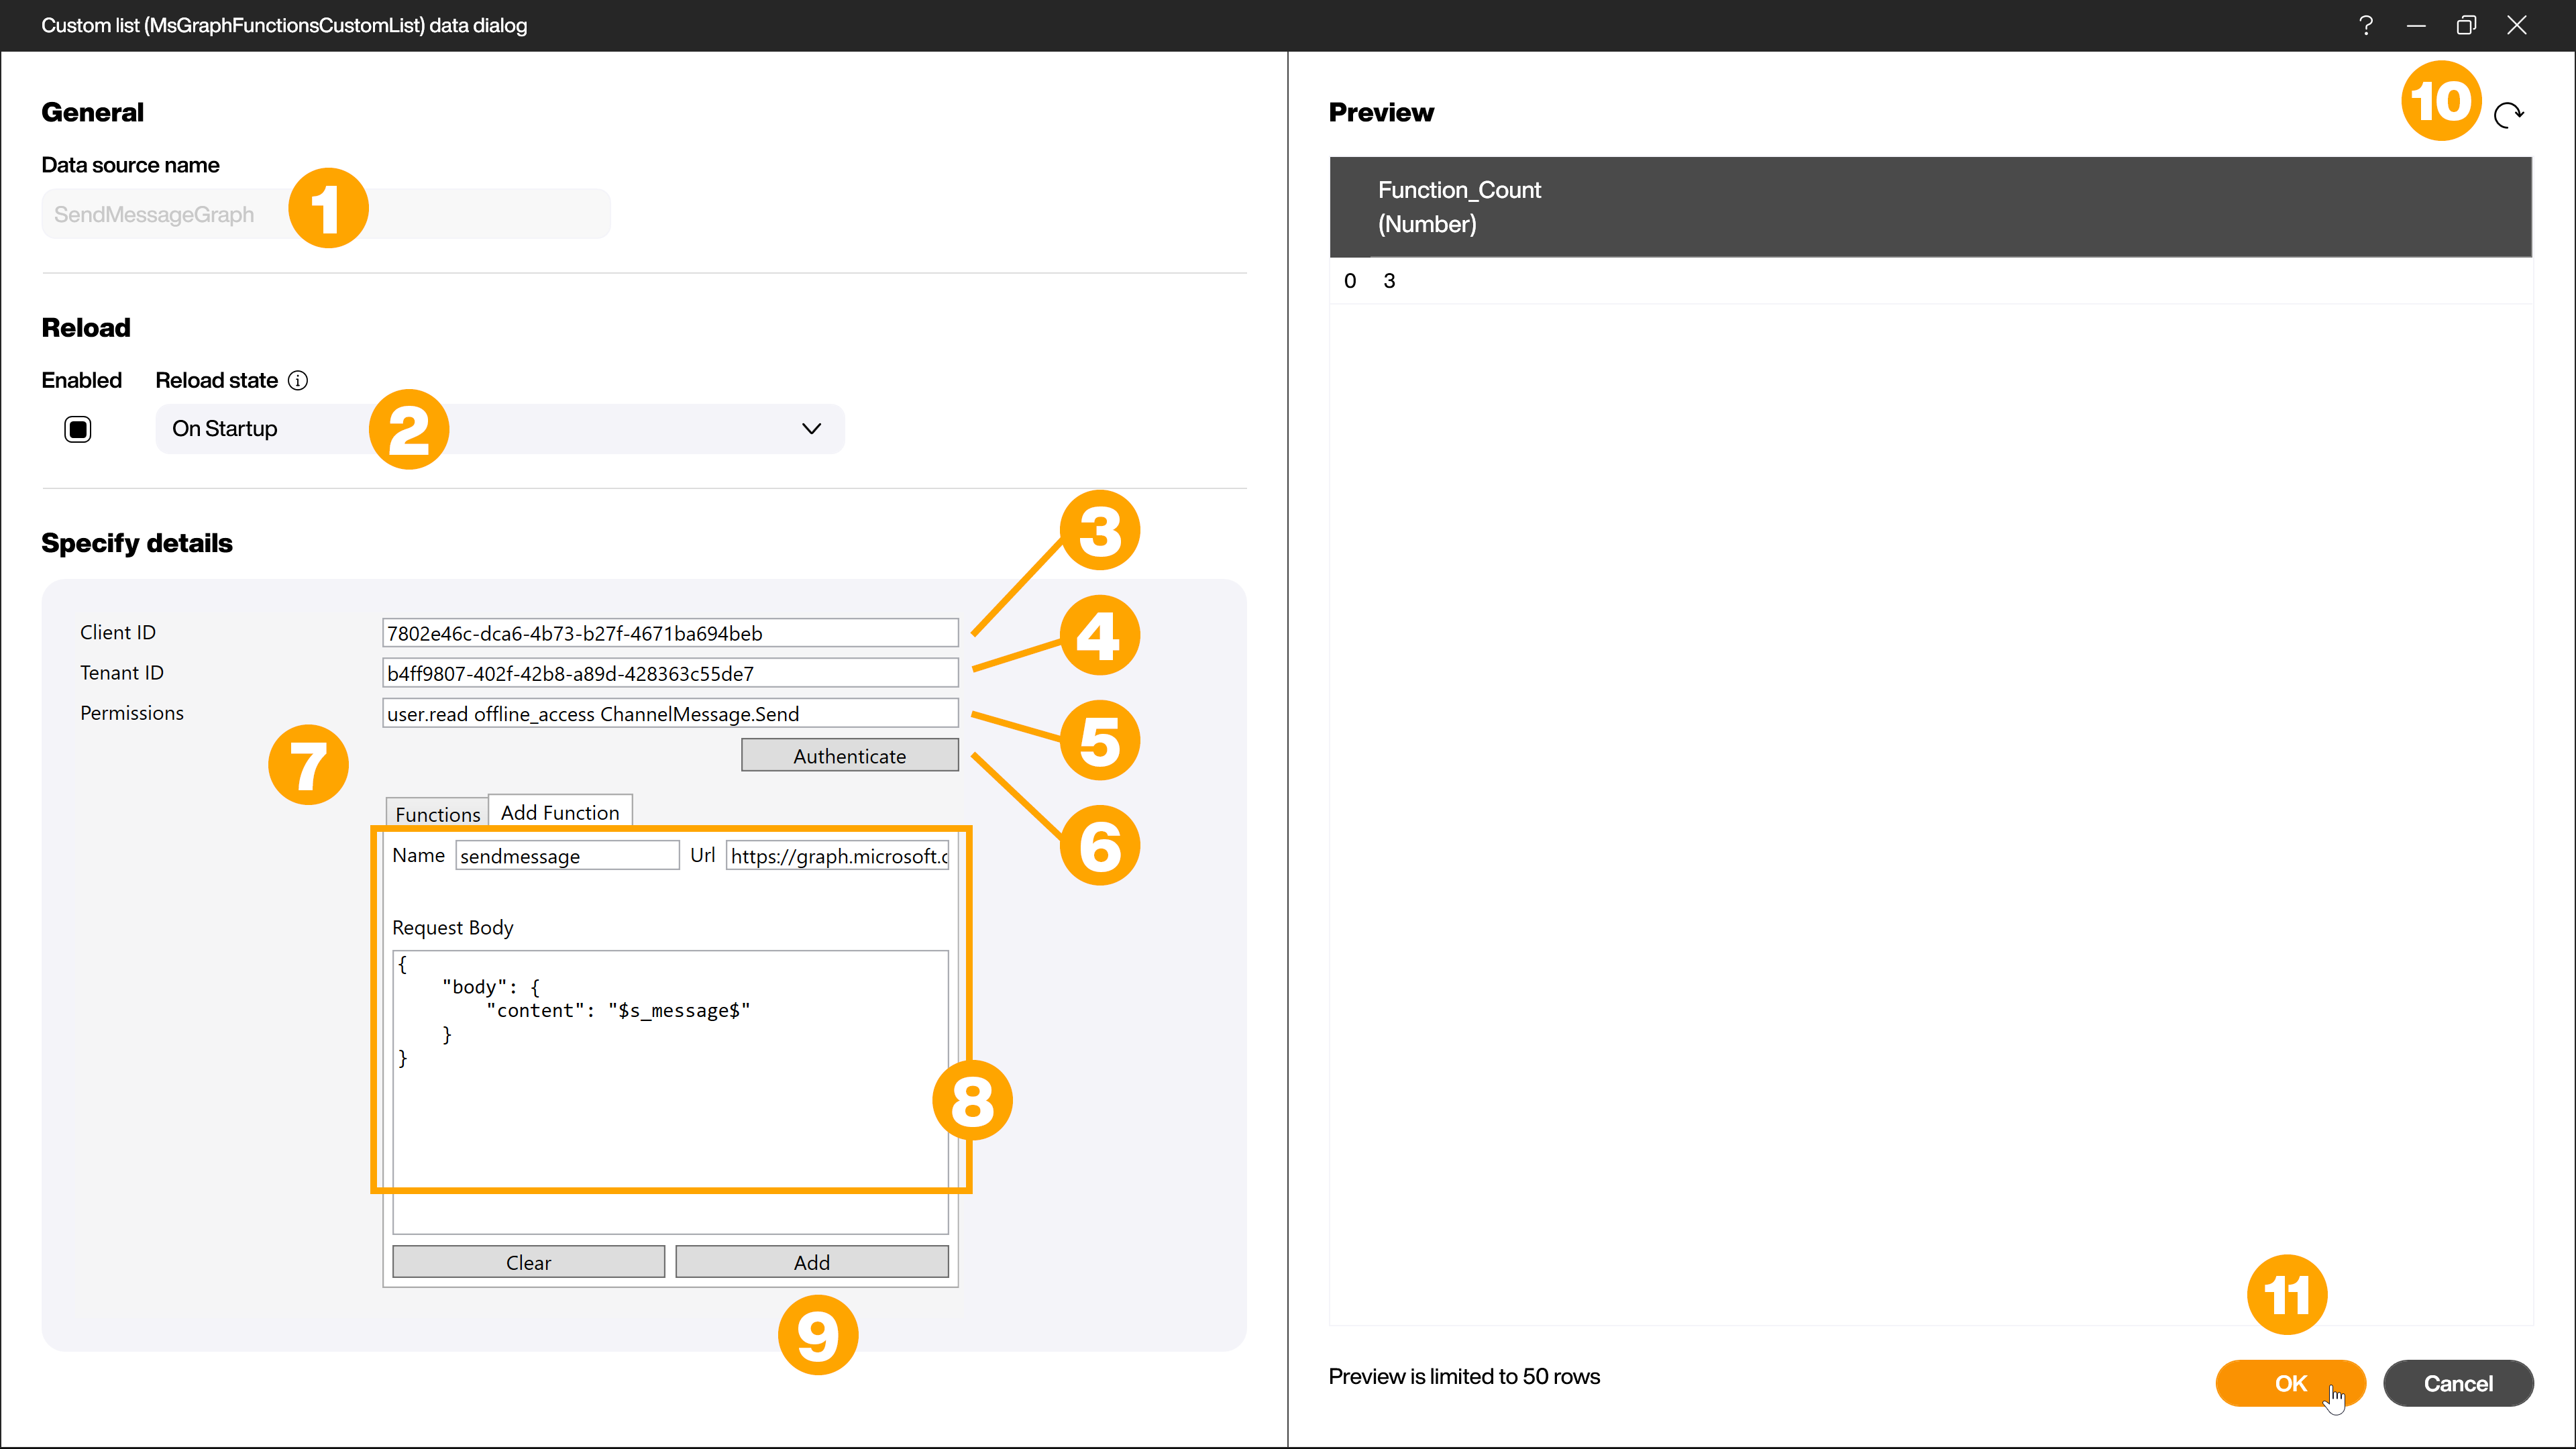
Send messages - SendMessageGraph
The third API call requires a data source with the access type [Microsoft Graph User Functions] (1) in order to be able to send messages.
Give the data source a name (1) and change the reload status to [On startup] (2). In the [Specify details] area, enter the client ID (3), the tenant ID (4) and the authorizations (5) as for the other two data sources and carry out the authentication with your Microsoft account using the [Authenticate] button (6).
Now you need to create two functions for sending messages. One for creating new messages and one for replying to messages. To do this, switch to the [Add Function] tab (7) and fill in the three fields (8) as follows.
Function 1 - Create messages
Name:
sendmessage
URL:
https://graph.microsoft.com/v1.0/teams/[GroupID]/channels/[ChannelID]/messages
Request body:
{
    "body": {
        "content": "$s_message$"
    }
}
Replace the two placeholders [GroupID] and [ChannelID] in the URL with your respective Teams ID. Confirm the addition of the function by clicking on the [Add] button (9).
Function 2 - Reply to messages
Name:
senddynamicreply
URL:
https://graph.microsoft.com/v1.0/teams/[GroupID]/channels/#[messageID]#/messages/#[replyID]#/replies
Request Body:
{
    "body": {
        "content": "$s_message$"
    }
}
Replace only the [GroupID] placeholder in the URL with your Teams Group ID. Confirm the addition of the function by clicking on the [Add] button (9).
Then click on [Load data] (10) and confirm the creation of the data source with [OK] (11).
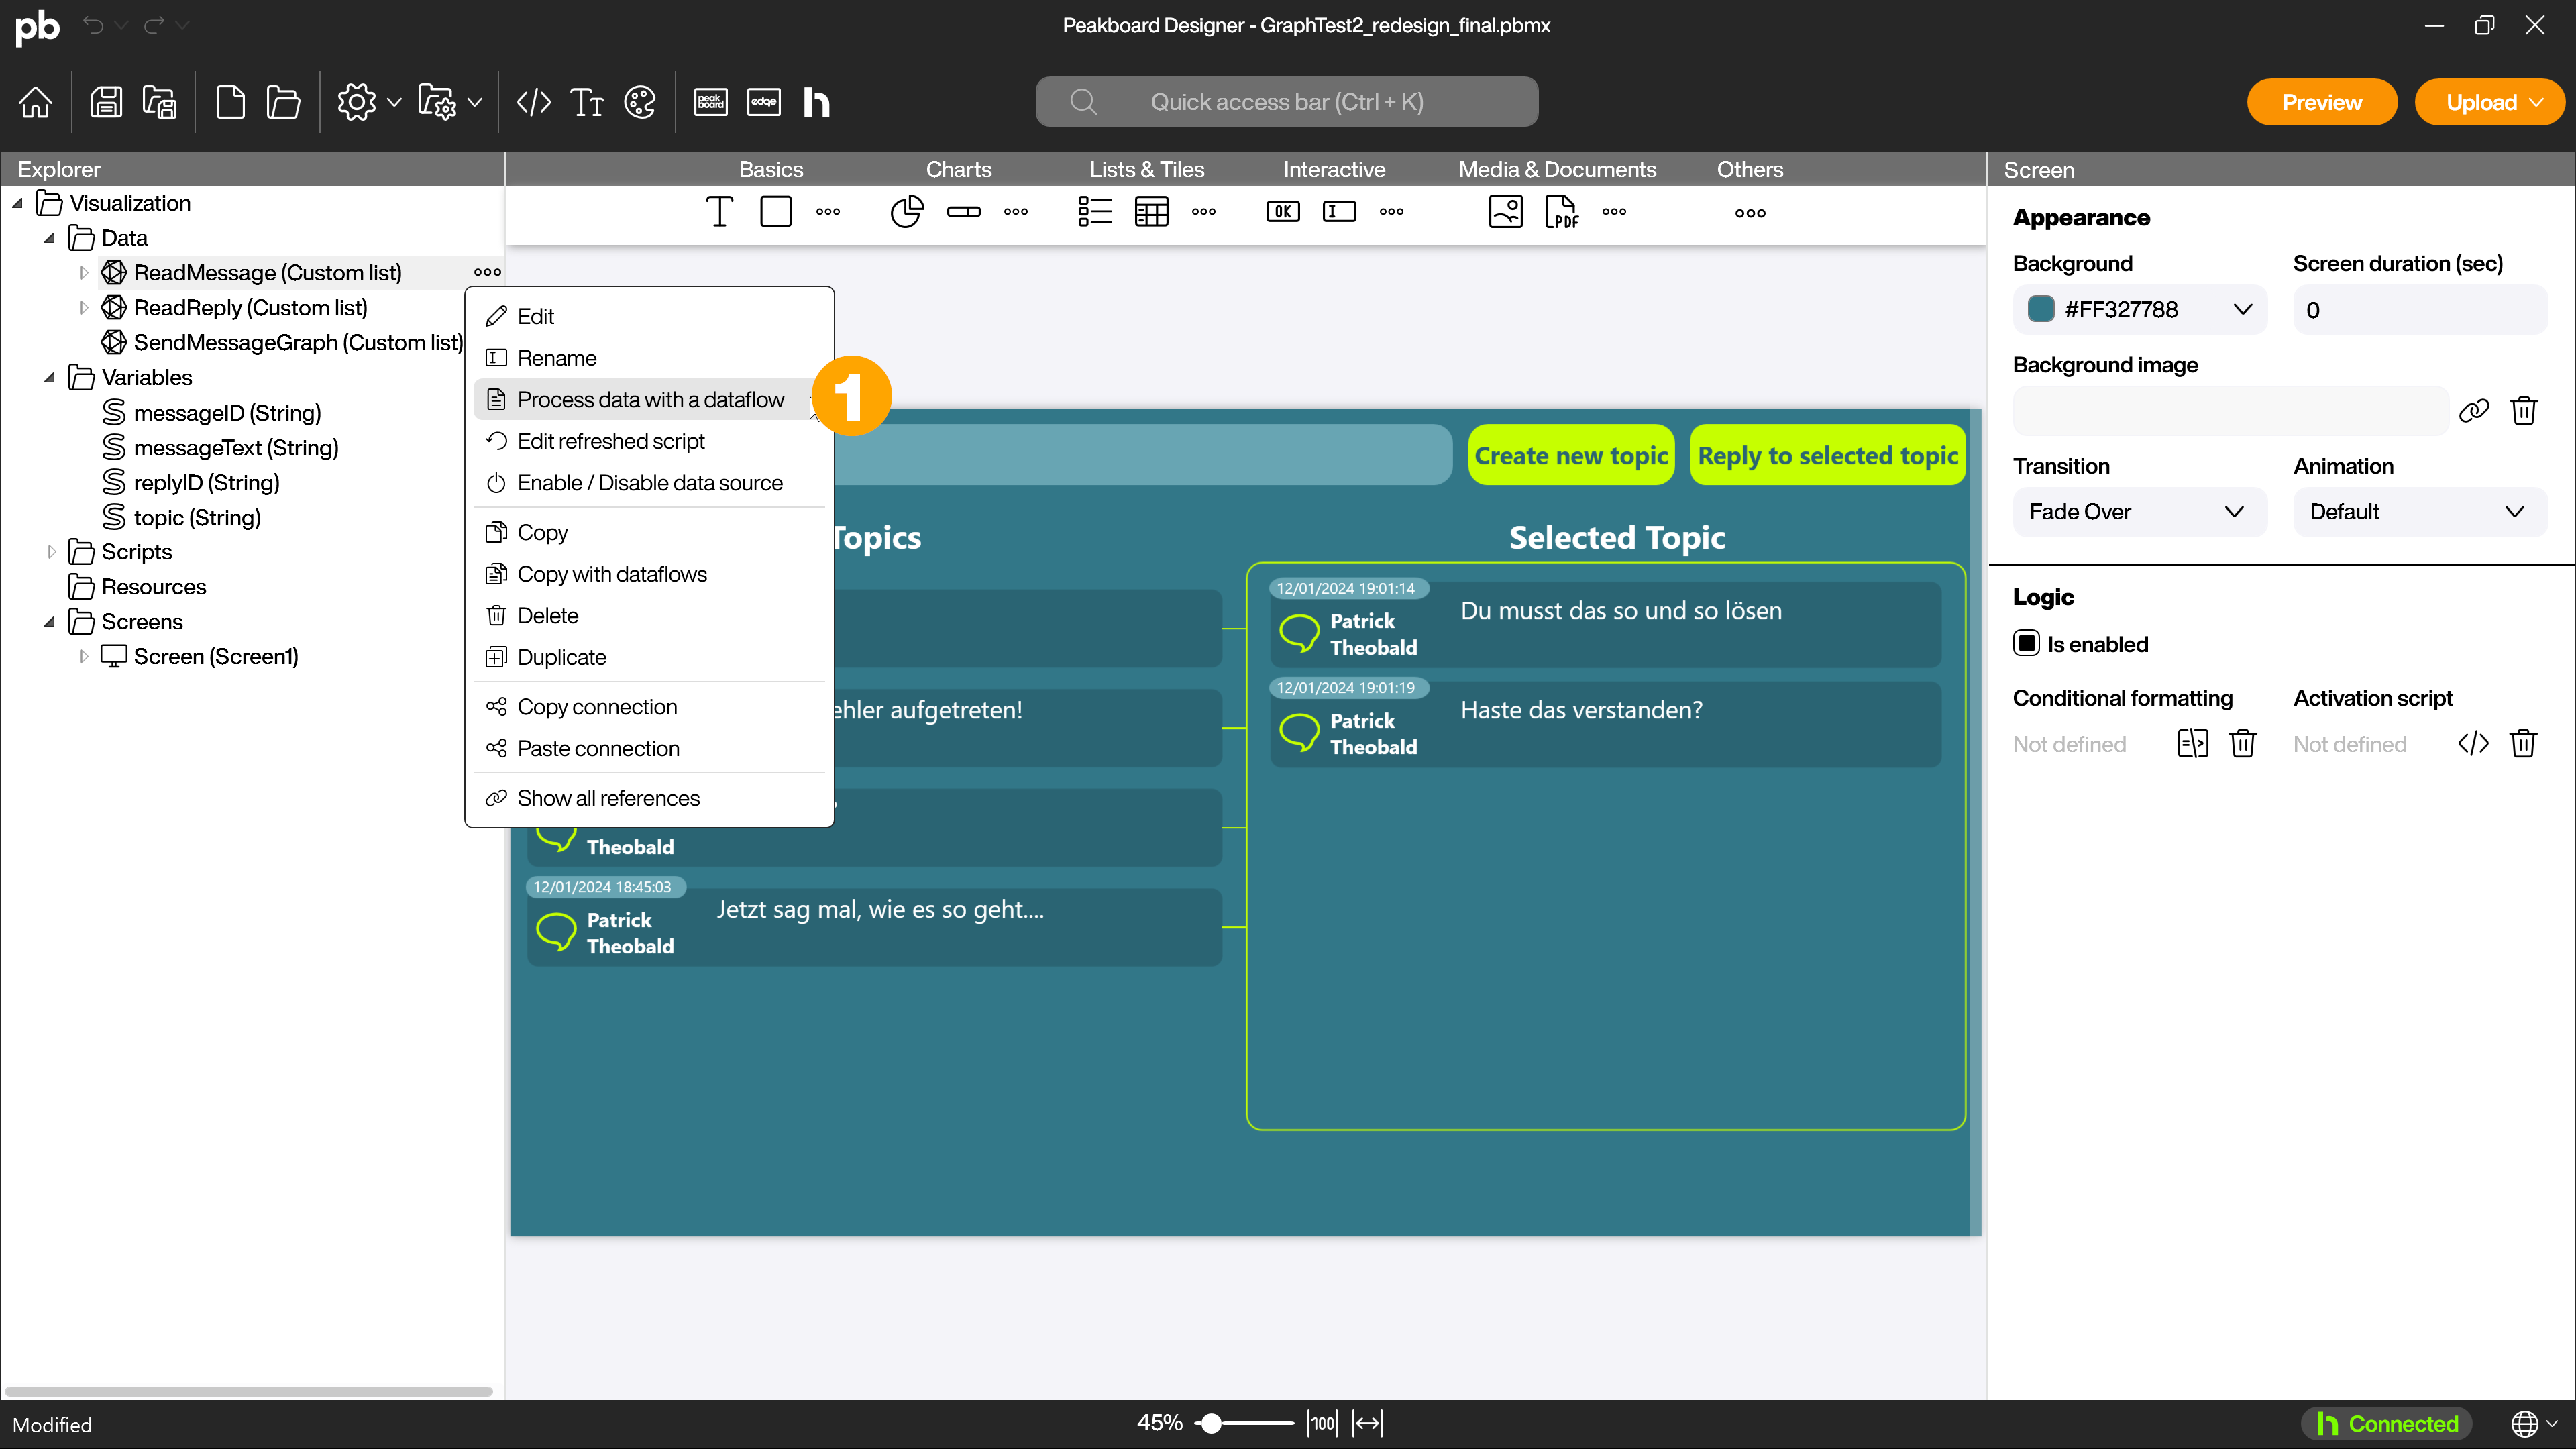
Create dataflows for the data sources
In order for the messages to be displayed correctly, you must create a dataflow for the two reading data sources. To do this, right-click on the data source and select [Process data with a dataflow] (1).
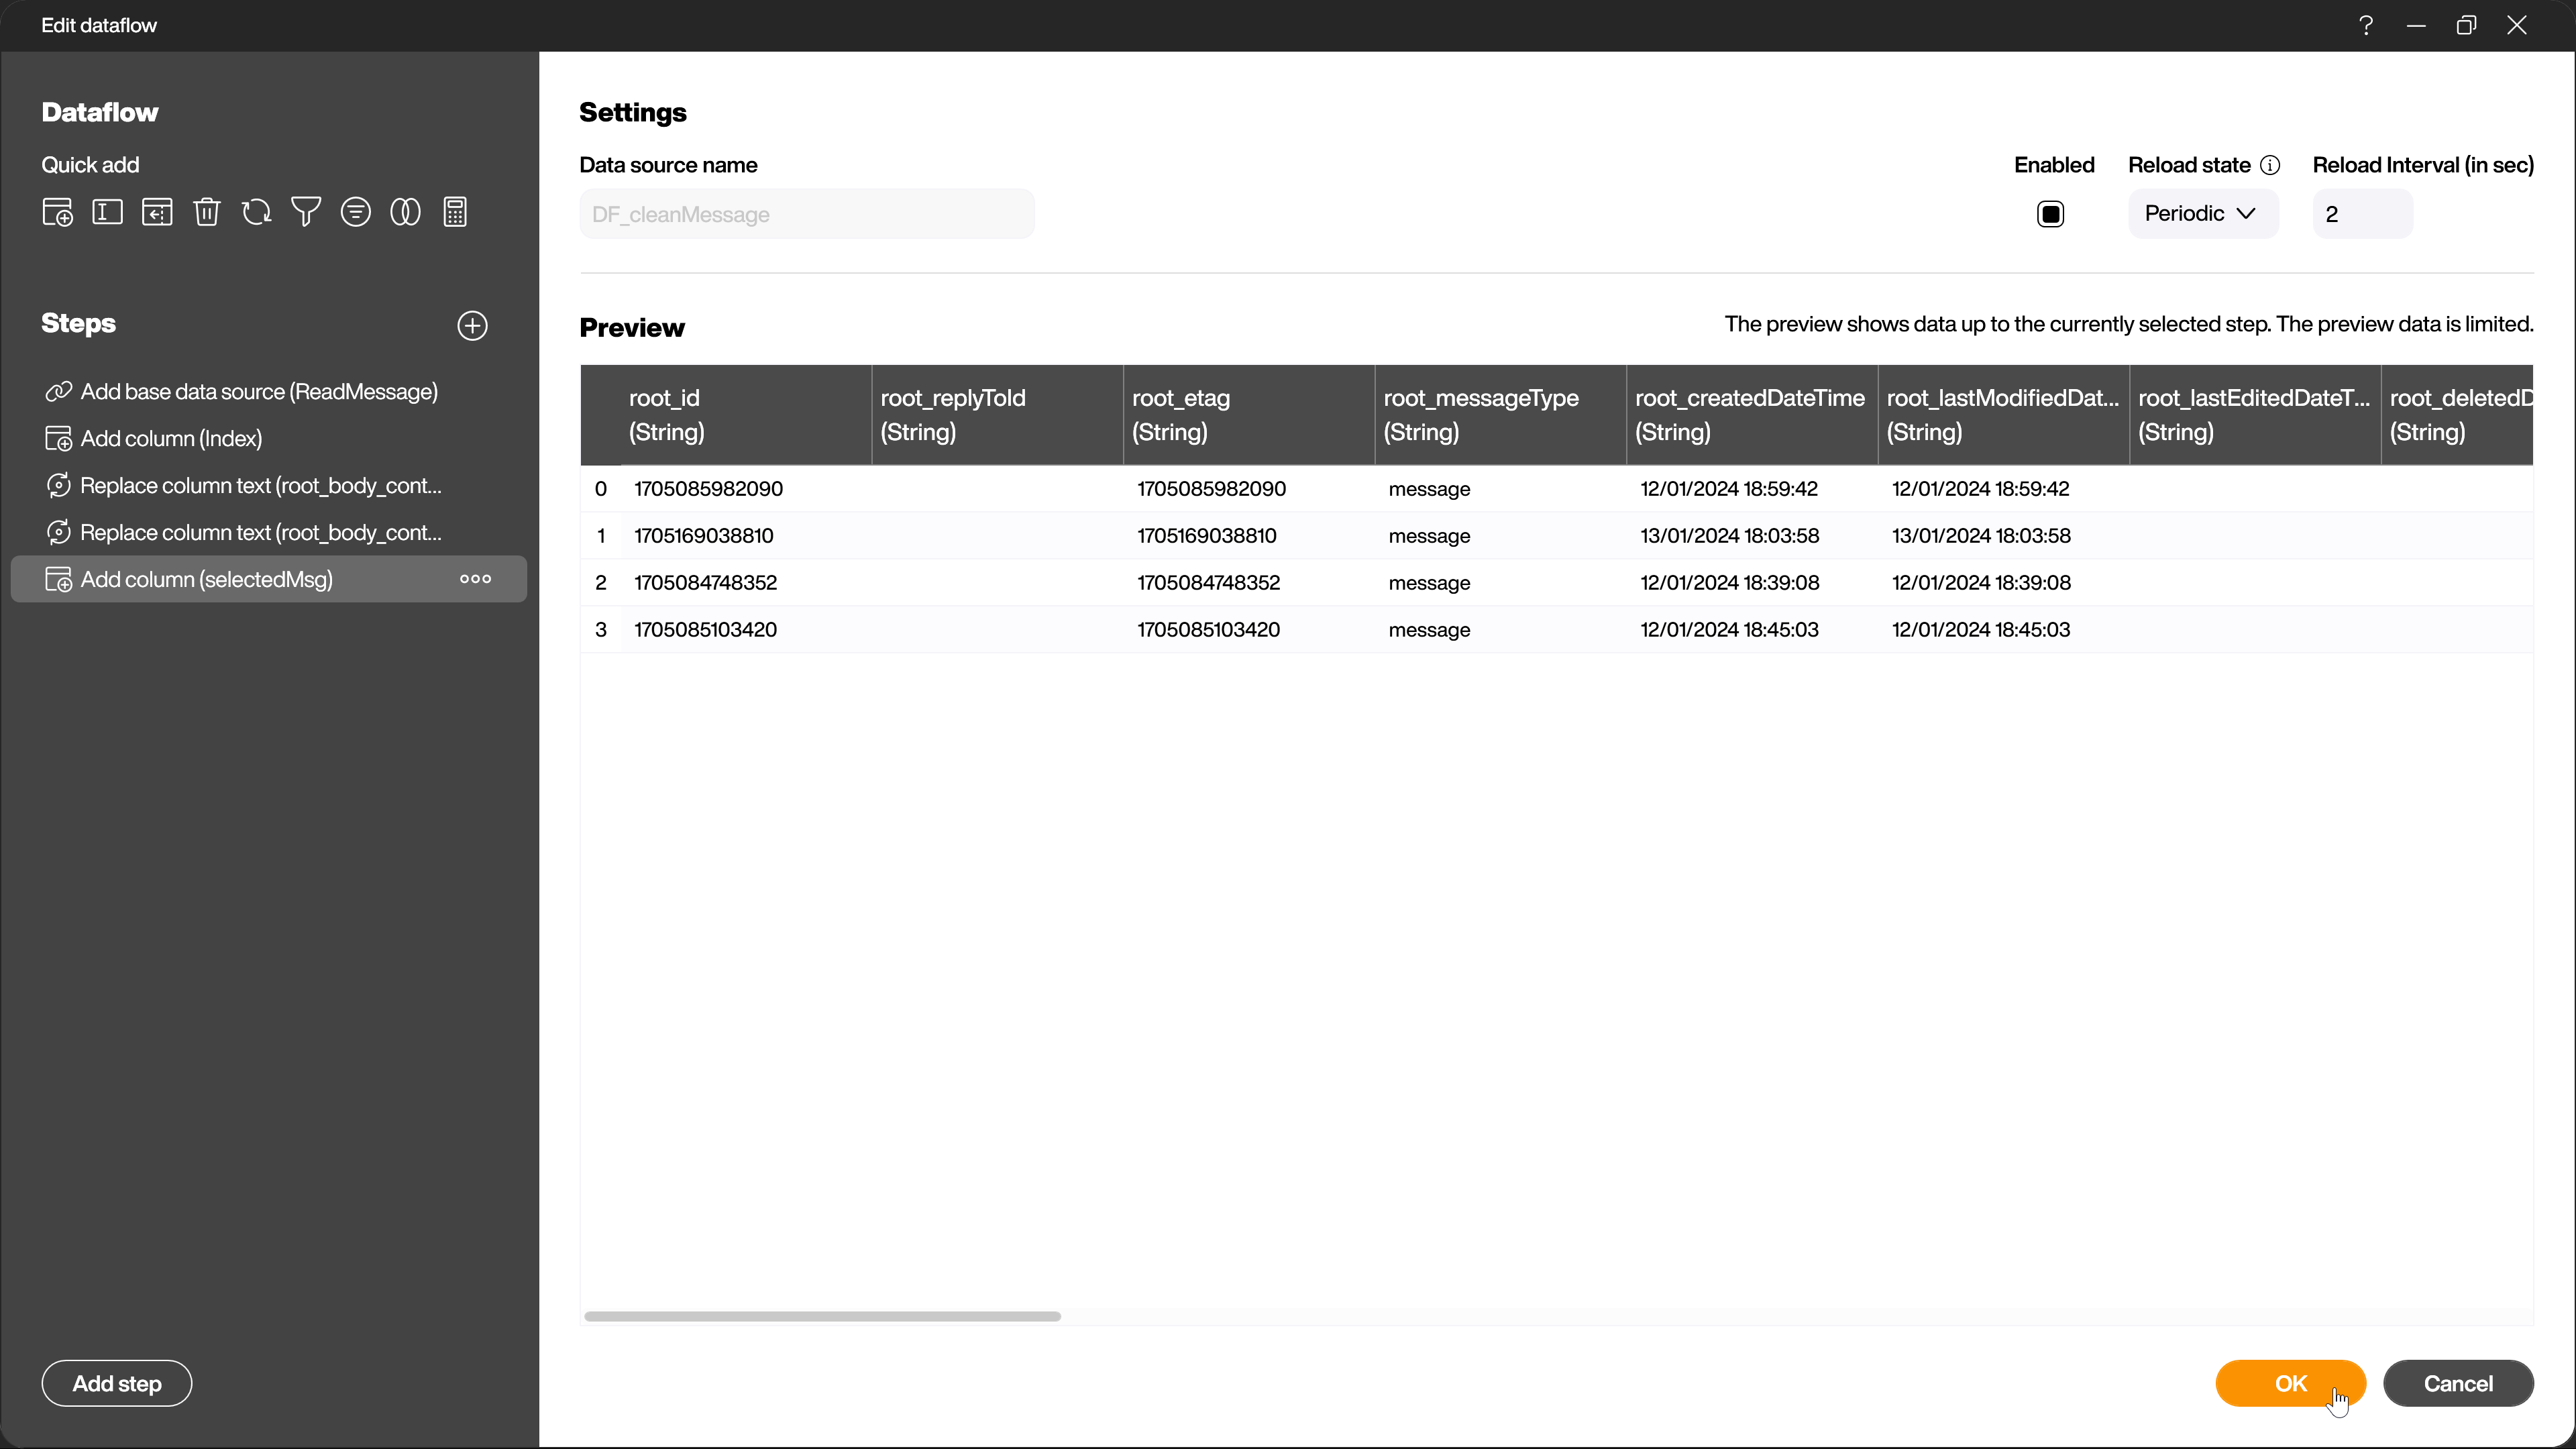
Data source ReadMessage - Dataflow DF_cleanMessage
Make the following adjustments in the [ReadMessage] data source:
- Change the reload status to [Periodic] and select a reload interval of 2 seconds.
- Add a column [Index] of type number with the script
return indexto be able to reference it later. - Remove the paragraph tags
<p>in the column [root_body_content] using the step [replace column text] so that they are not displayed later as plain text in the message. - Add a column [selectedMessage] of type boolean, with which you can determine which message is currently selected. Use this as a script:
if item.root_body_content == data.topic then
    return true
else
    return false
end
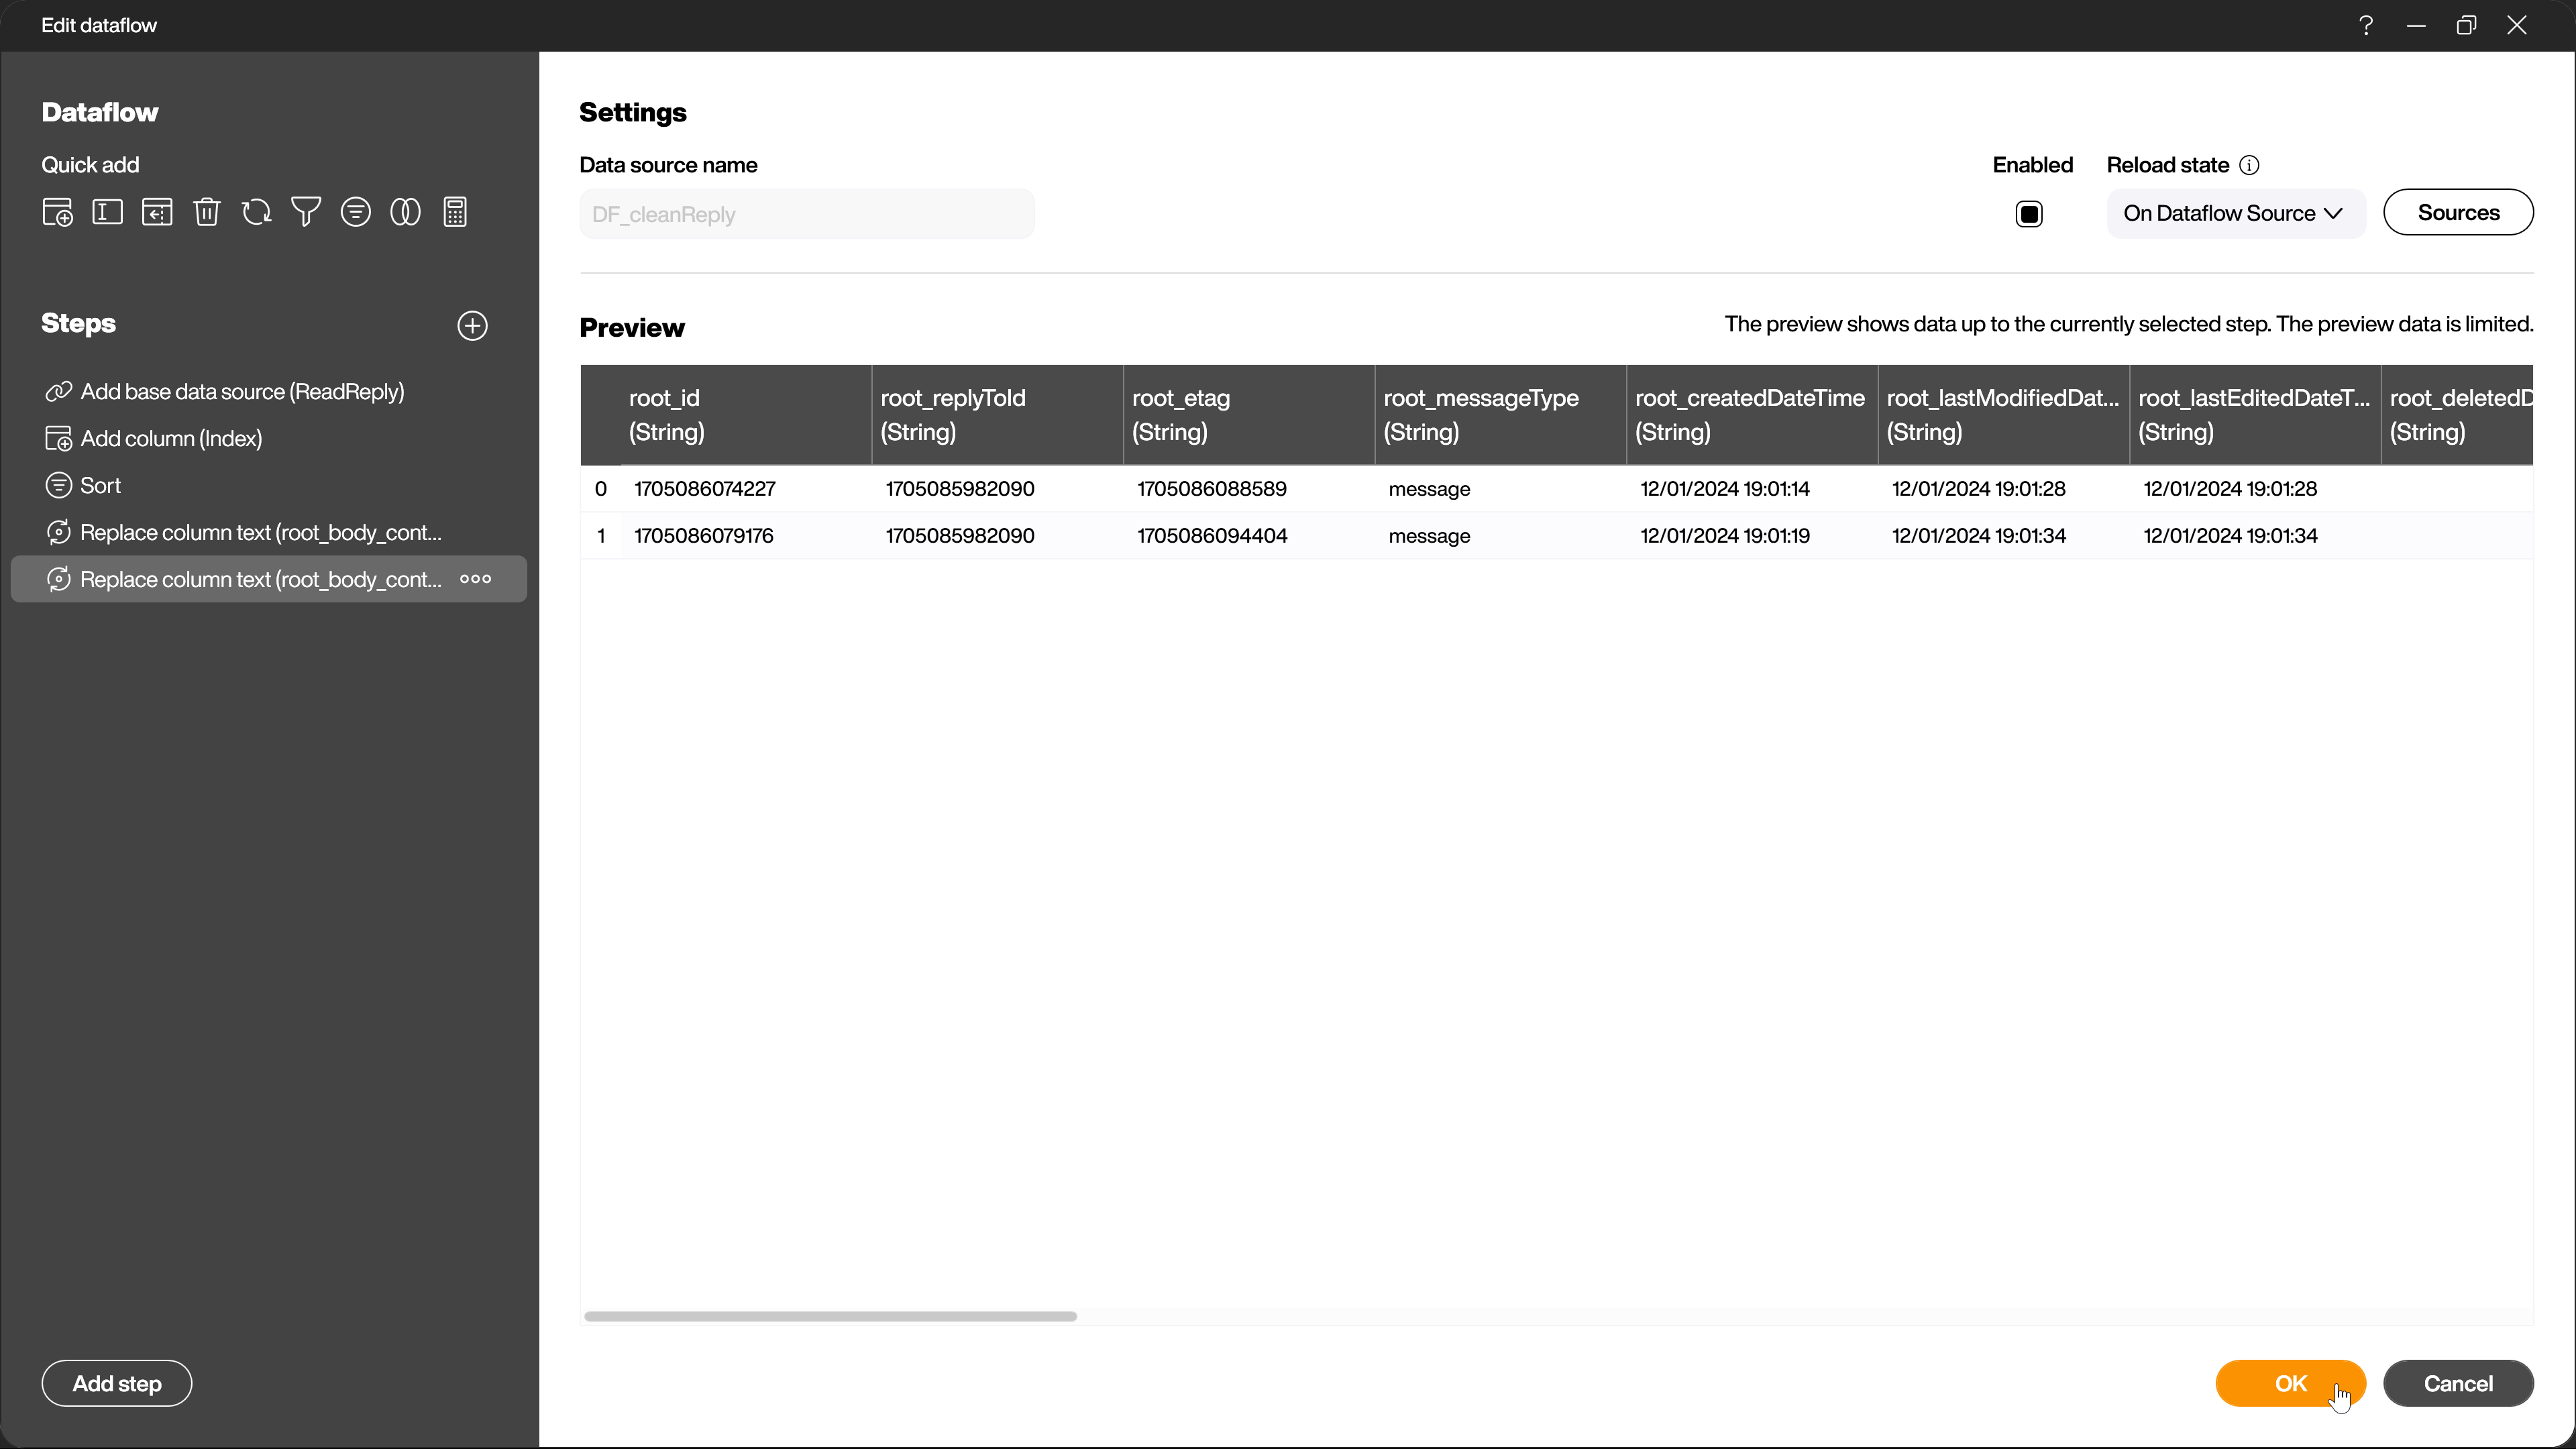
Data source ReadReply - Dataflow DF_cleanReply
Make the following adjustments in the [ReadReply] data source:
- Add a column [Index] of type number with the script
return indexto be able to reference it later. - Sort the data with the [Sort] step according to the newly created column [Index] in descending order.
- Remove the paragraph tags
<p>in the [root_body_content] column using the [Replace column text] step so that they are not displayed later as plain text in the message.
Building the application in the Peakboard Designer
Once all the preparations have been made, you can start building the visual interface of the application. Only the required controls and scripts are explained below. You can customize the visual design according to your wishes.
Display existing messages area
To display the messages from the Teams channel, create a styled list control (1) and connect it to the dataflow [DF_cleanMessage] (2). Activate the [Scrollable] checkbox (3) and in the [Logic] area the [Used in scripts] checkbox (4). Give the control a name there (5). Then you can define a template (6) for how the messages are displayed.
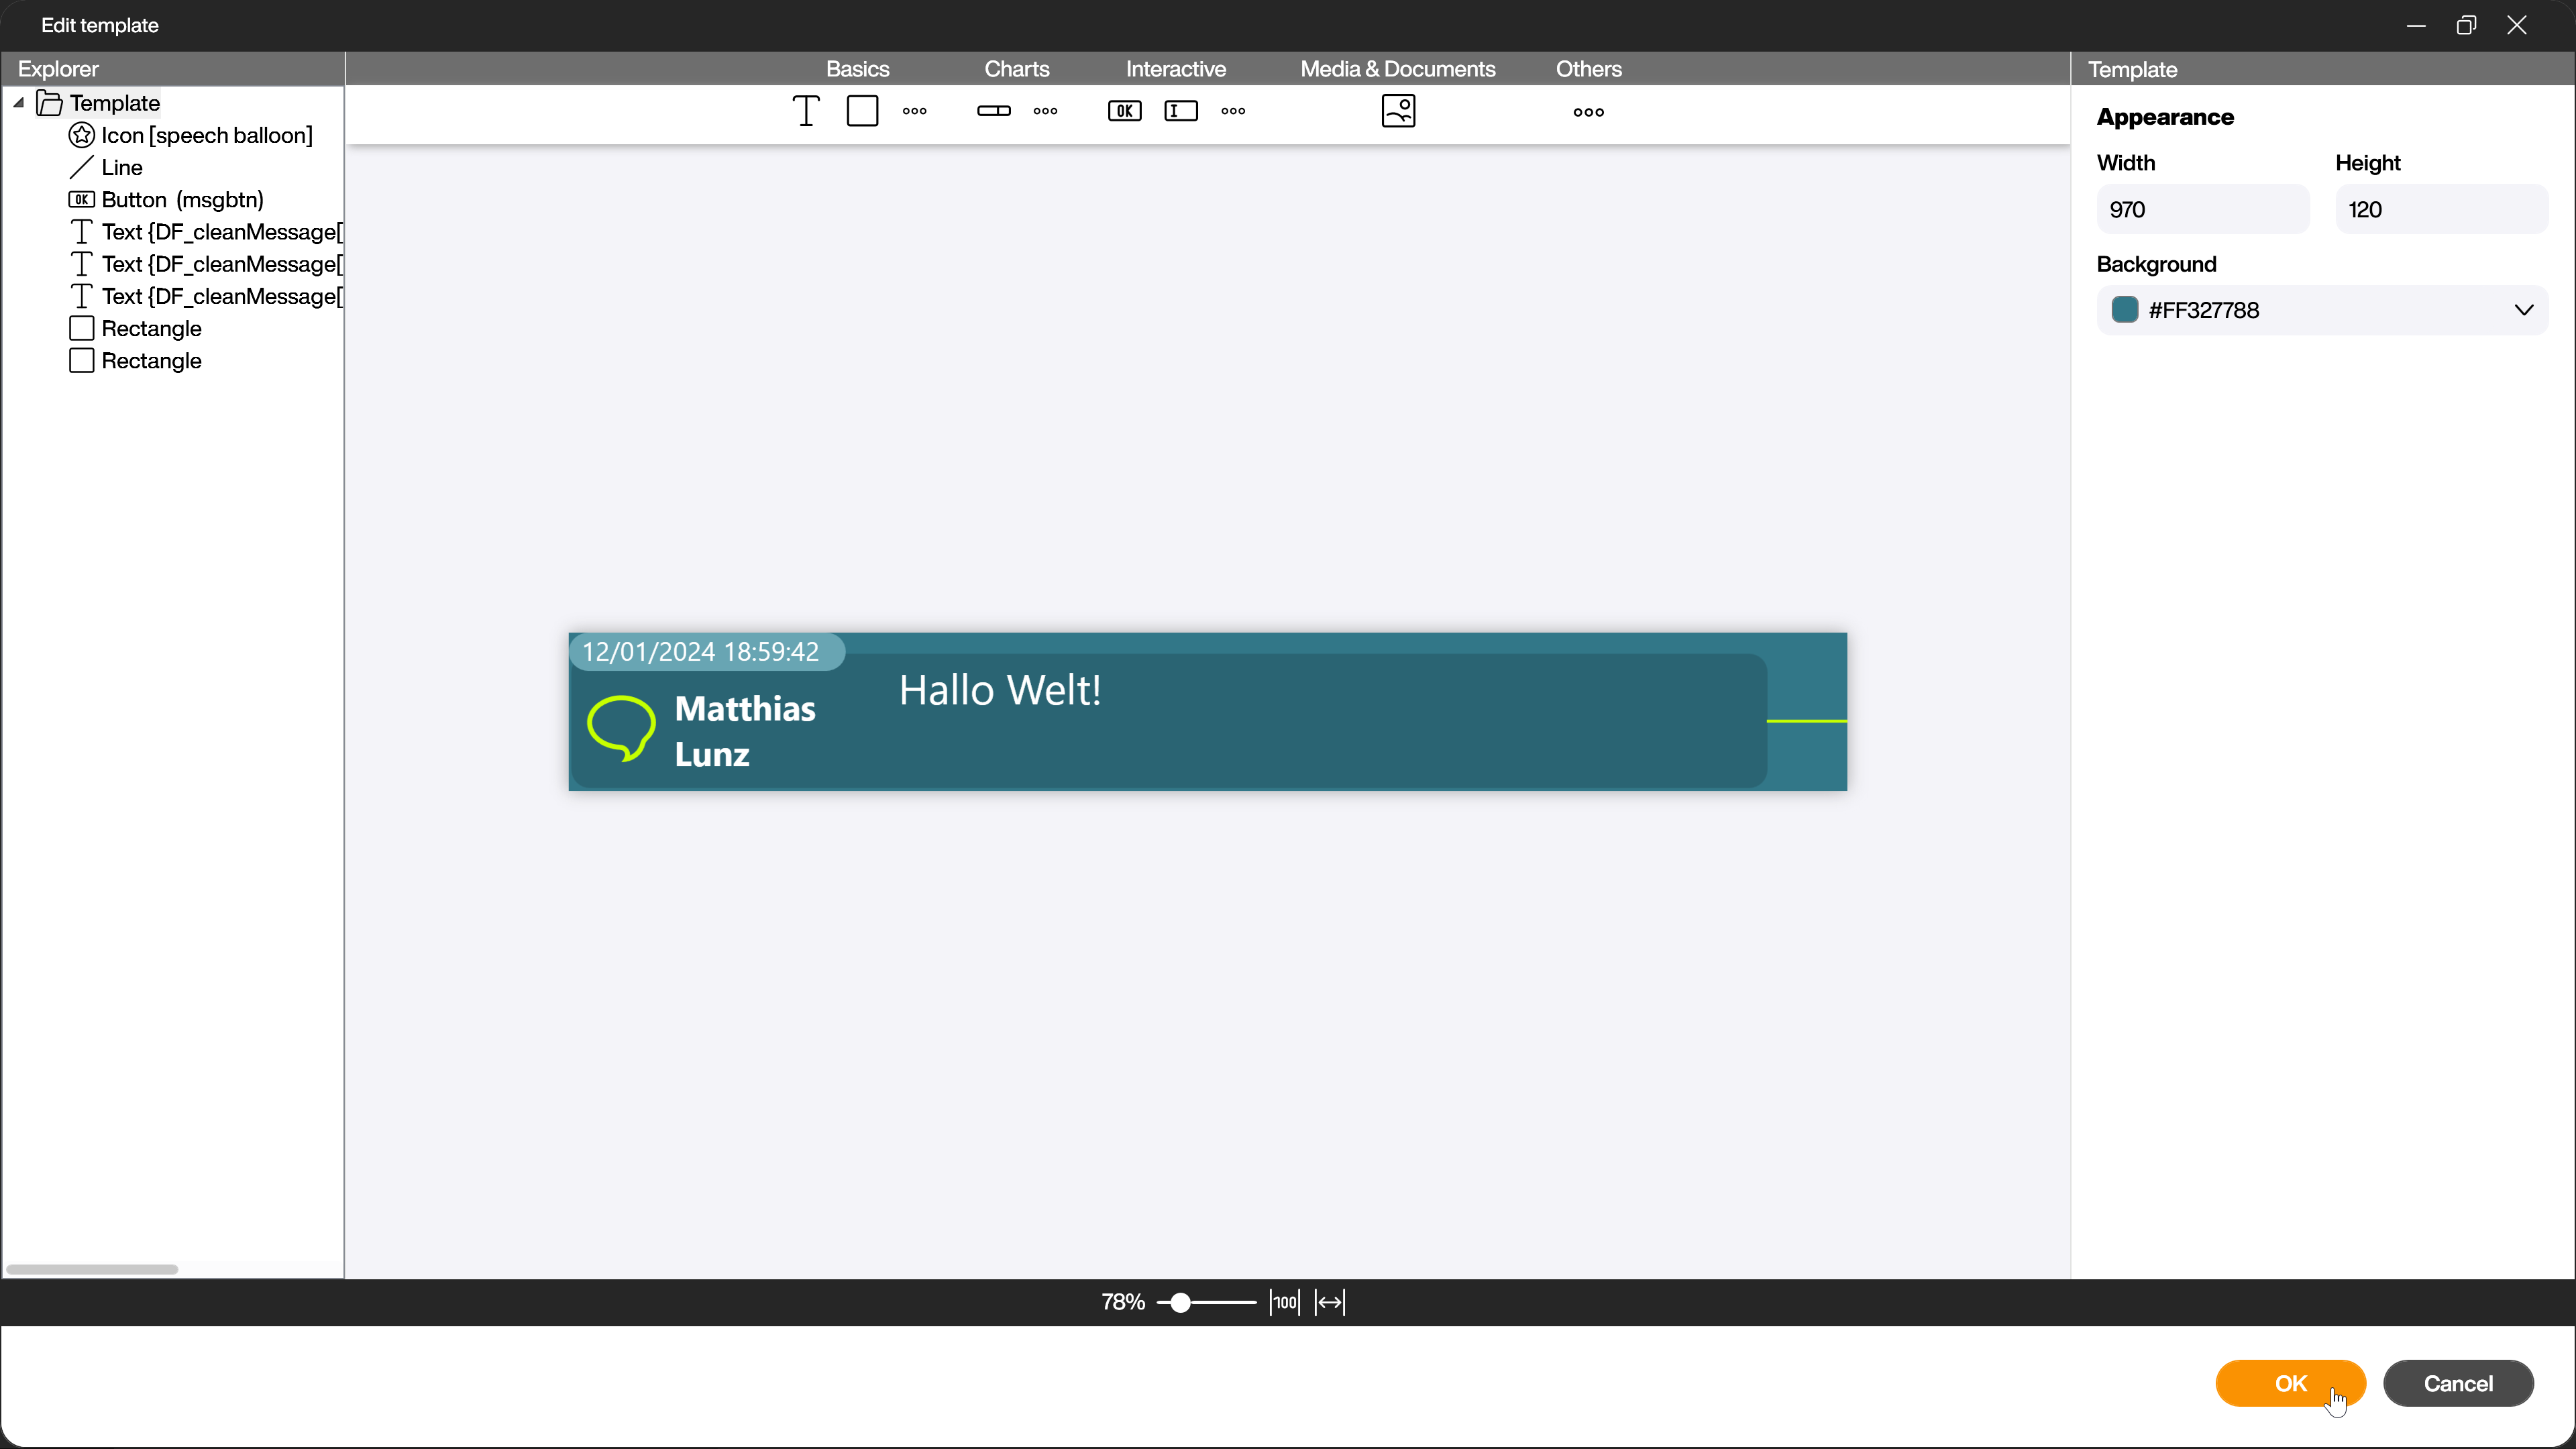
The template in the next screenshot consists of the following elements:
- Rectangle controls and a line control as the background of the message, which contain conditional formatting. The conditional formatting adds an outline to the rectangles or fades the line in and out if the [selectedMessage] column is true and the message has therefore been selected in the application.
- An icon control with conditional formatting to indicate whether the message was sent from the application or from Teams. The system checks whether the user in the [root_from_user_displayName] column is the user of the application or not and displays a suitable icon.
- A text control with the date and time from the [root_createdDateTime] column.
- A text control with the name of the user from the [root_from_user_displayName] column.
- A text control with the message from the [root_body_content] column.
- A transparent button control that lies above the entire message field. The [Used in scripts] checkbox is activated and the control has a name. The tapped event of the button sets the [replyID] variable to the value of the [root_etag] column of the current row, the [topic] variable to the value of the [root_body_content] column of the current row and reloads the [ReadMessage] and [ReadReply] data sources. It is required to display the appropriate replies for the currently selected message.
Show replies to existing messages area
To connect to the line control from the template of the existing messages, create a visually matching rectangle control (1) in the background. In this example, its background is transparent and the control has an outline that matches the line. To display the replies to the messages from the left-hand area, add another styled list control (2) on the right-hand side. Connect it to the dataflow [DF_cleanReply] (3) and activate the checkbox [Scrollable] (4). Then you can define the template for displaying the responses (5).
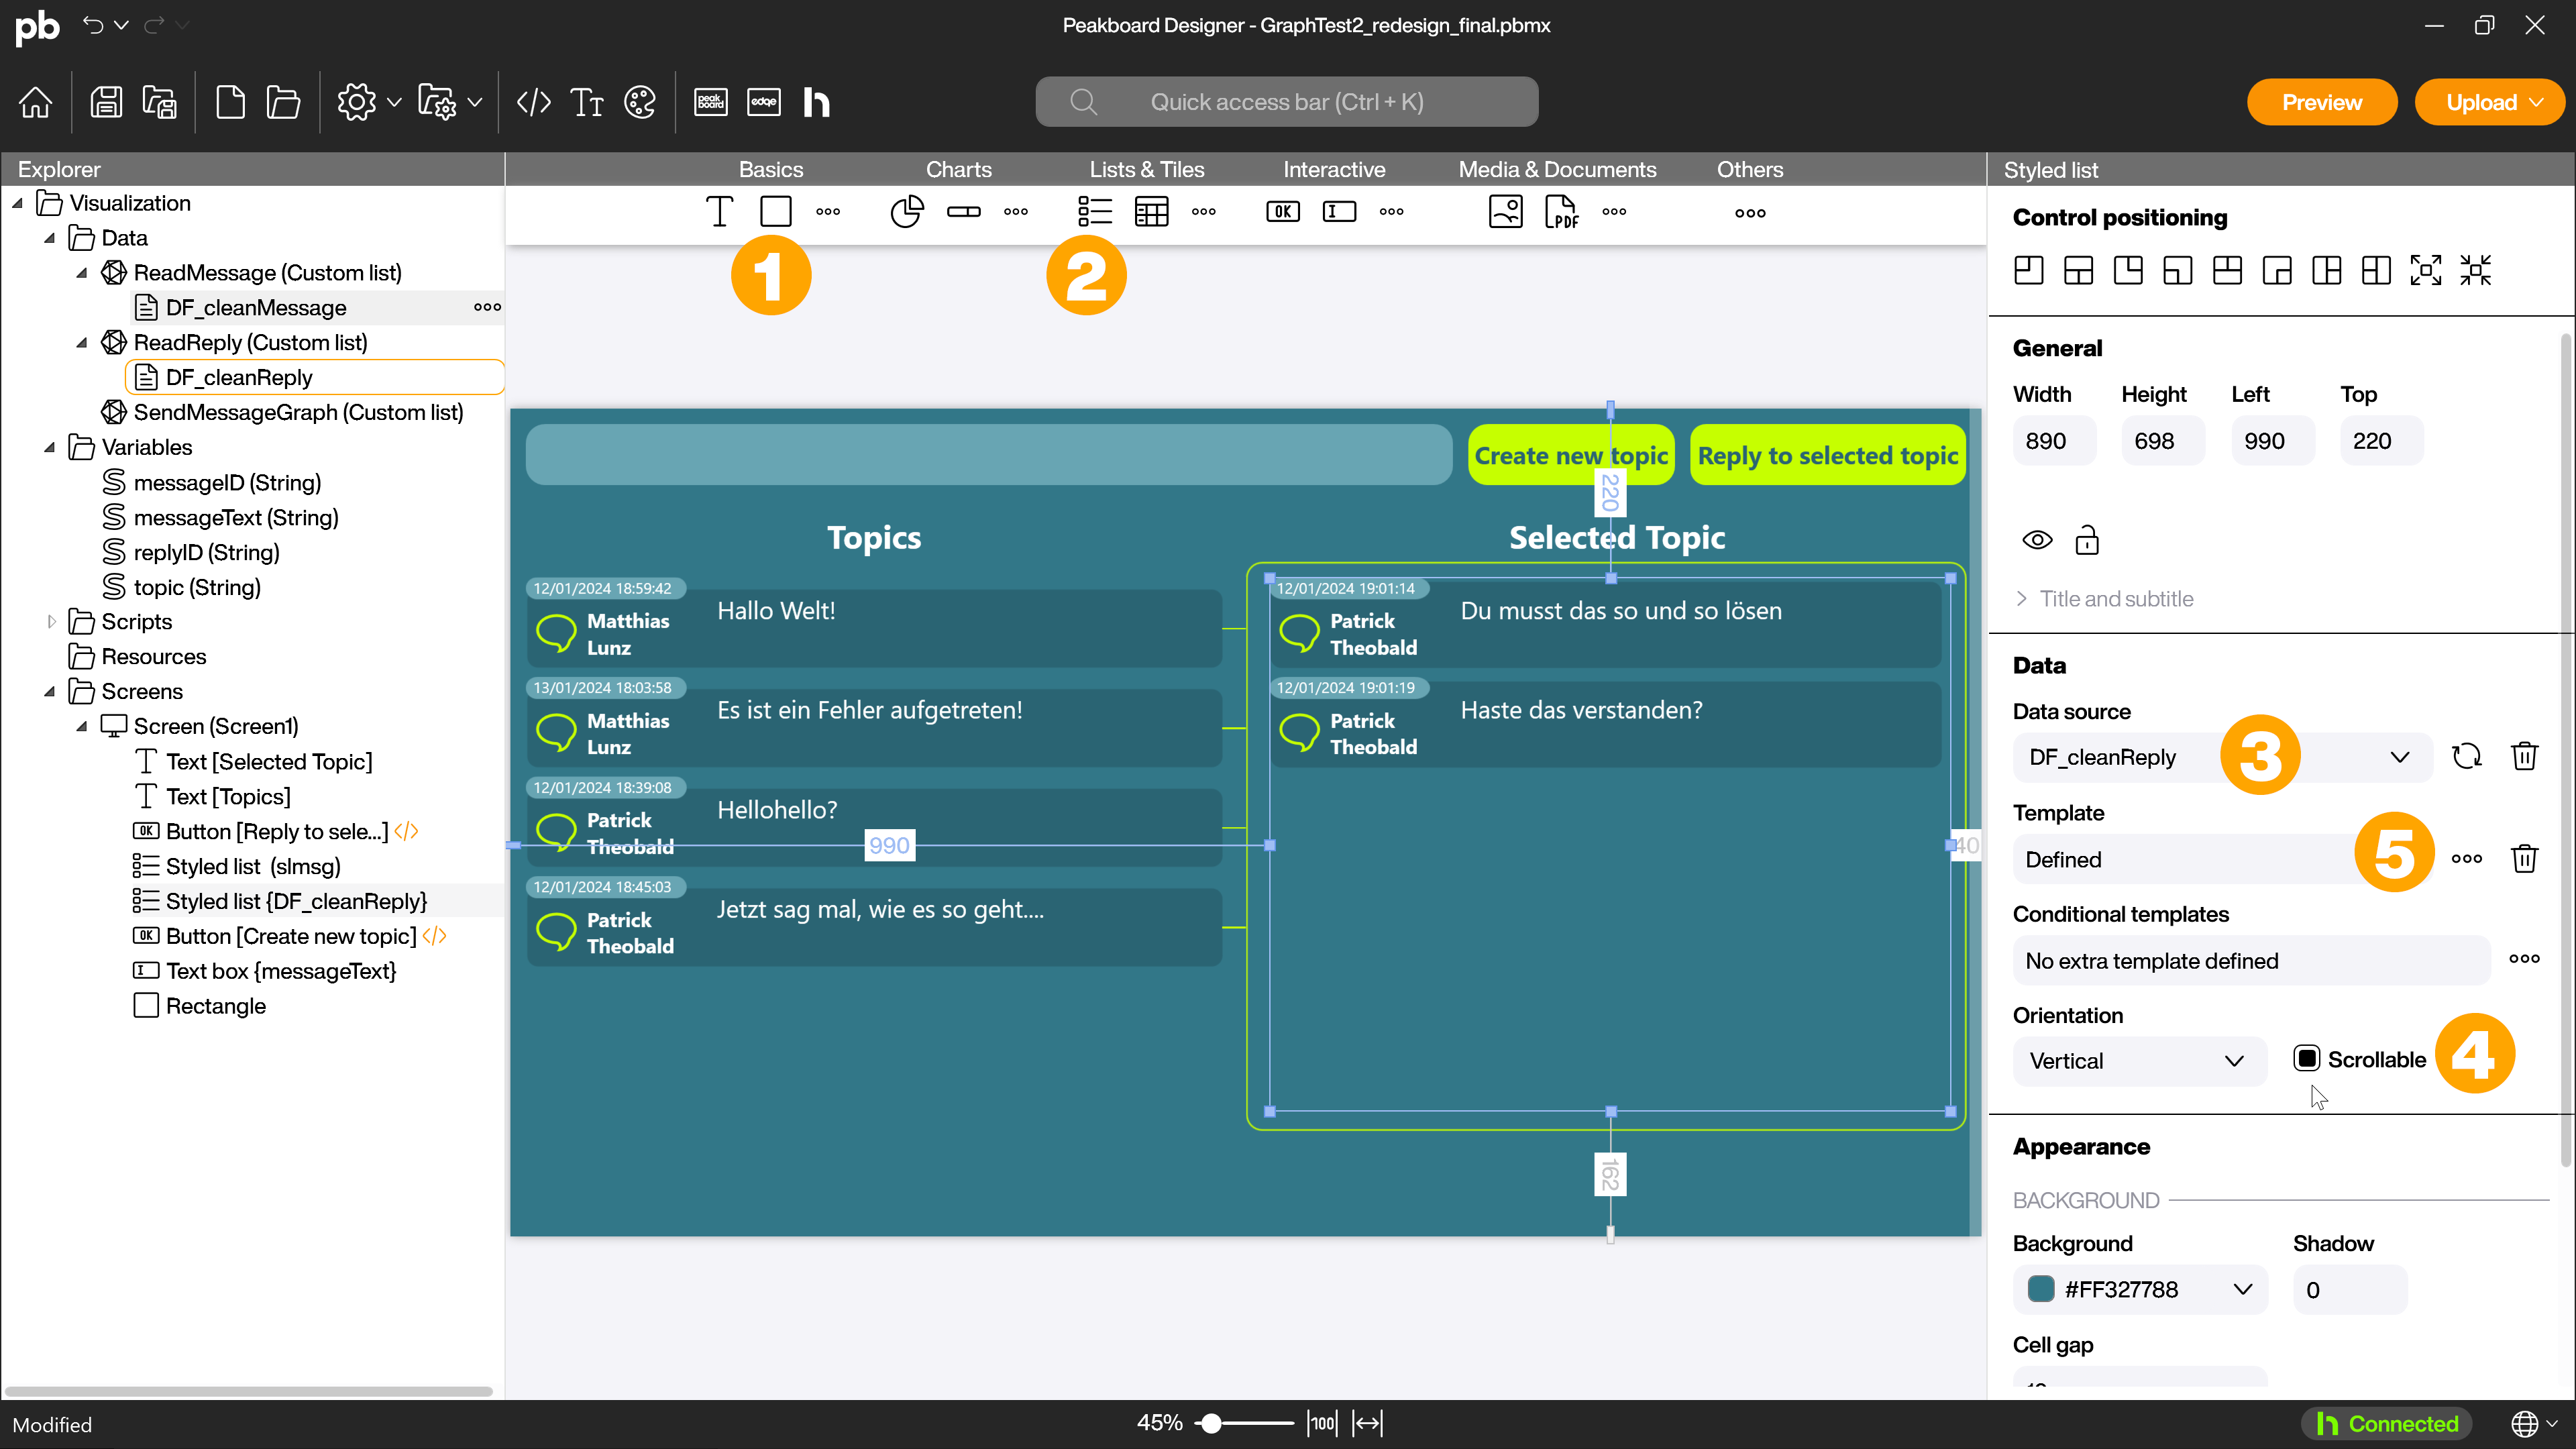
The template in the next screenshot consists of the following elements:
- Rectangle controls as the background of the message, which contain conditional formatting. The conditional formatting adds an outline to the rectangles if the [selectedMessage] column is true and the original message that was replied to was therefore selected in the application.
- An icon control with conditional formatting to indicate whether the message was sent from the application or from Teams. The system checks whether the user in the [root_from_user_displayName] column is the user of the application or not and displays a suitable icon.
- A text control with the date and time from the [root_createdDateTime] column.
- A text control with the name of the user from the [root_from_user_displayName] column.
- A text control with the message from the [root_body_content] column.

Send messages area
Finally, you need a text box control and two button controls to enter the messages and send them as a new message or as a reply to a selected message.
Text box control
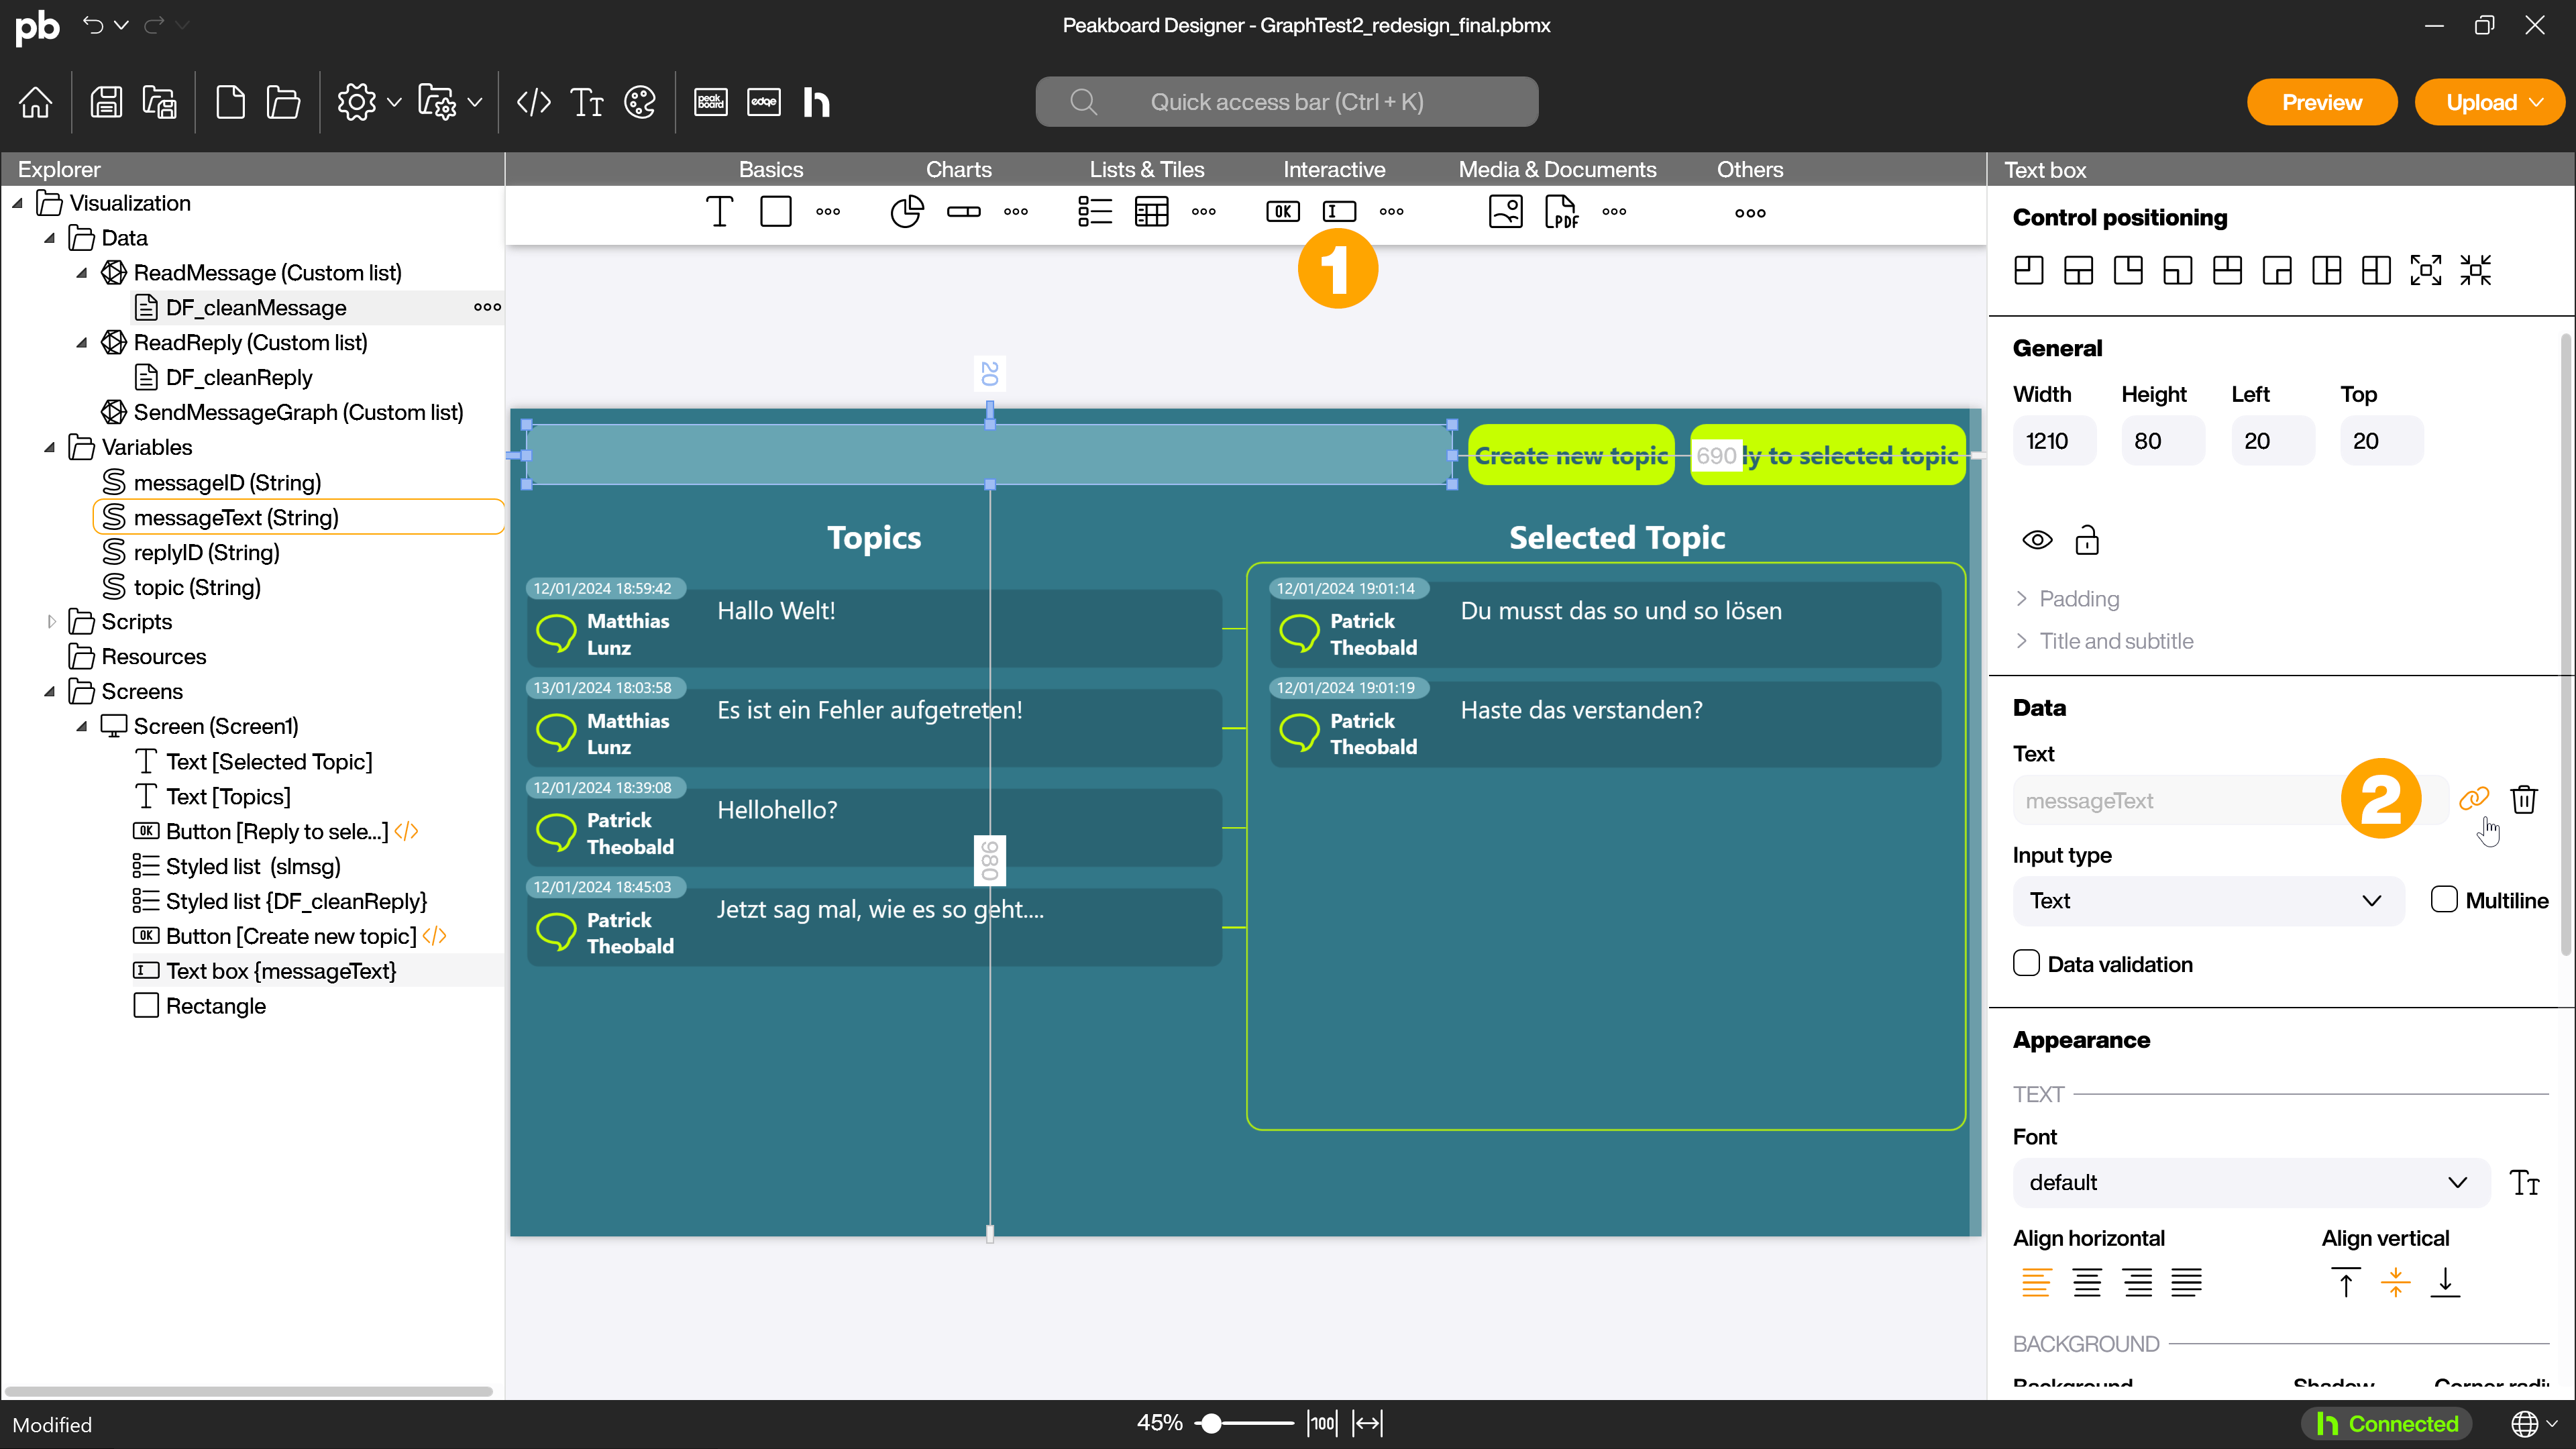
Create the text box Control (1) and connect it to the variable [messageText] (2).
Button control send new message
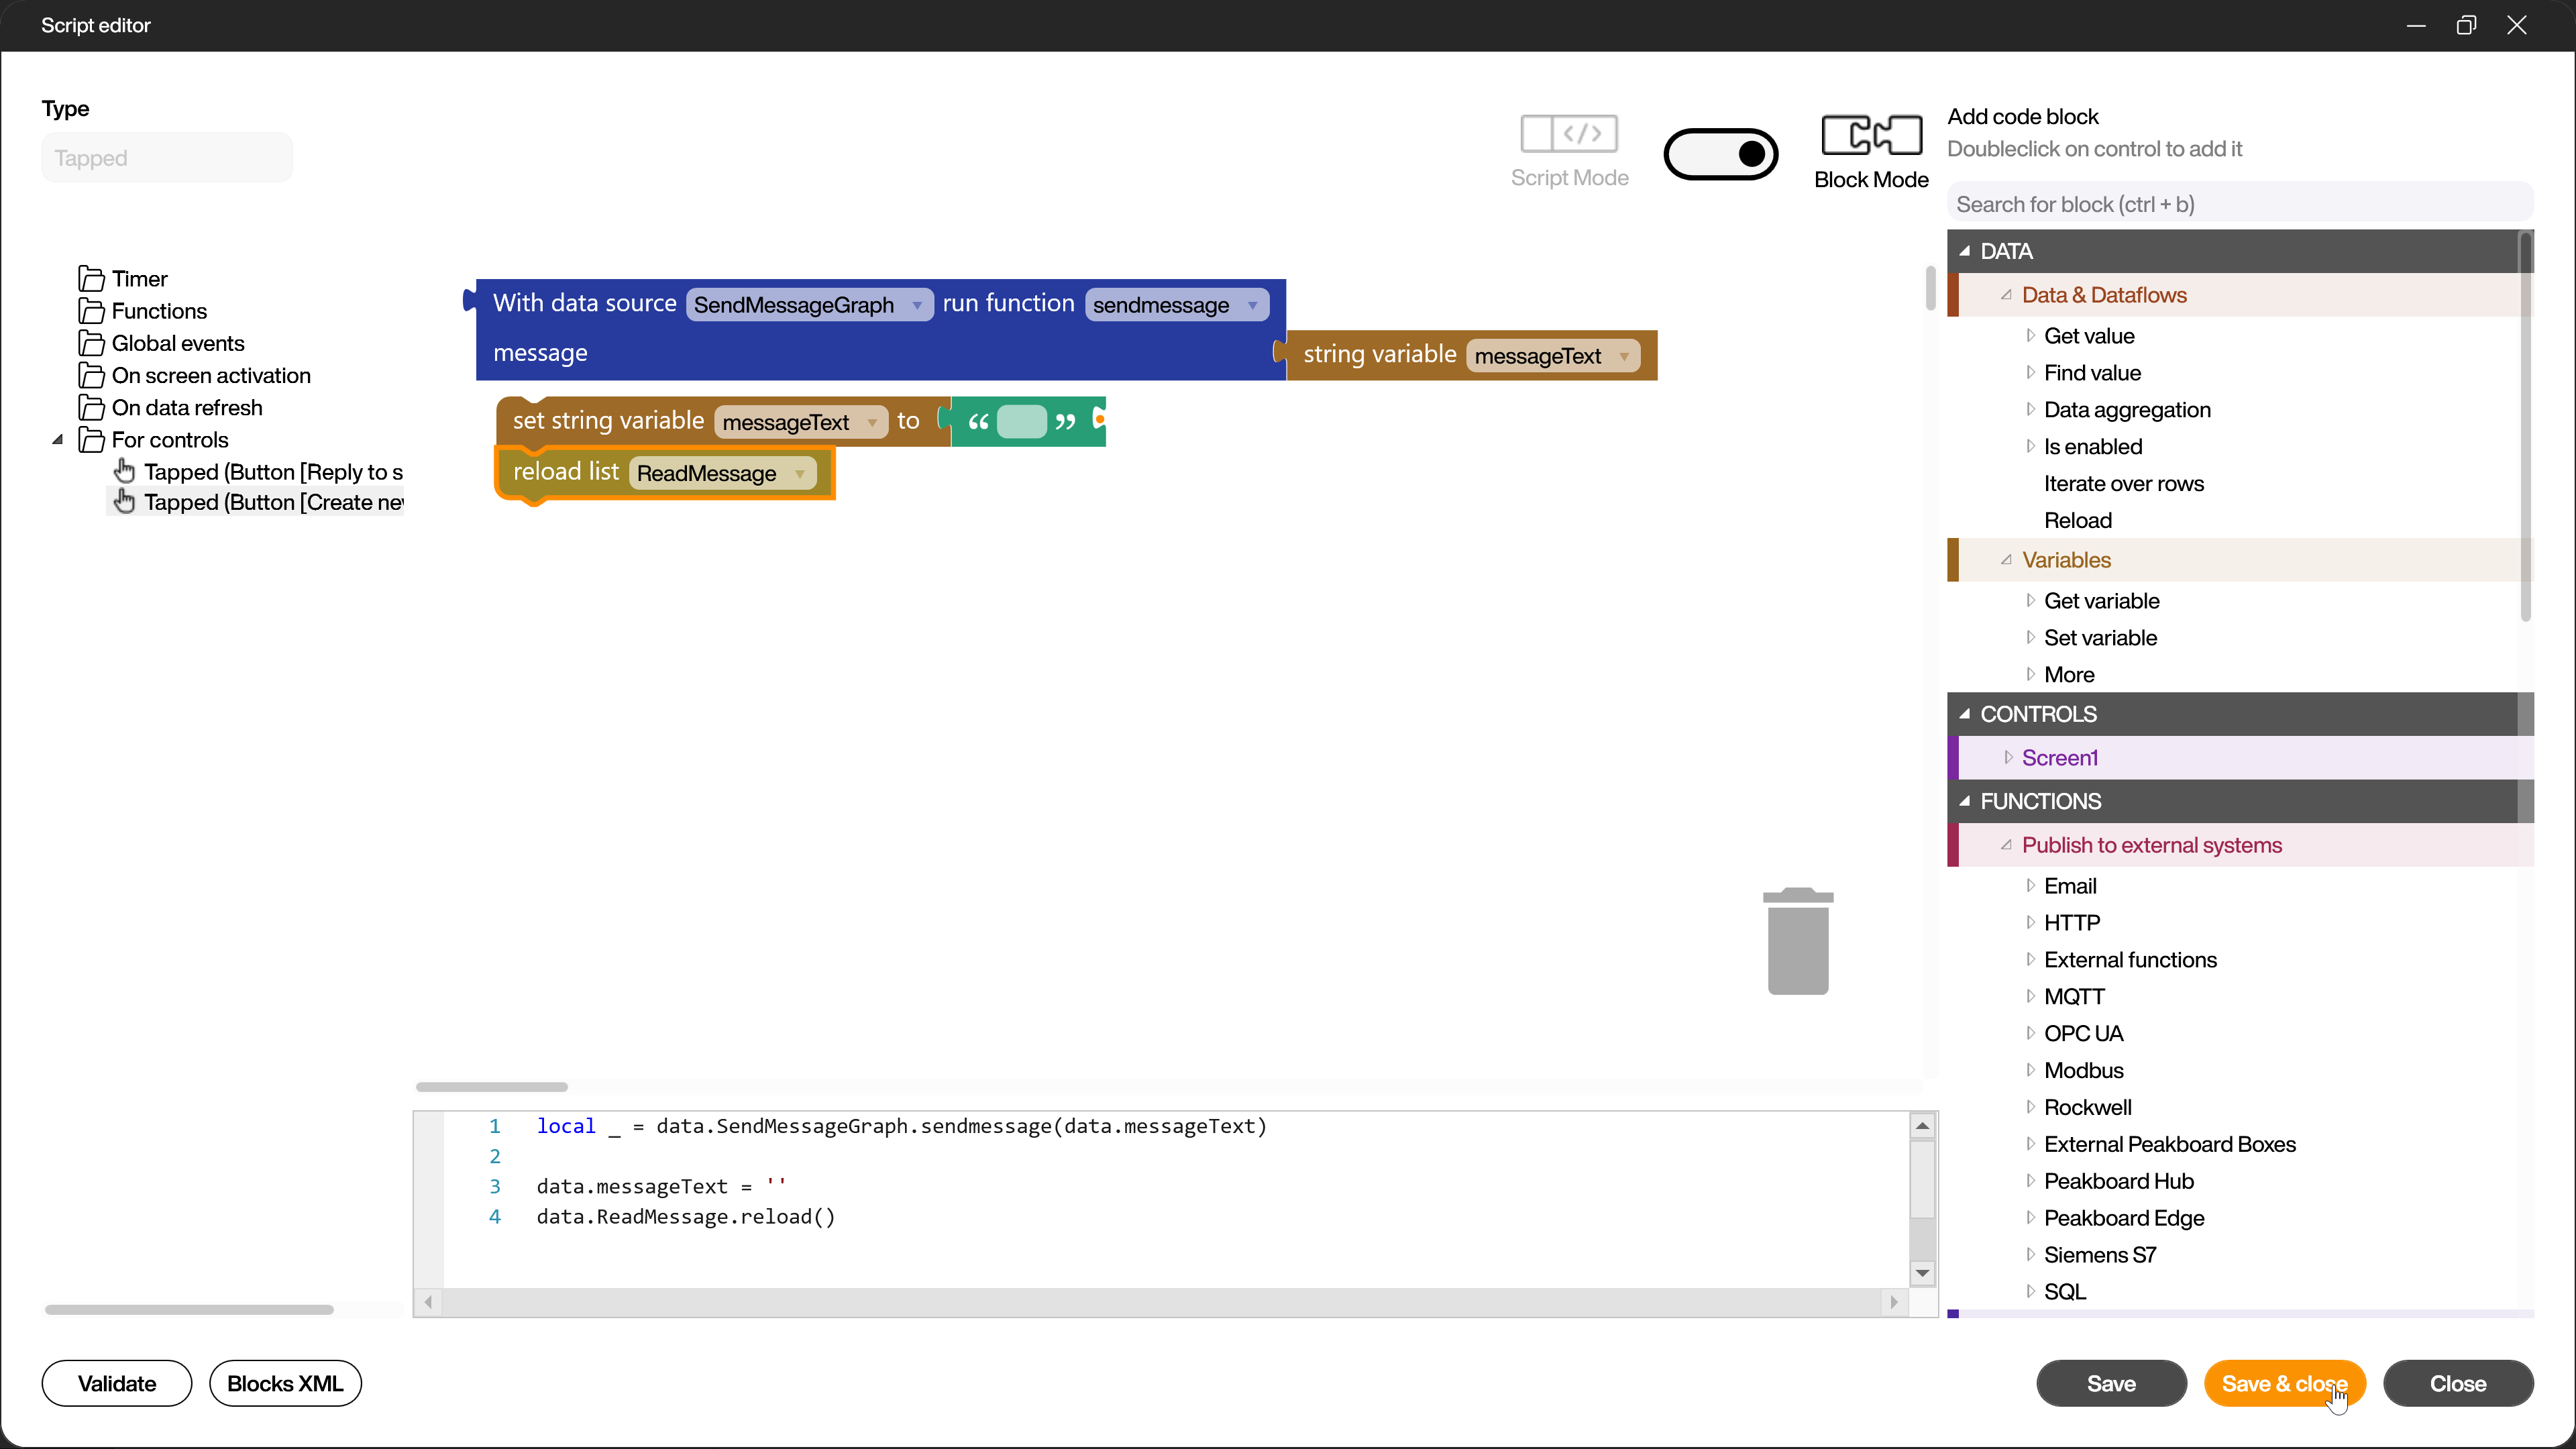
Create a button control (1) and enter a suitable button text (2).
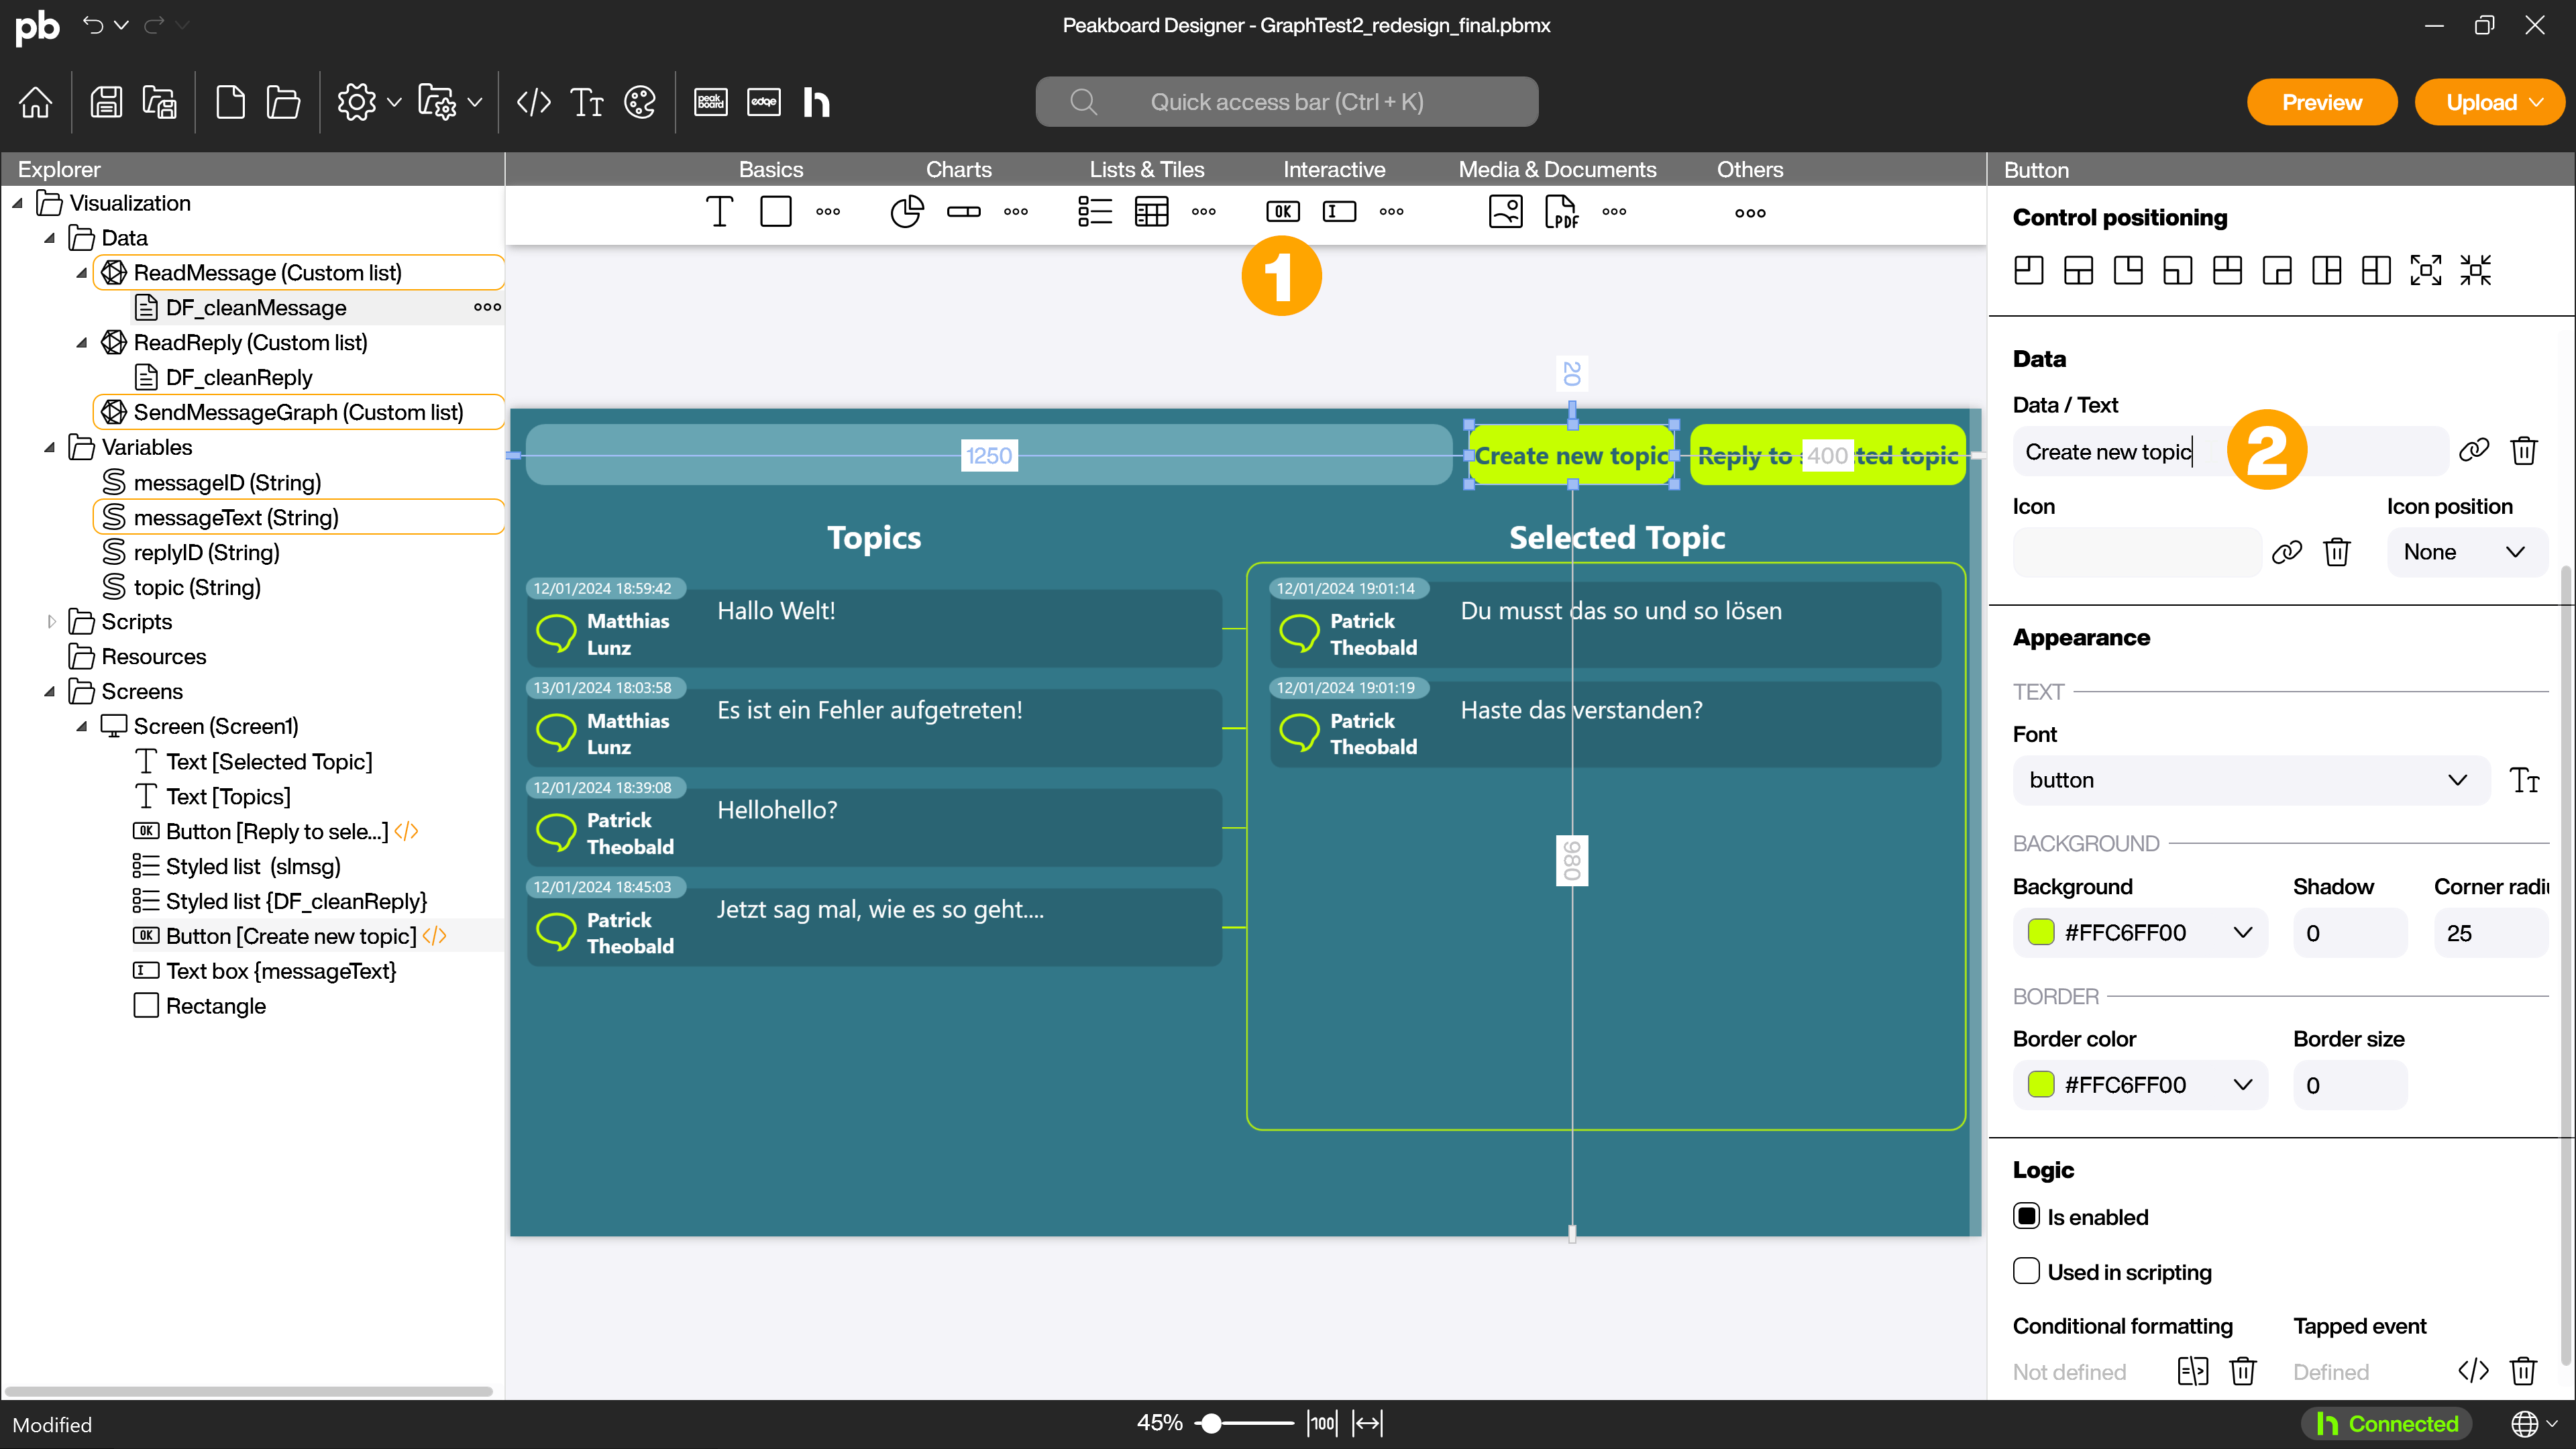
Open the script editor for the tapped event by double-clicking on the control. The script sends the message from the [messageText] variable with the [sendmessage] function from the [SendMessageGraph] data source. It then empties the variable and reloads the [ReadMessage] data source.
Button control reply to selected message
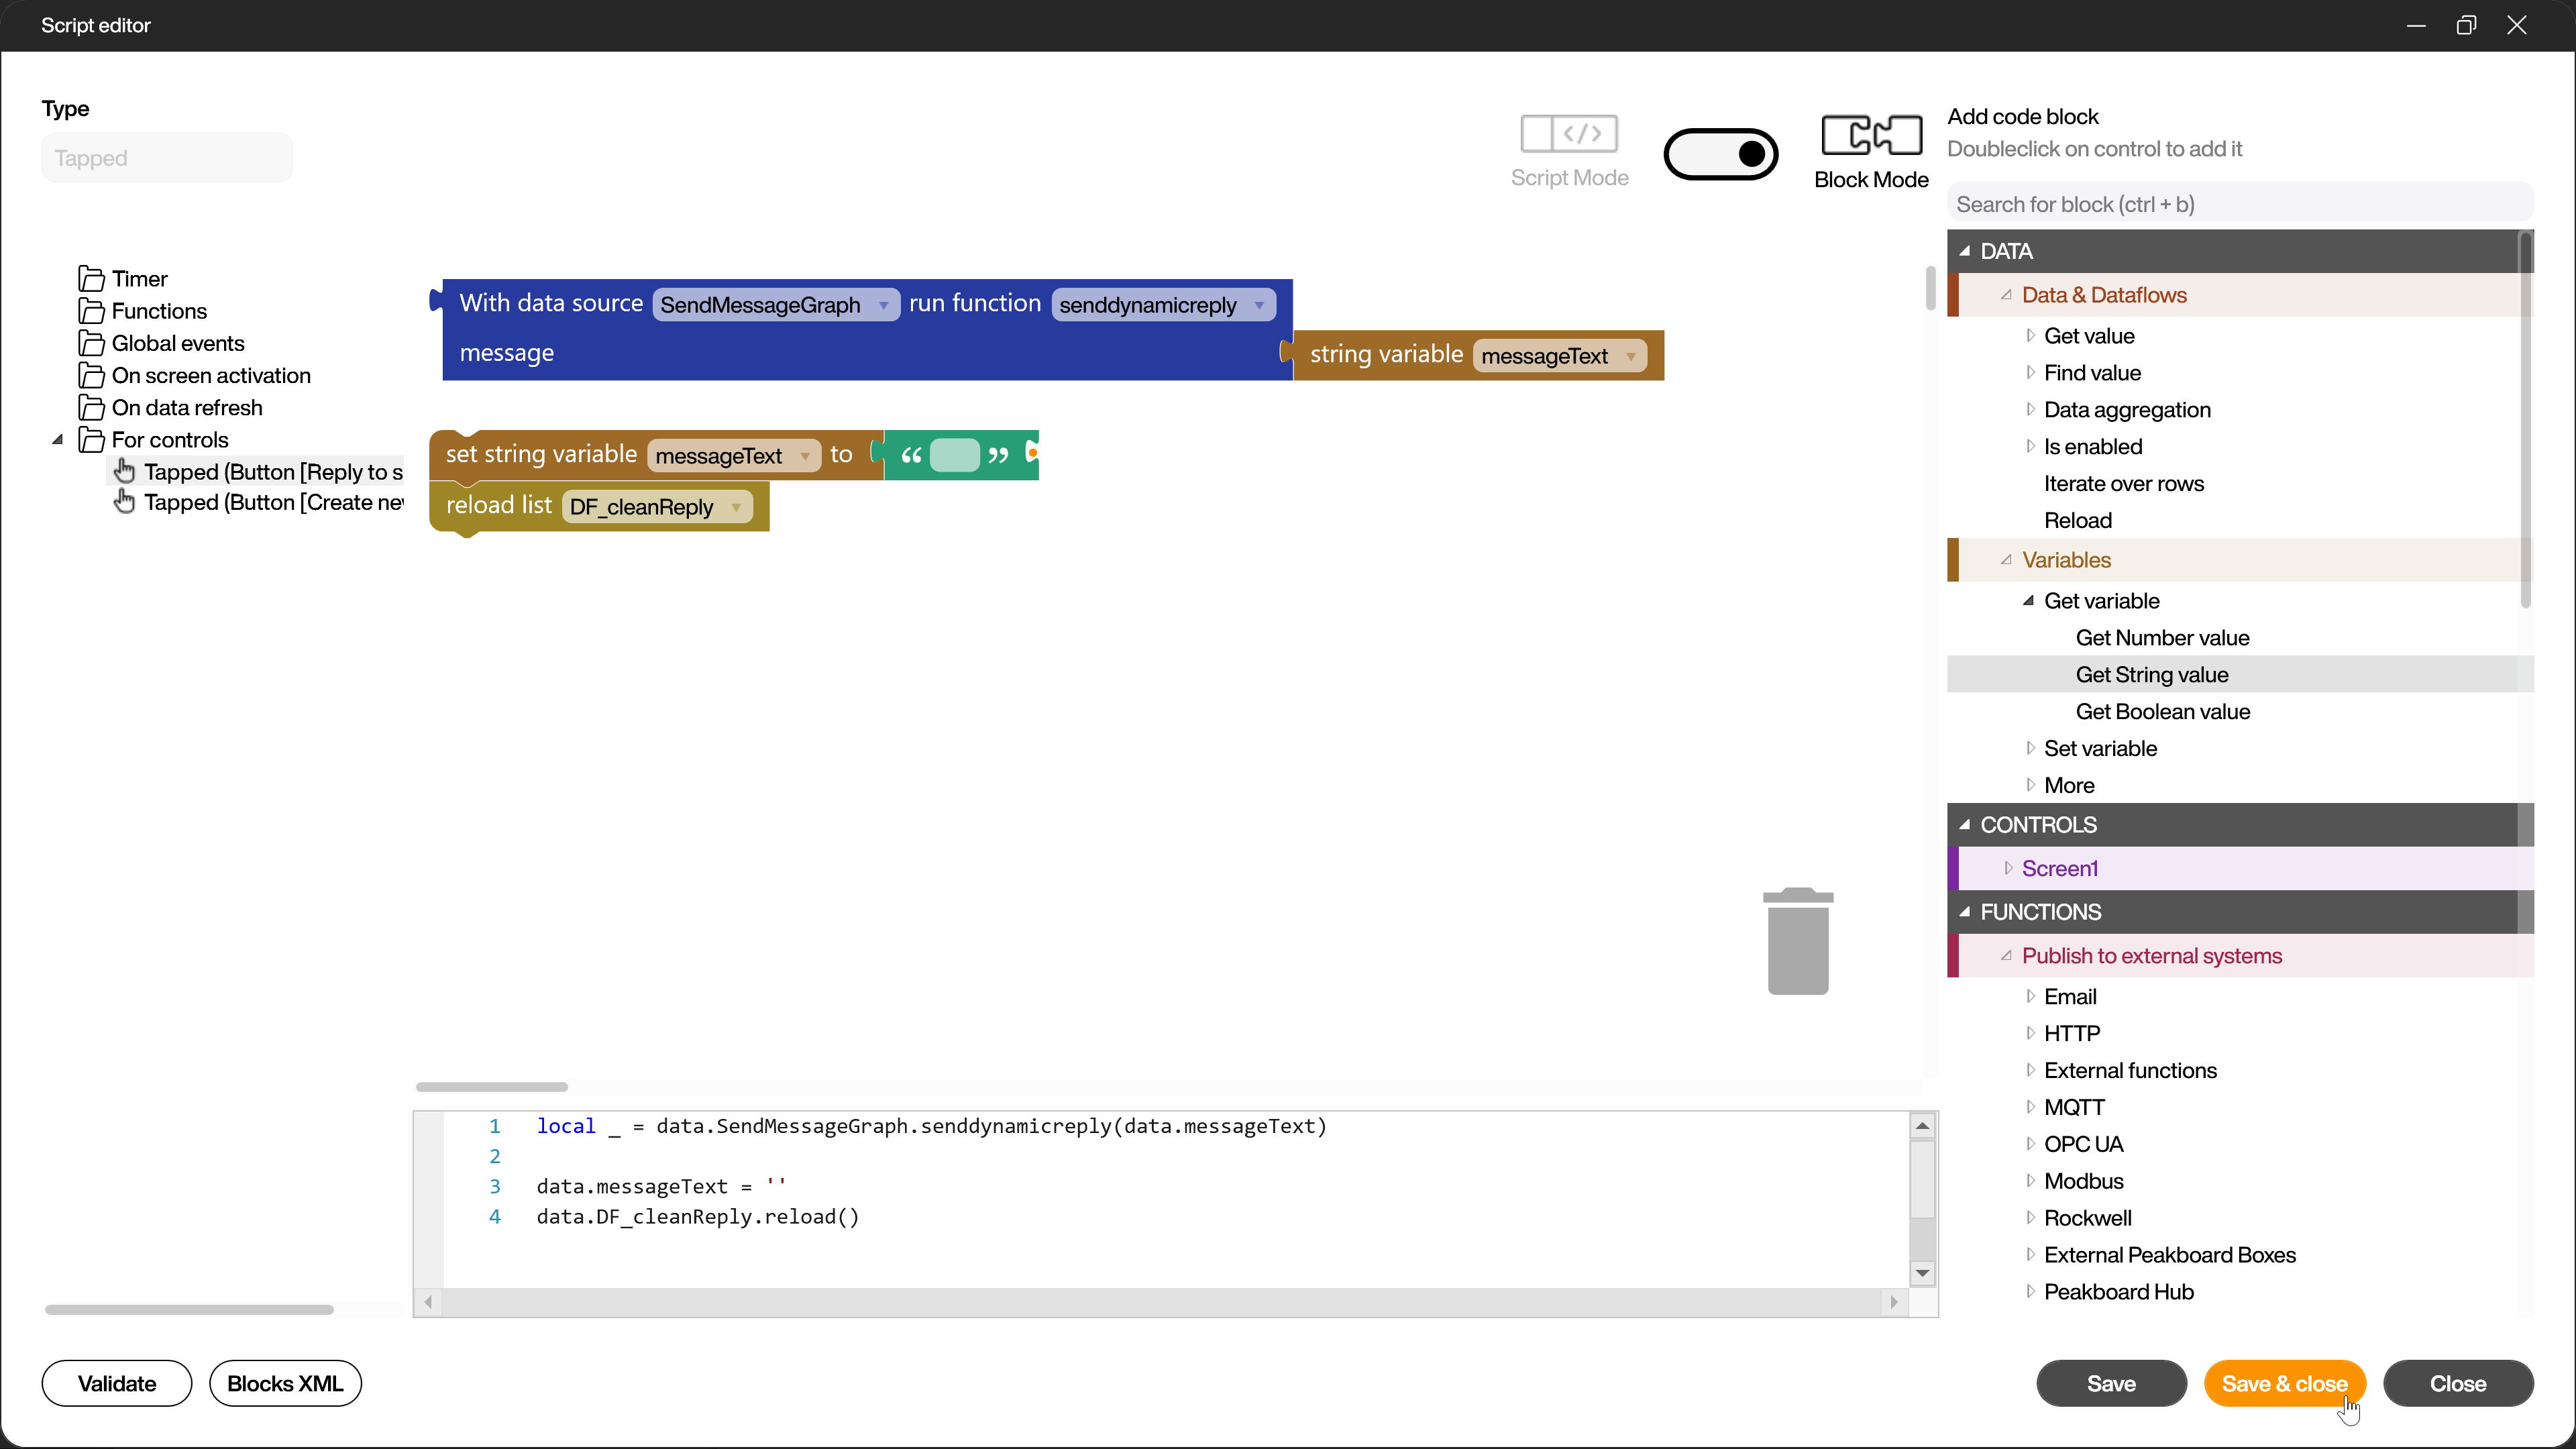
Create a button control (1) and enter a suitable button text (2).
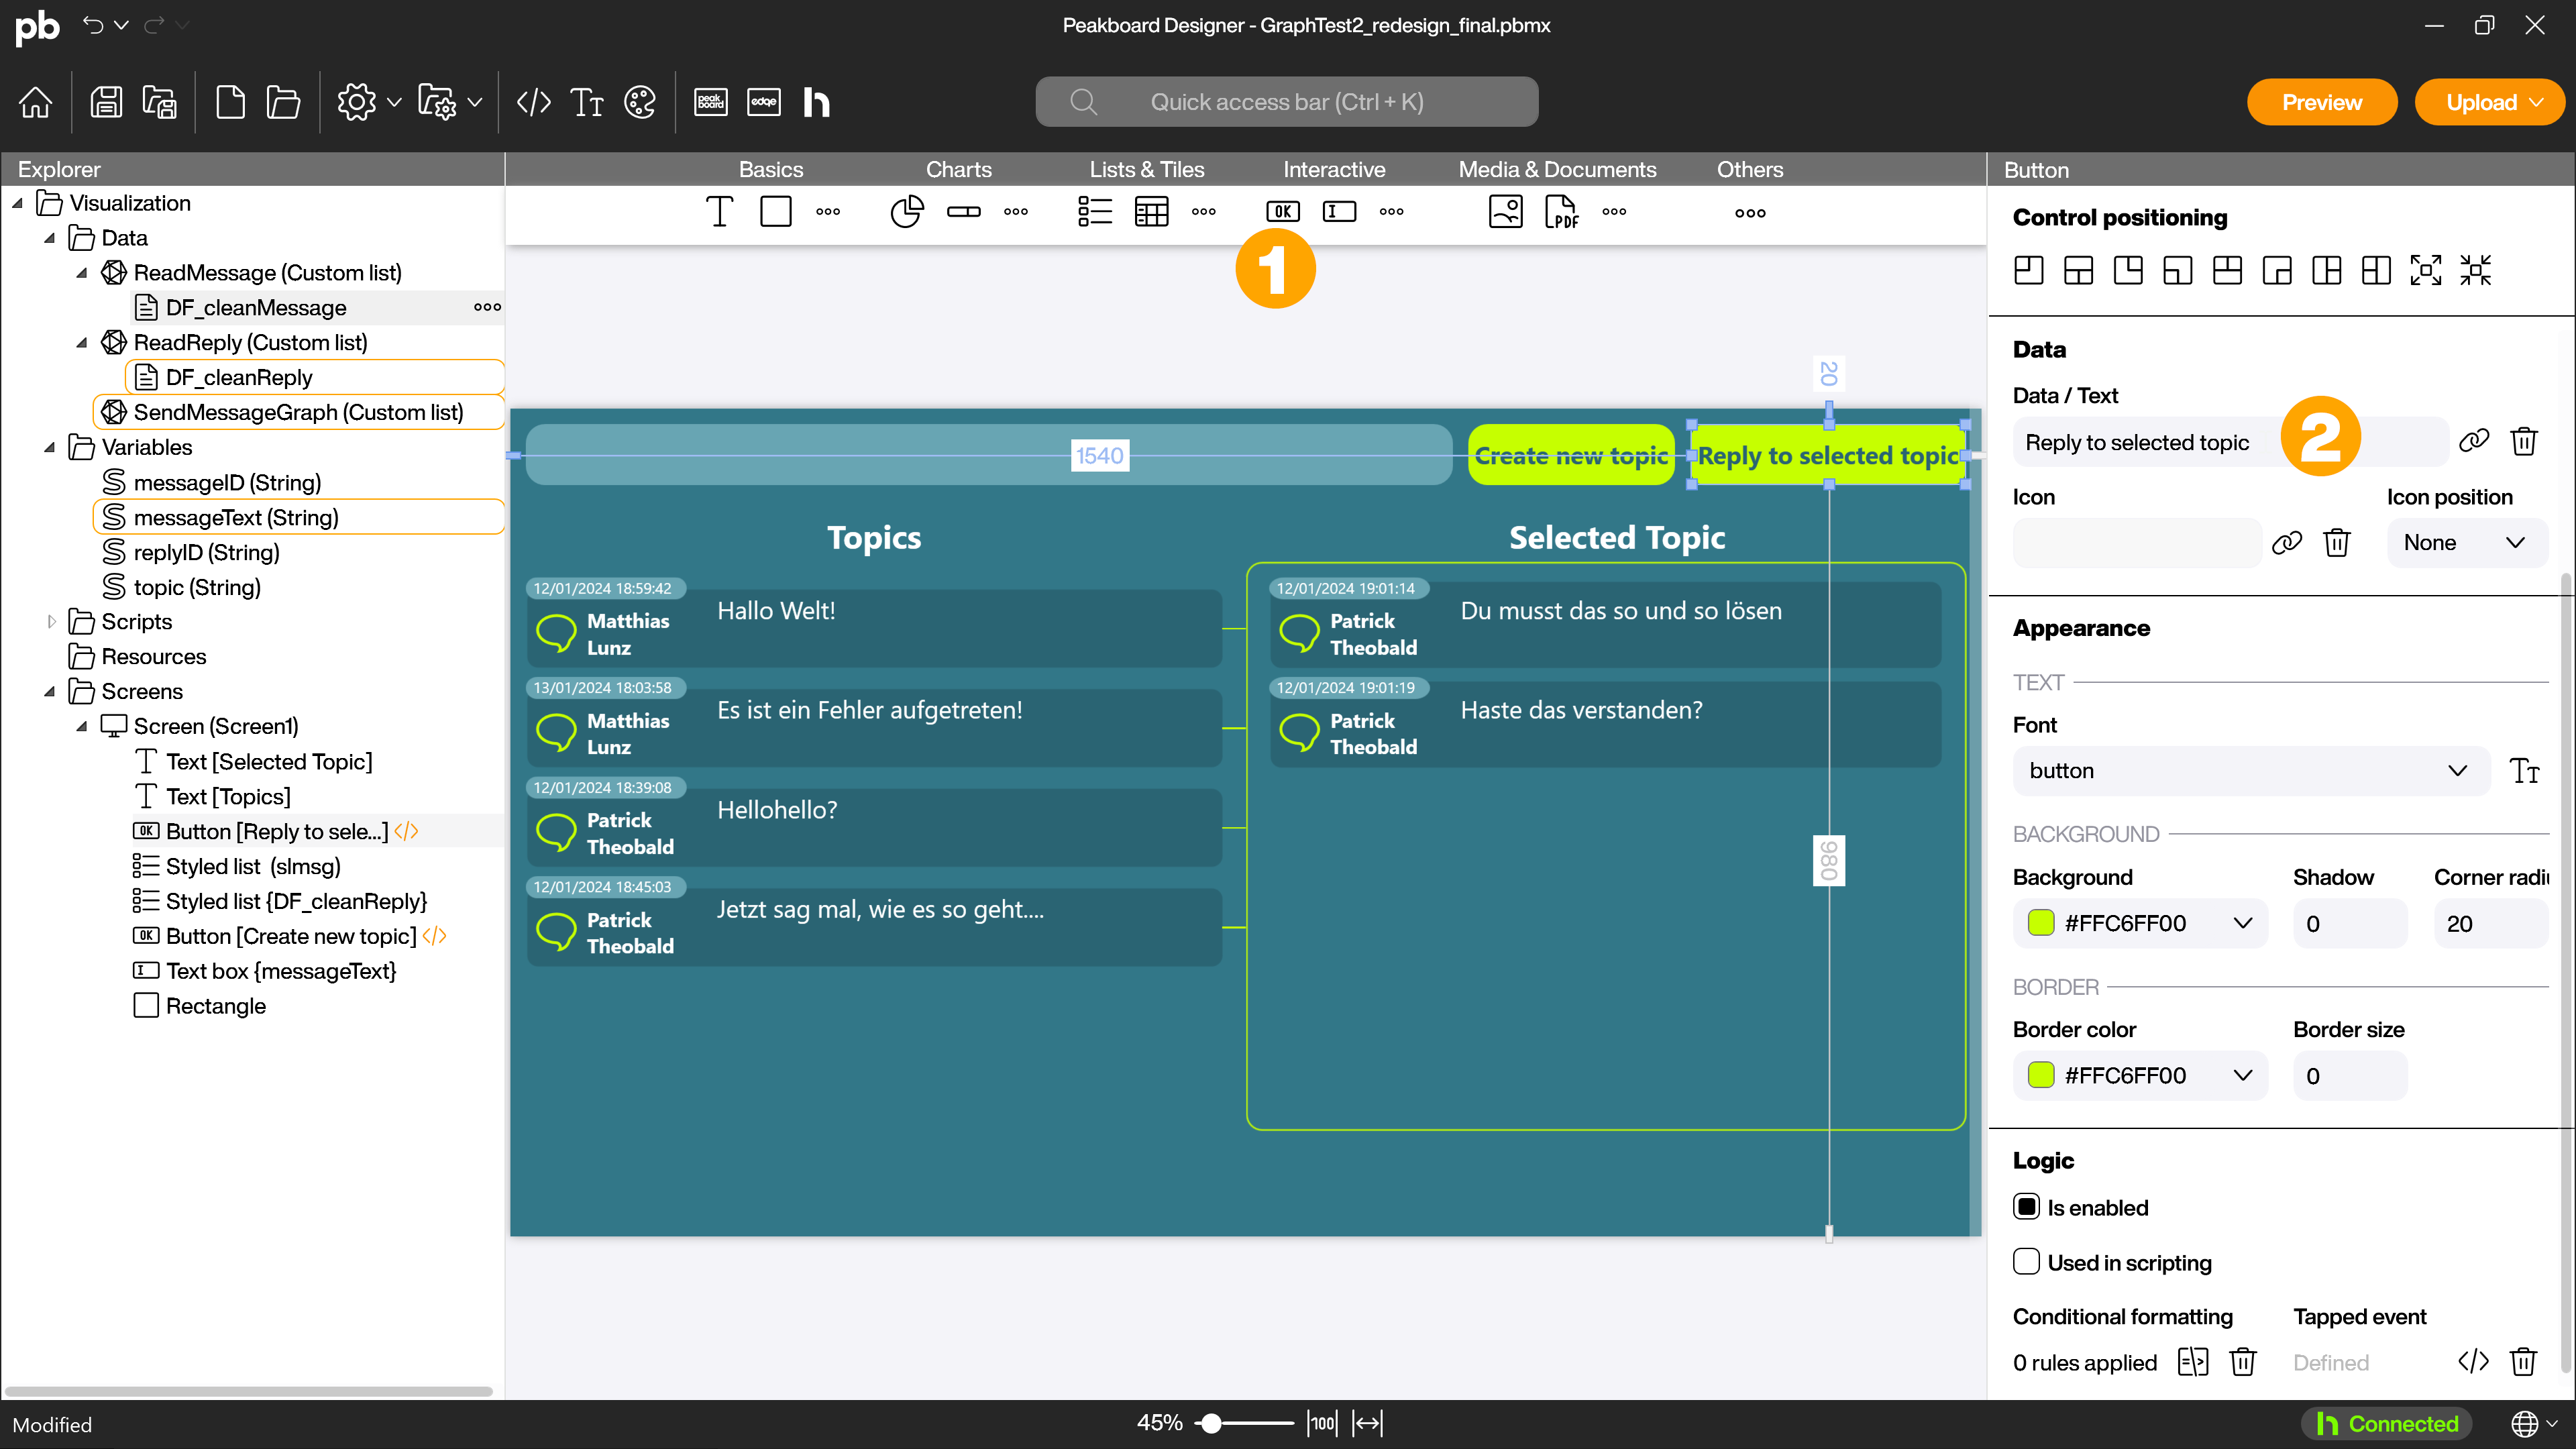
Open the script editor for the tapped event by double-clicking on the control. The script sends the message from the variable [messageText] with the function [senddynamicreply] from the data source [SendMessageGraph]. It then empties the variable and reloads the dataflow [DF_cleanReply].
Test and use the application
You can now test the application by clicking on [Preview]. If you now send a message, it should be displayed in the corresponding Teams channel including the associated replies.